Section 1: What You’ll Need
In order to set up Google Analytics and Google Tag Manager, you will need the following:
- Access to your Google account
- Access to the CMS of the website (WordPress, Strapi, Wix, etc.)
- The Google Tag Assistant Chrome Extension
Section 2: Google Tag Manager Account Setup
- Navigate to https://tagmanager.google.com
- Sign in to your Google account

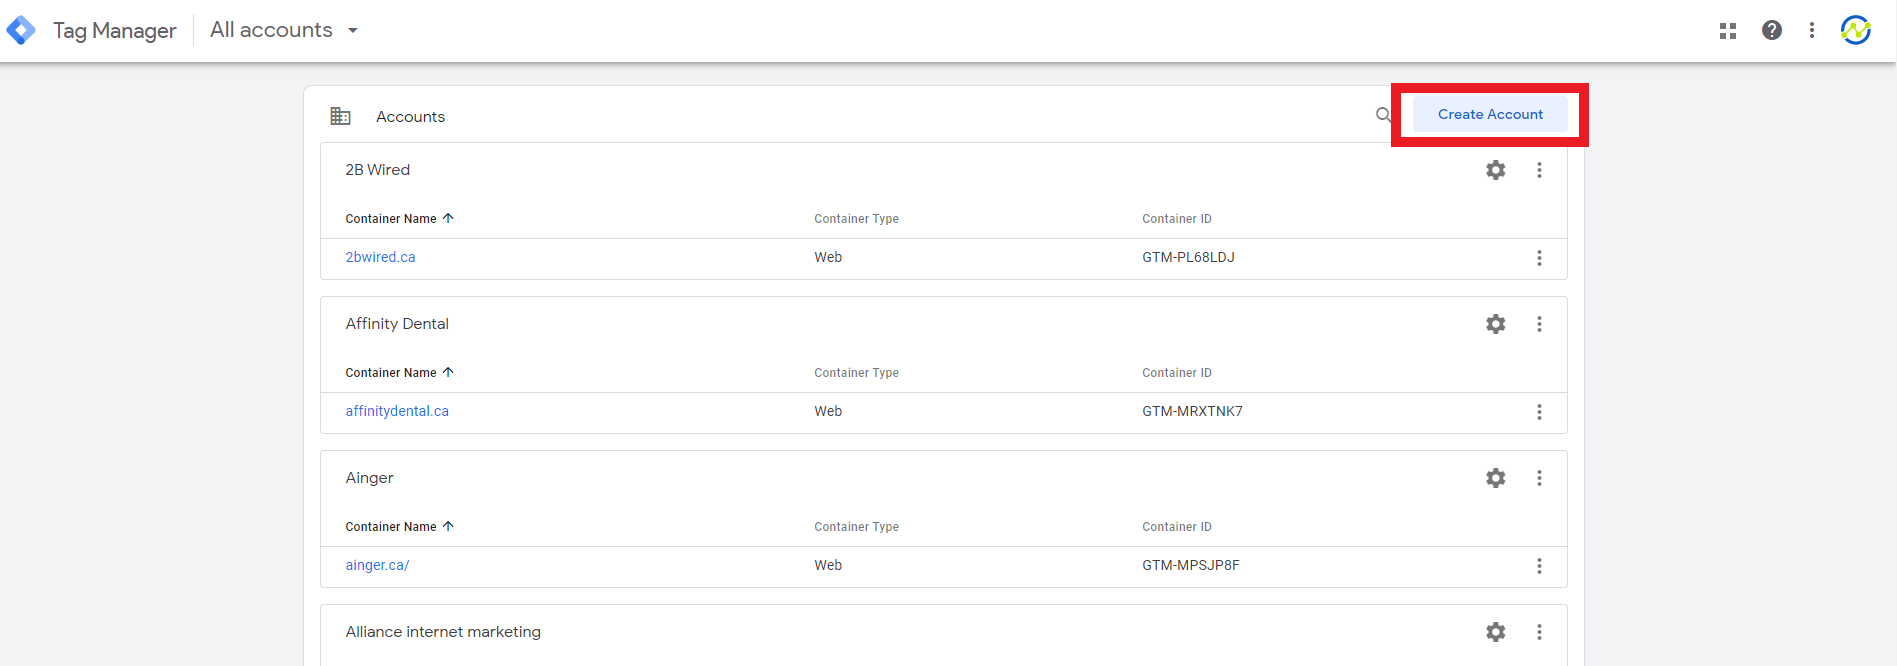
- Click the Create Account button in the top right corner of the Accounts section.
- On the “Add a New Account” screen, enter the client’s business name in the Account Name field. Set the country to Canada. Under Container Setup, enter the client’s website URL. Do not include Error! Hyperlink reference not valid. or any special symbols. Use the format: clientwebsite.ca. Click on “Web” under Target Platform, then click the Create button.

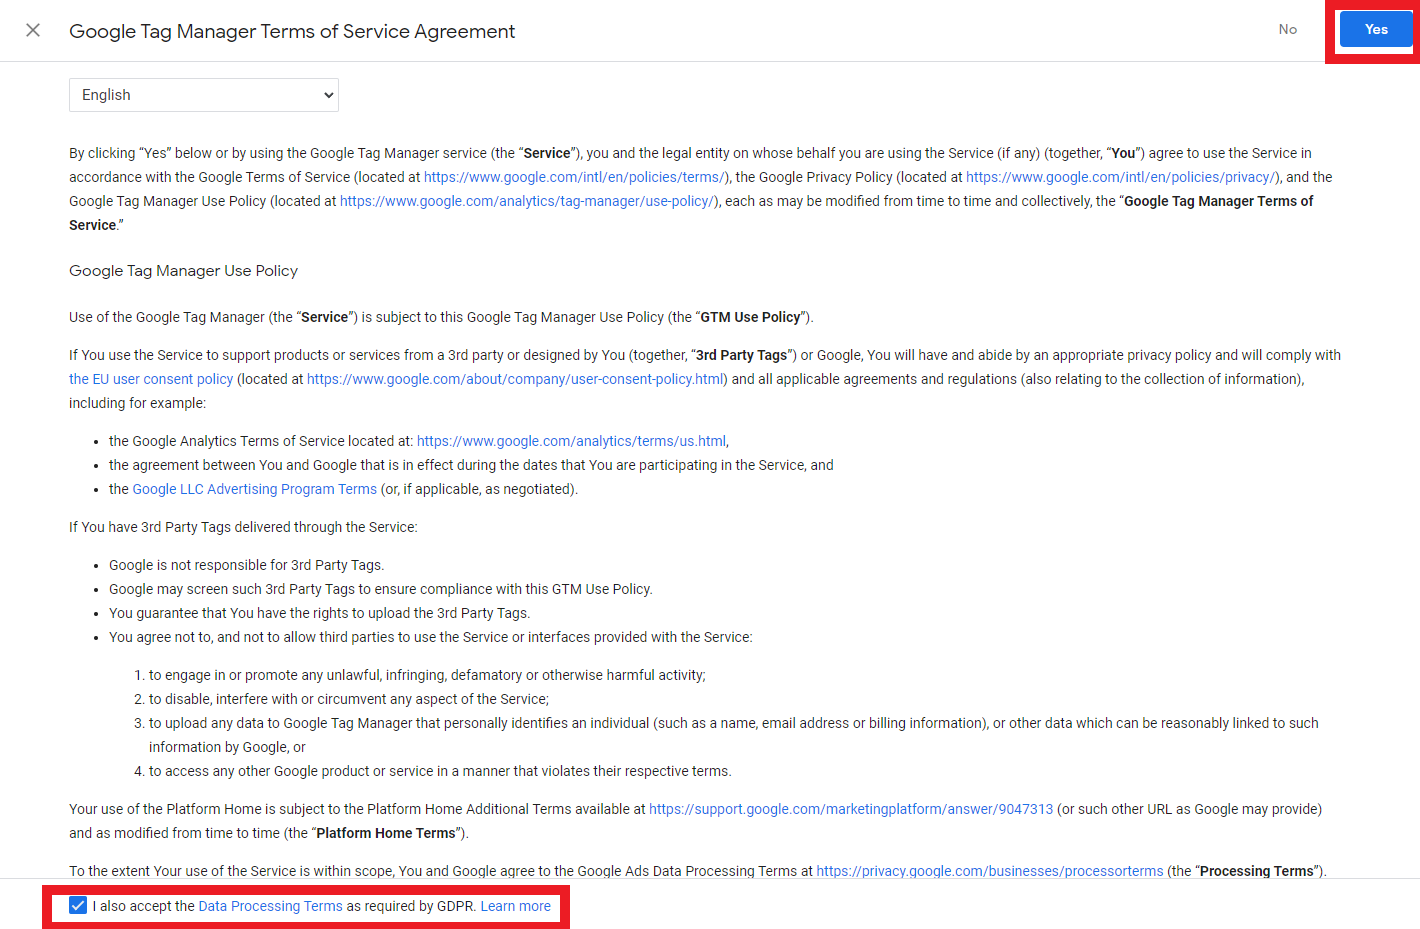
- In the Google Tag Manager Terms of Service Agreement, check the box at the bottom of the page to agree to the Data Processing Terms for the GDPR, then click the Yes button in the top right corner. Leave this window open as you proceed to install the container.
Section 3: Google Tag Manager Container Installation
NOTE: Before starting this step, check which CMS the client’s website uses. This process document outlines how to install the Tag Manager container on WordPress Sites. If the client’s website is on any other CMS (Shopify, Wix, Strapi, etc.), copy both container tags, label the first one “<head>” and the second one “<body>” and send them to Colby.
- Sign in to the client’s WordPress account.
- In the WordPress Dashboard, hover over Appearance in the left side menu, then click Theme File Editor. This could also be called Theme Editor

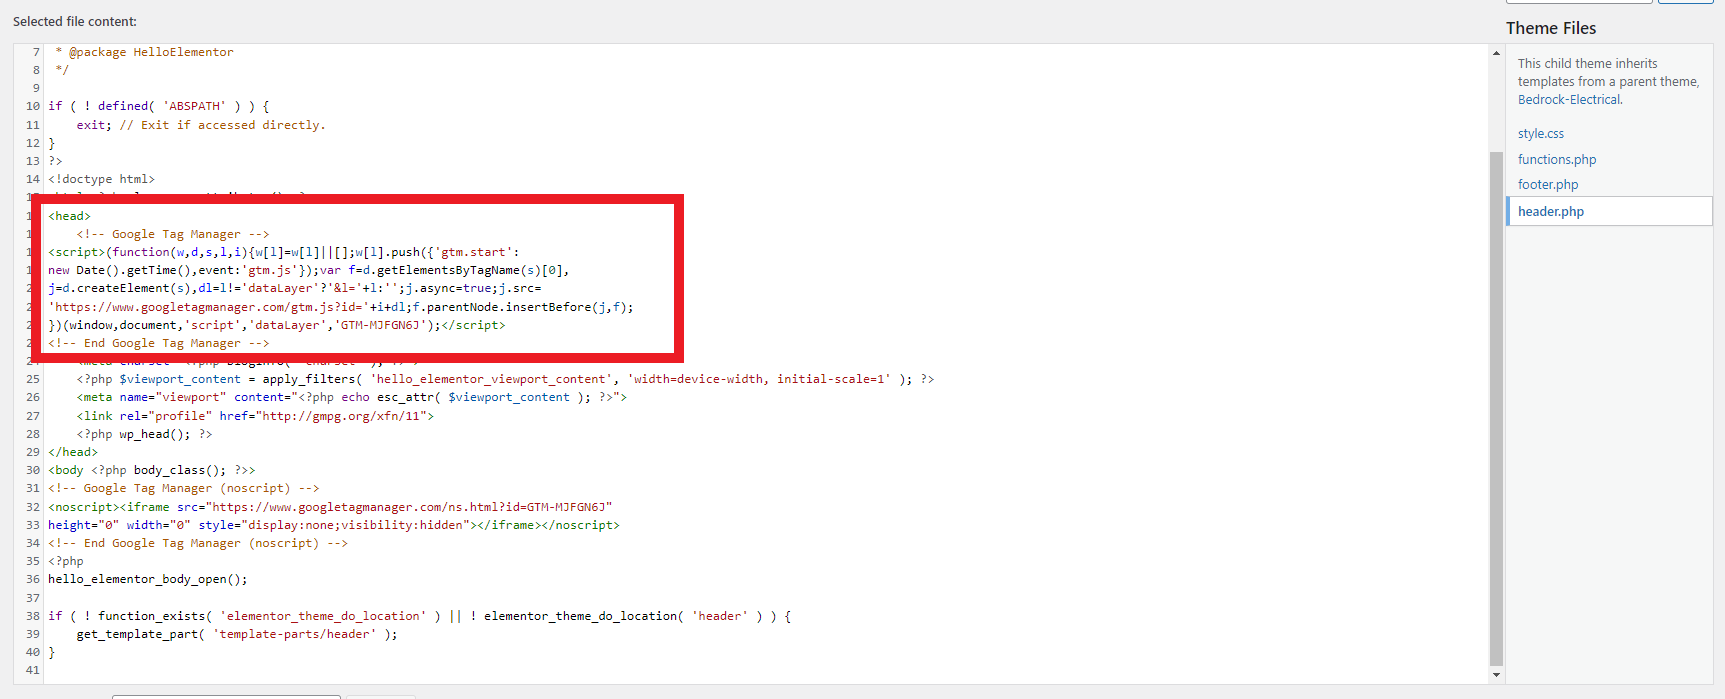
- In the Theme Files column on the right side of the next screen, click on the file named “header.php”.

- Switch to the Google Tag Manager Tab in your browser and copy the first container snippet.
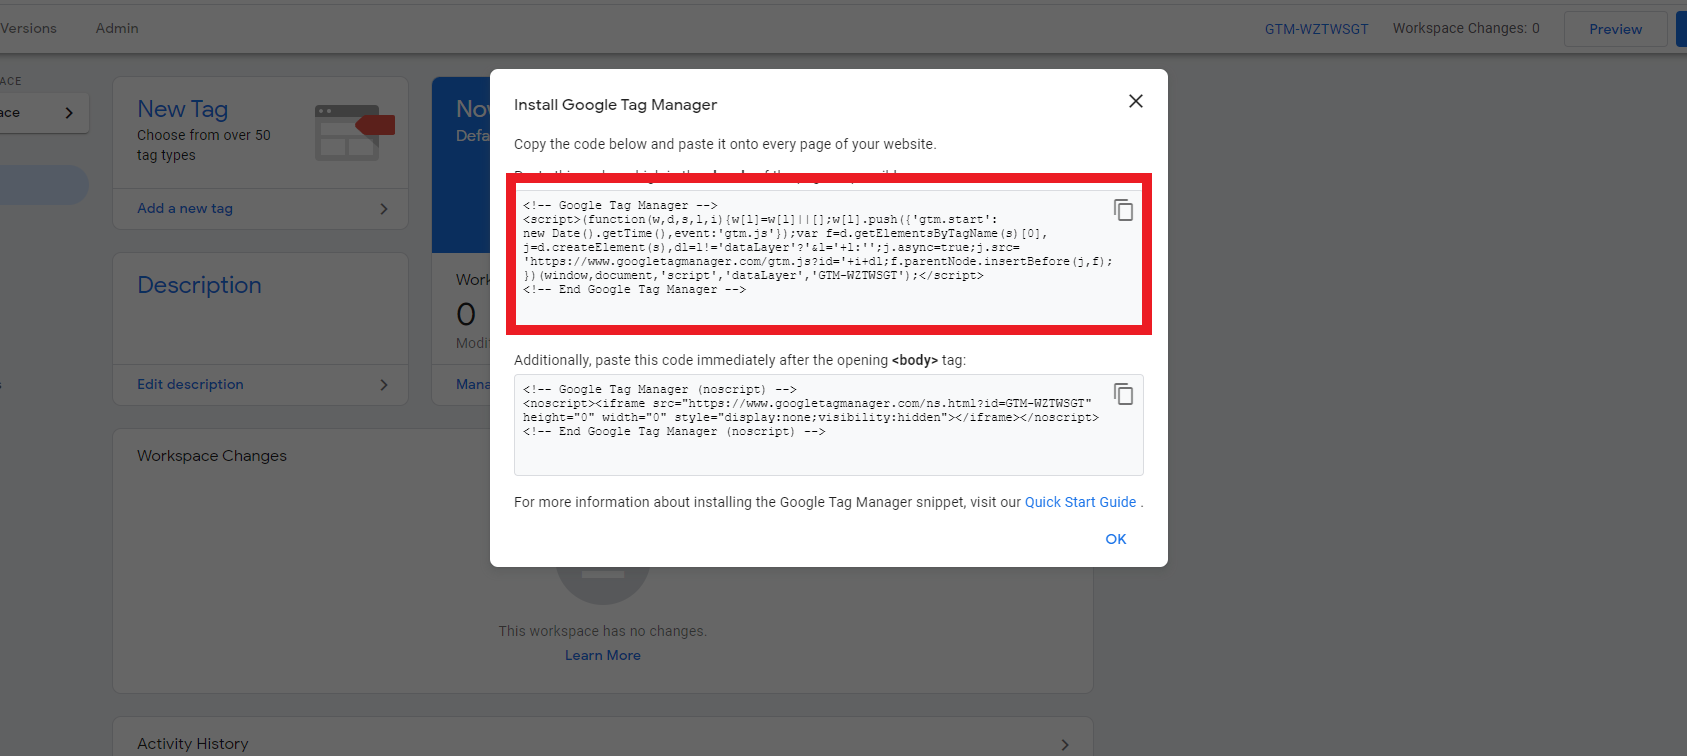
- Go back the the tab where you have opened the header.php file in WordPress, then paste the first container snippet immediately after the first <head> tag that you see. NOTE: Make sure you do not highlight anything in the header.php file before pasting. Doing so and saving the file can break the site.
- Go back to the Google Tag Manager tab in your browser, and copy the second container snippet.
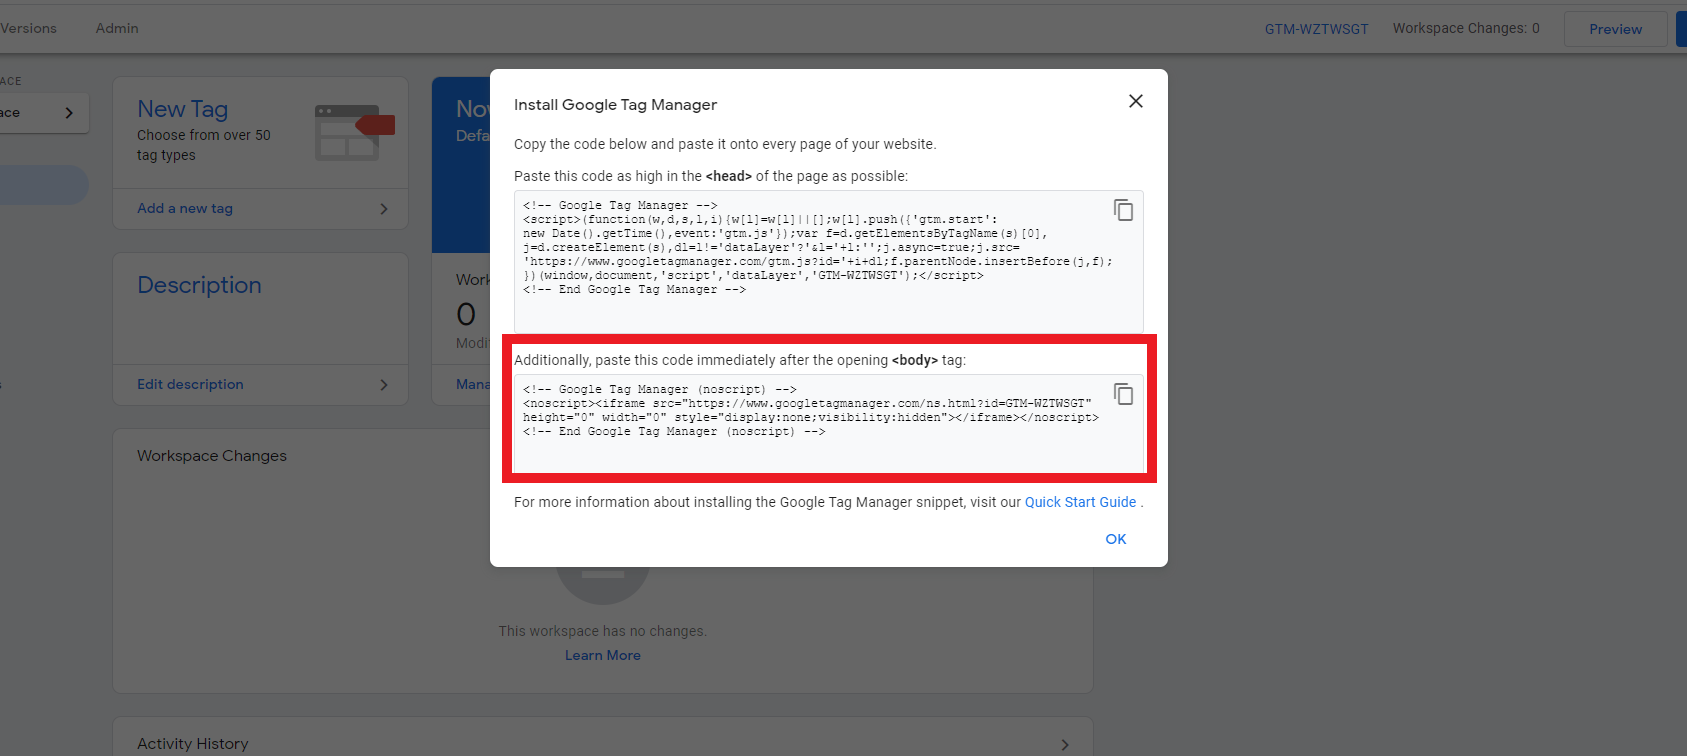
- Go back to the tab where you have opened the header.php file in WordPress, then paste second container snippet immediately after the first <body> tag that you see.NOTE: Make sure you don’t highlight anything in the header.php file before pasting. Doing so and saving the file can break the site

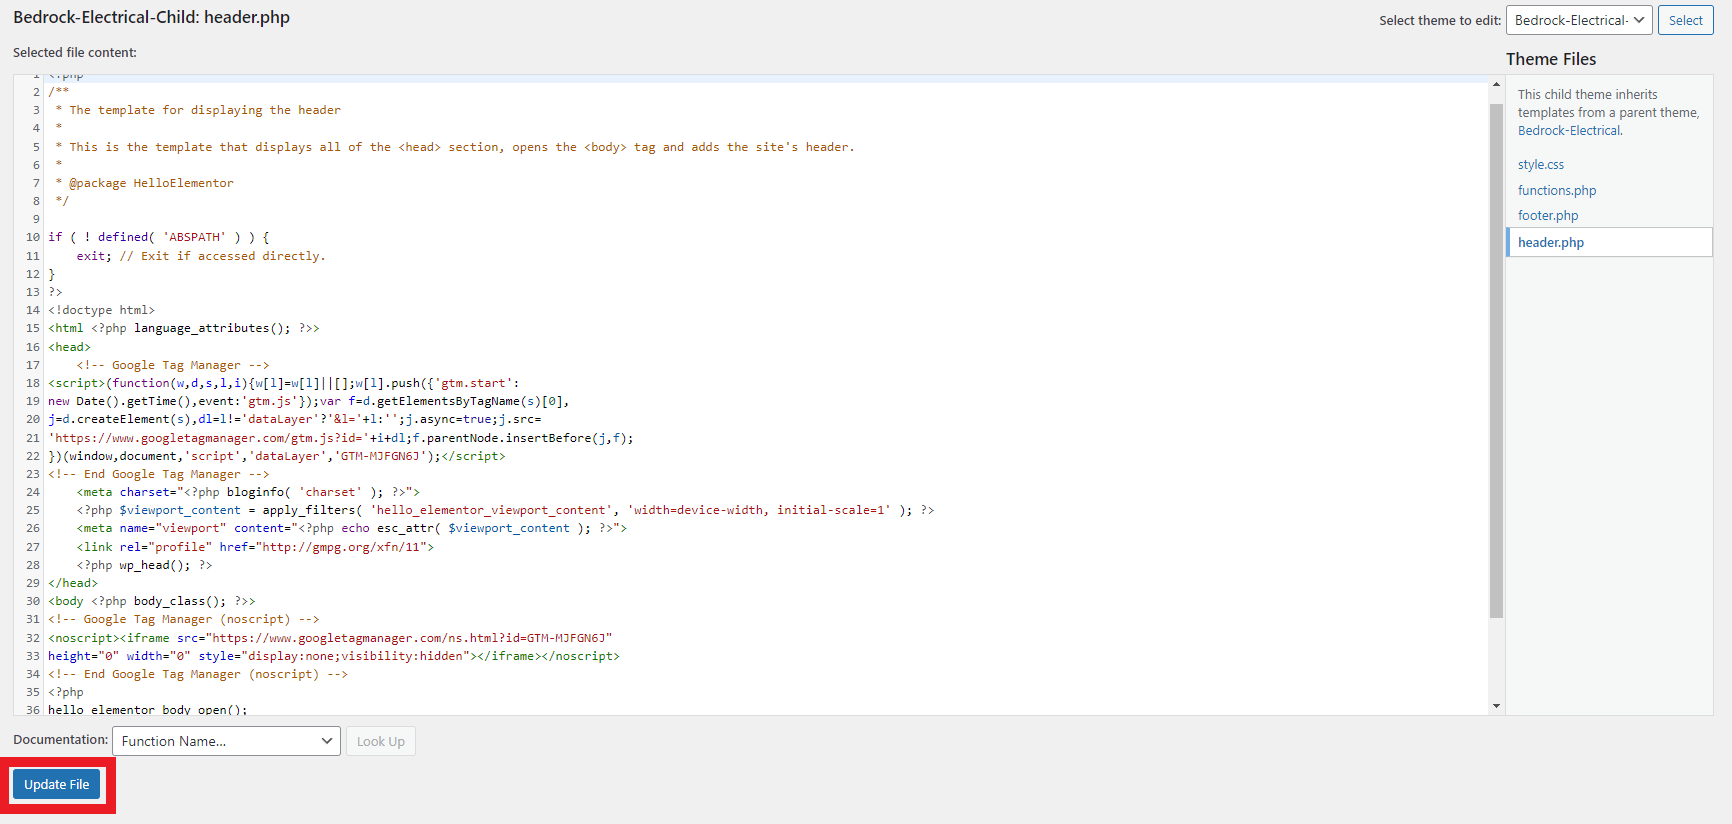
- Once both container snippets have been pasted in the header.php file, click the Update File button.
Section 4: Google Analytics Account Setup
This section is broken down into two subsections based on the type of Google Analytics account you’re creating. For Universal Analytics, follow section 4.1. For Google Analytics 4, follow section 4.2.
Section 4.1: Google Analytics Account Setup: Universal Analytics
- Navigate to https://analytics.google.com
- Sign in to your Google account
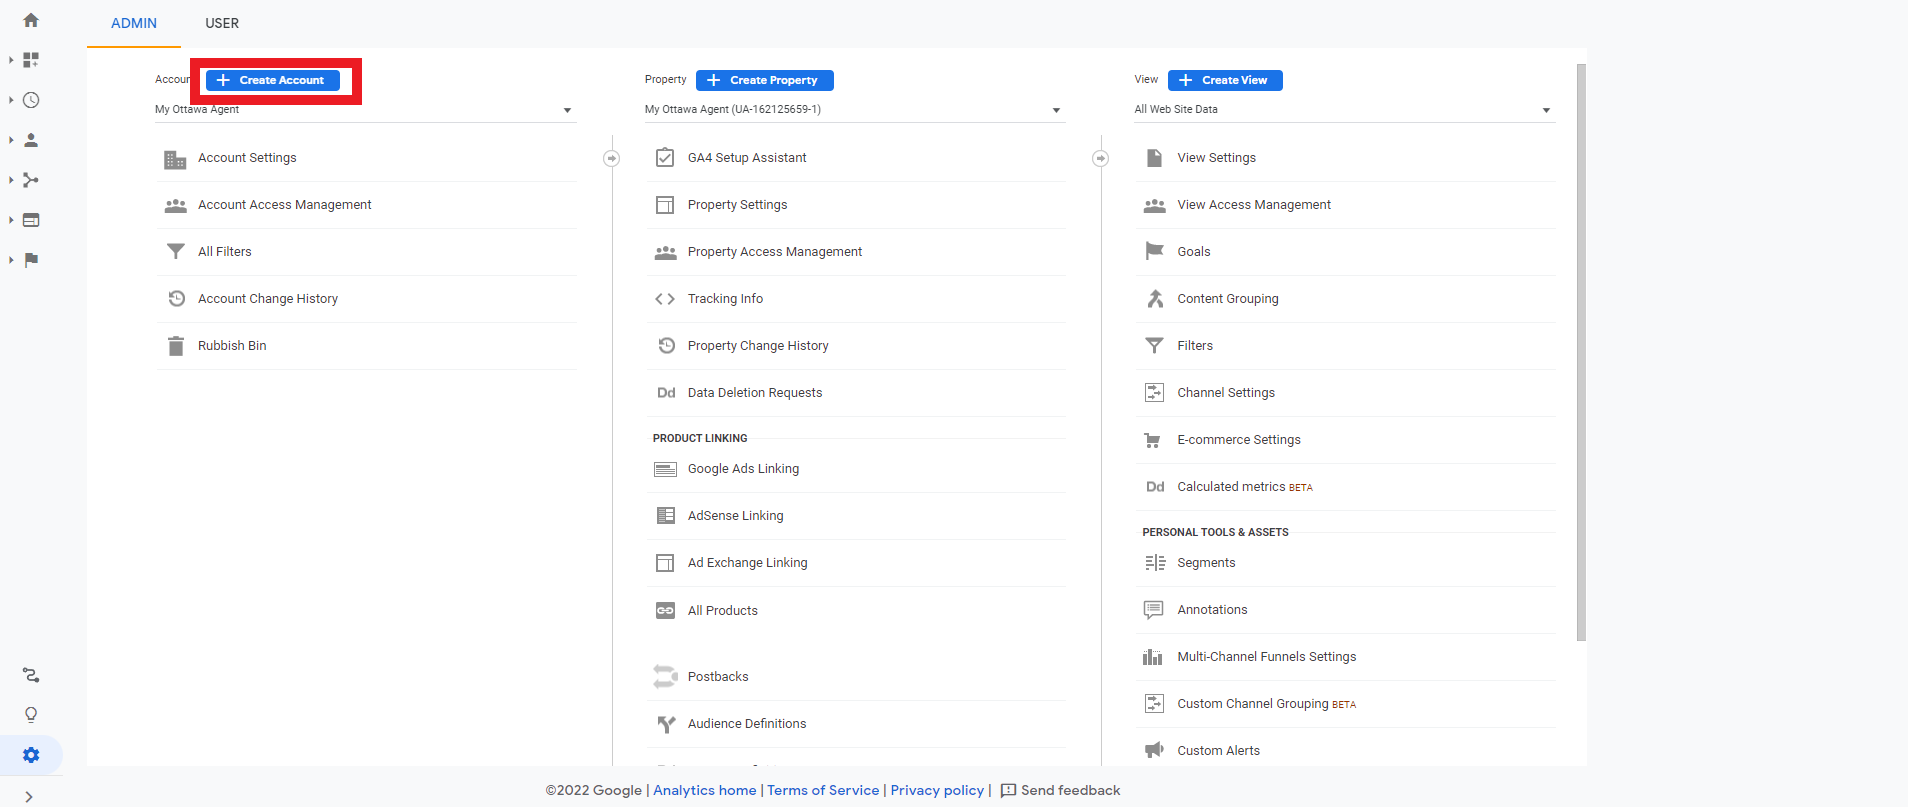
- Click on the admin button in the bottom left corner of the Google Analytics dashboard.

- Click on the “Create Account” button at the top of the first column.
- Enter the client’s business name into the Account Name field. Make sure the checkbox under Organisation Link is checked.

- Below the Account Data Sharing Settings, click the Next button.

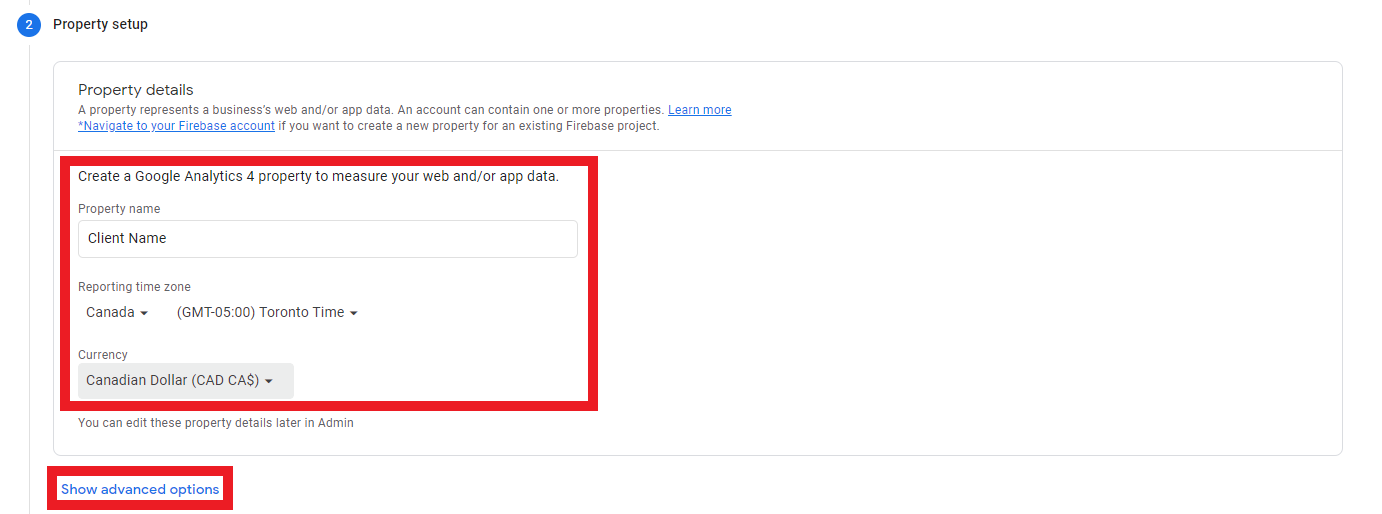
- In the Property Setup section, enter the client’s business name in the Property Name field, then set the reporting time zone to the closest city to where the client’s business is located. Then set the currency to the Canadian Dollar (CAD). then click on “Show advanced options.”
- In the Create a Universal Analytics Property section, click on the toggle button on the right side of the screen to show the settings. Then, enter the URL for the home page of the client’s website. Next, click on the radio button beside “Create a Universal Analytics property only.” Finally, click on the Next button.

- At the bottom of the About Your Business section, click on the Create button.

- In the Google Analytics Terms of Service Agreement popup, Set the country to Canada, check the checkbox for the Data Processing Terms, then click the “I Accept” button.

Section 4.2: Google Analytics Account Setup: Google Analytics 4
- Navigate to https://analytics.google.com
- Sign in to your Google account
- Click on the admin button in the bottom left corner of the Google Analytics dashboard.
- Click on the “Create Account” button at the top of the first column.

- Enter the client’s business name into the Account Name field. Make sure the checkbox under Organisation Link is checked.

- Below the Account Data Sharing Settings, click the Next button.
- In the Property Setup section, enter the client’s business name in the Property Name field. Then set the reporting time zone to the closest city to where the business is located. Then set the currency to the Canadian Dollar (CAD). Then click the Next button.
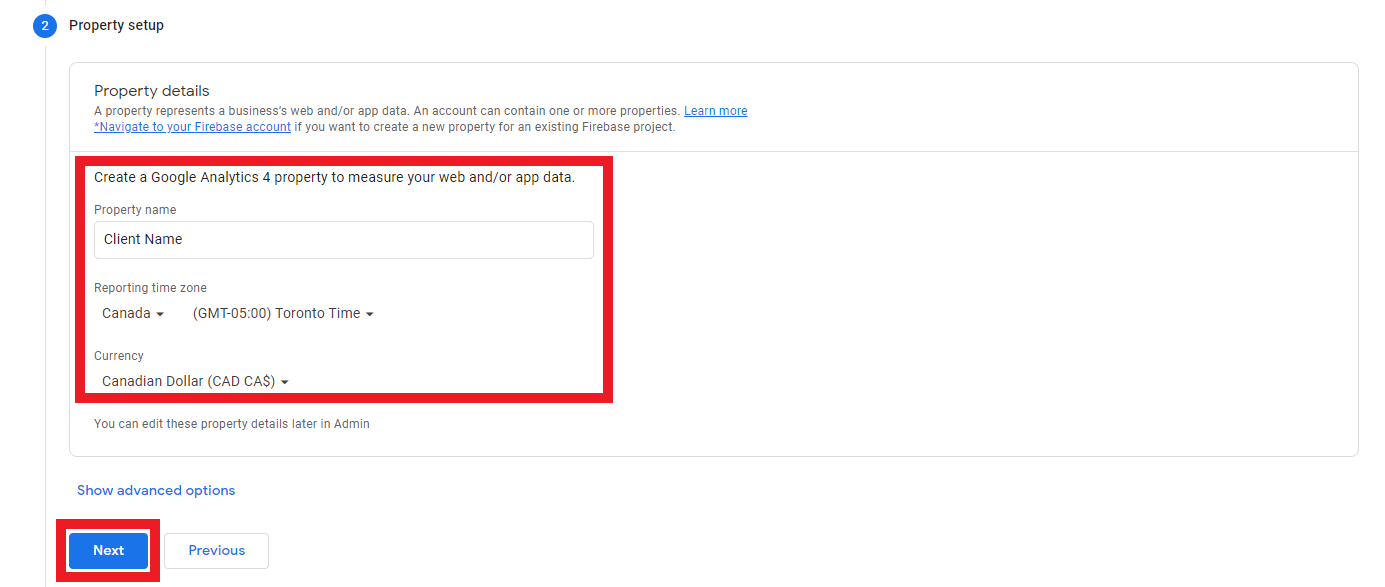
- At the bottom of the About Your Business section, click on the Create button.
- In the Google Analytics Terms of Service Agreement popup, Set the country to Canada, check the checkbox for the Data Processing Terms, then click the “I Accept” button.
Section 5: Setting Up Conversion Actions in Google Analytics
This section is broken down into two subsections based on the type of Google Analytics account you have created. For Universal Analytics, follow section 5.1. For Google Analytics 4, follow section 5.2.
Section 5.1: Universal Analytics
- Identify your conversion points on the client’s website. Look for contact forms, email links, phone number links and newsletter signup forms.
- In the Universal Analytics account dashboard, click on the Admin tab in the lower right corner of the screen.
- In the View column (far right), click on Goals.

- Click on the red button labelled “+ New Goal”

- In the Name field, enter the name of the conversion action (Phone, Email, Contact Form, Newsletter Signup, etc.). Then select Event as the conversion type, then click the Continue button
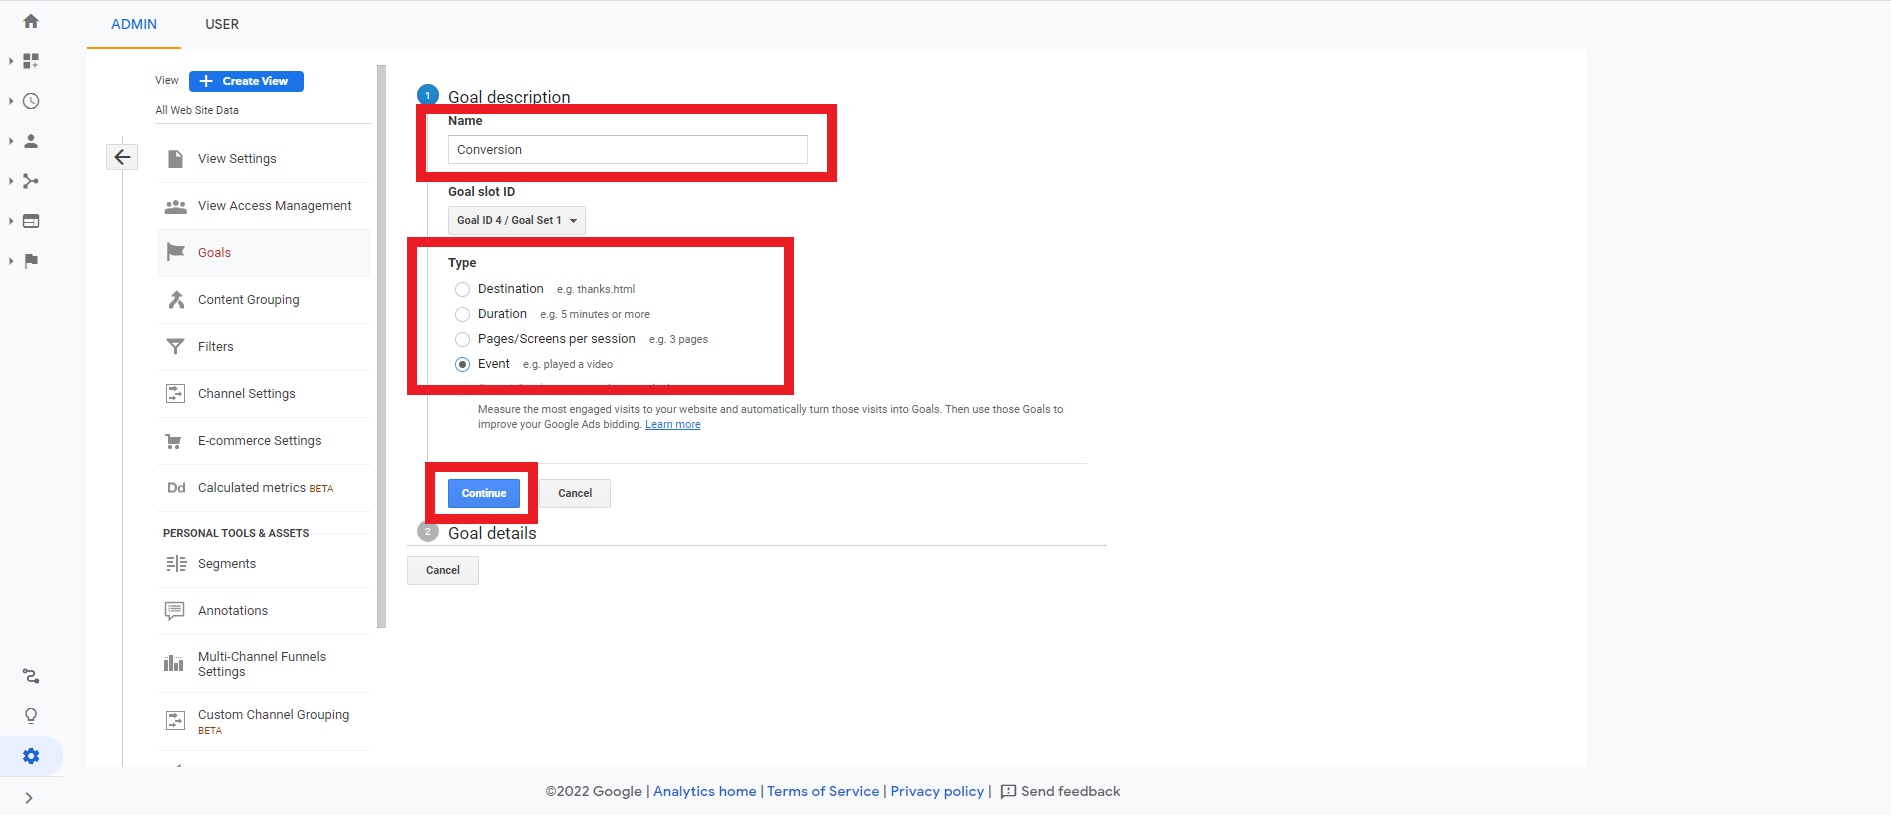
- In the Goal Details section, enter the type of conversion into the Category field, and the action into the Action field. Then, click the Save button
- Phone Conversions: Category = Phone, Action = Click
- Email Conversions: Category = Email, Action = Click
- Contact Form Conversions: Category = Contact Form, Action = Submission
- Newsletter Signup Conversions: Category = Newsletter, Action = Submission

- Repeat Steps 4 through 6 until there is a goal set up for every conversion action you want to track.
Section 5.2: Google Analytics 4
- Identify your conversion points on the client’s website. Look for contact forms, email links, phone number links and newsletter signup forms.
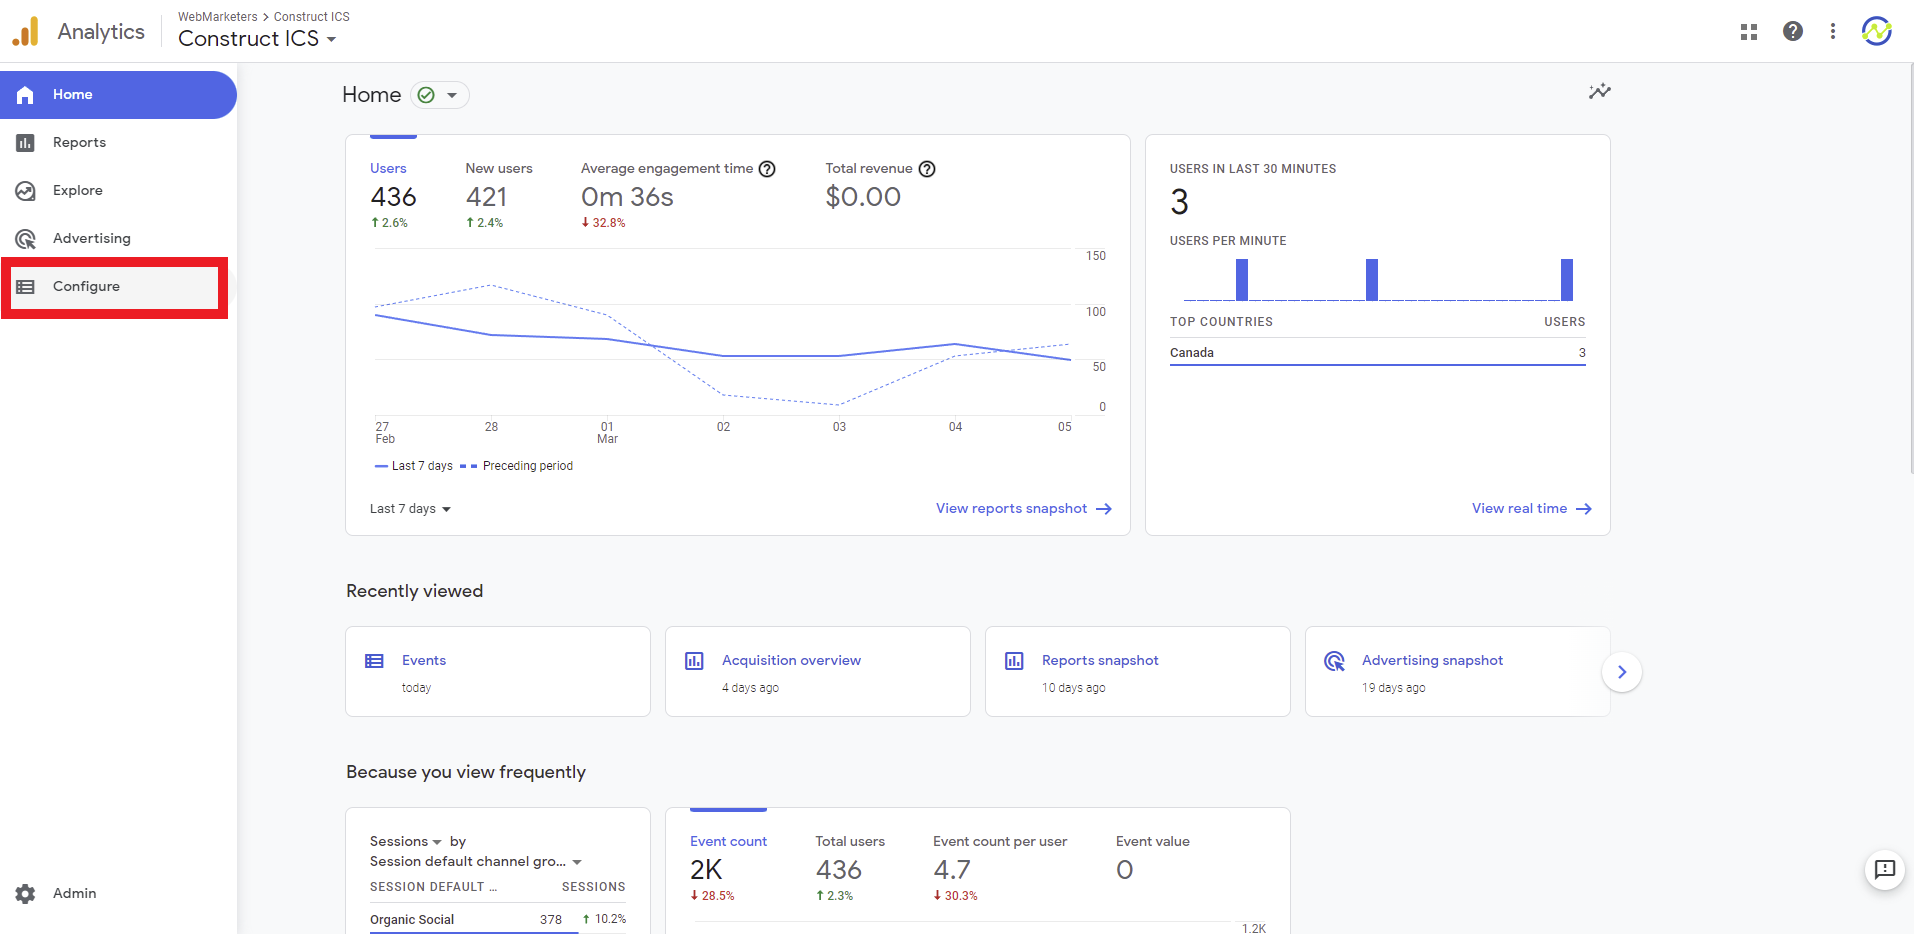
- In the Google Analytics 4 account dashboard, click on the Configure tab in the left-hand menu.

- On the Configure screen, click on Conversions in the top left menu.
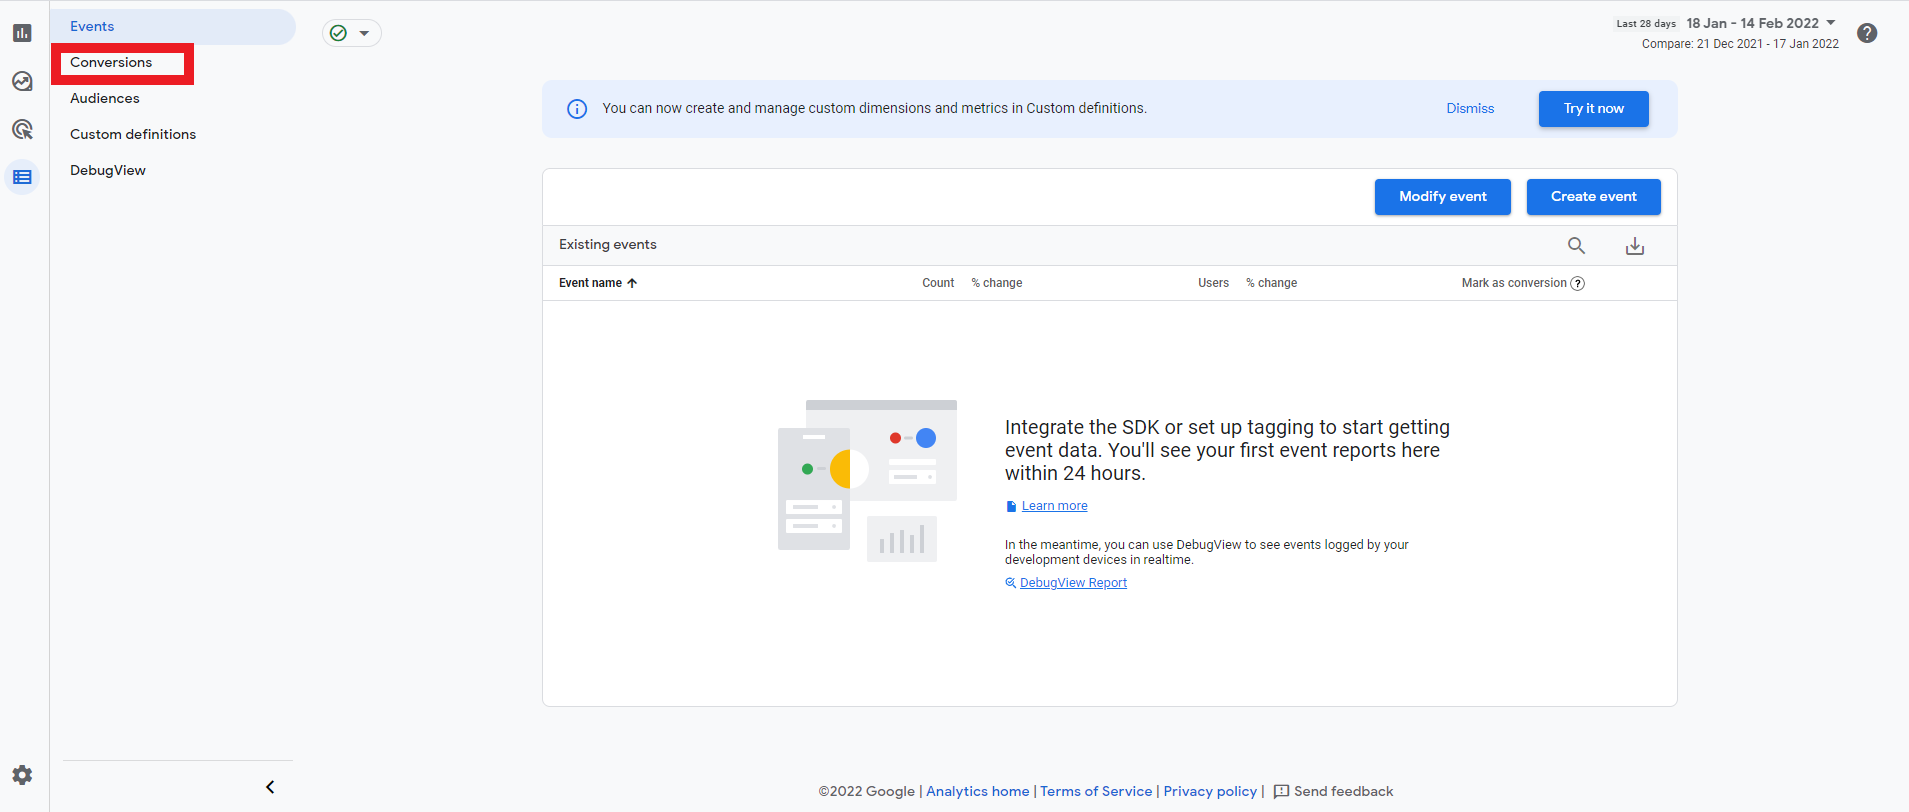
- On the Conversions screen, click the New Conversion Event button.
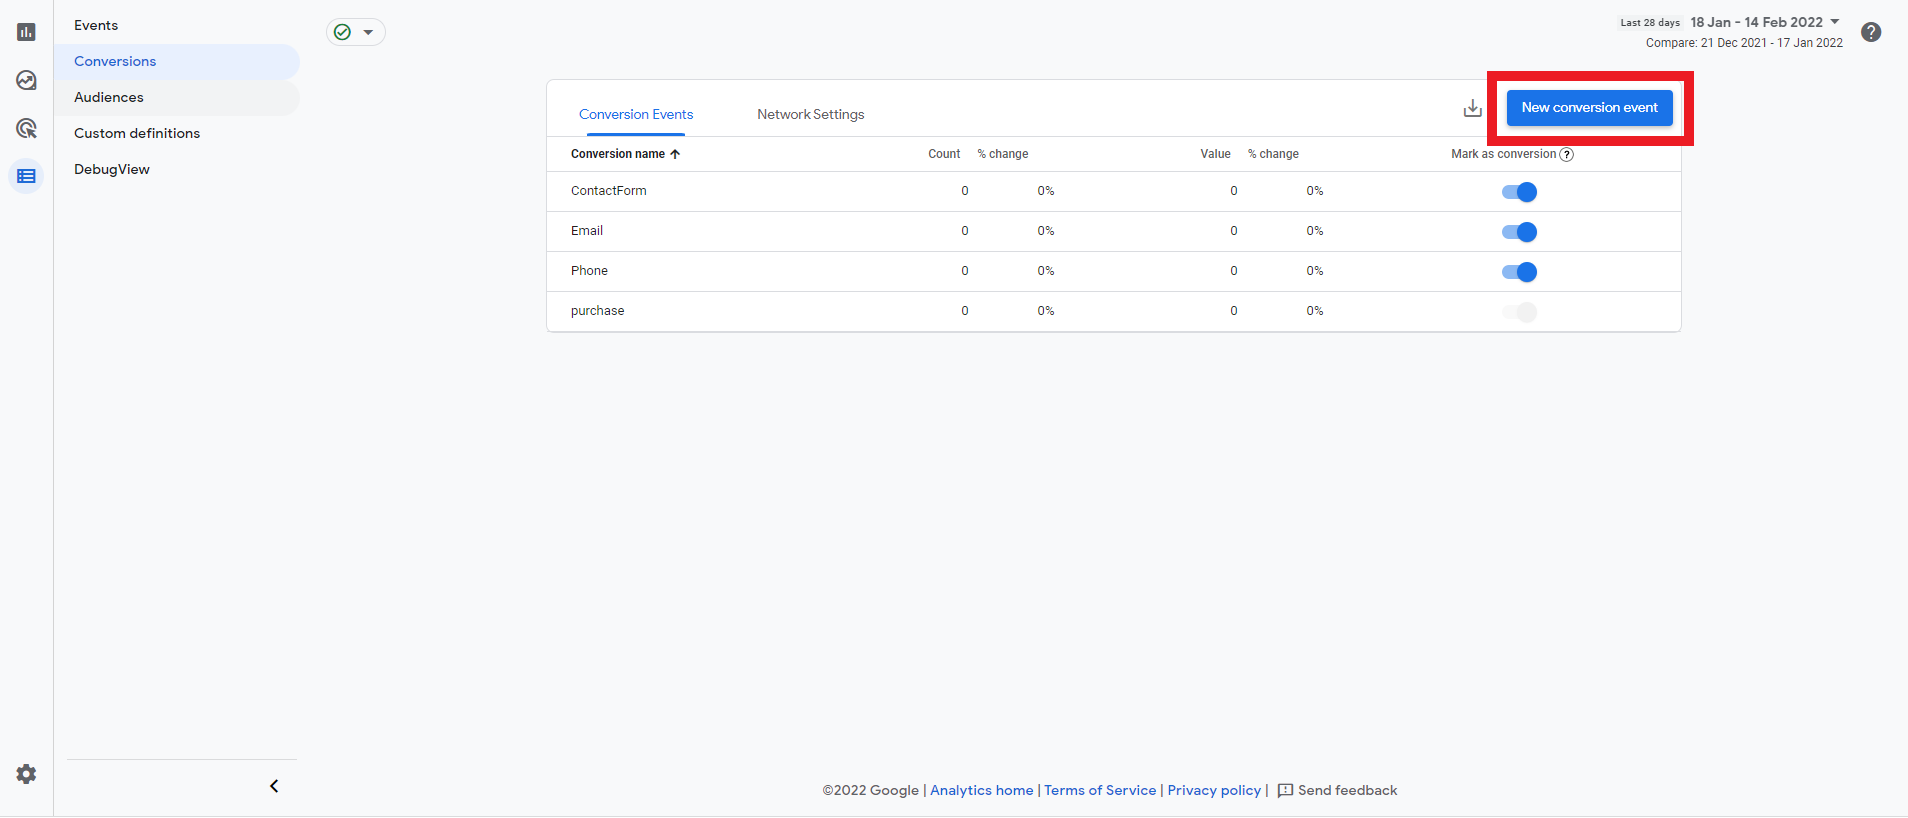
- In the popup that appears on screen, enter the conversion name in the New Event Name field. Do not put spaces in between multiple words as GA4 does not support this. Then, click the Save button.

- Repeat steps 4 and 5 until you’ve created all of the conversion actions you want to track.
Section 6: Set Up Conversion Tags in Google Tag Manager with Universal Analytics
This section covers how to set up conversion tracking tags in Google Tag Manager when you are using a Universal Analytics property. It is broken down into three subsections based on the type of conversion actions you are creating tags for. For instructions on setting up conversion tracking tags using a Google Analytics 4 property, see Section 8.
Section 6.1: Google Analytics Traffic Tracking Tag
This tag will track website traffic which is important to monitor for SEO. It is also required to be able to track conversions through the other tags that will be created.
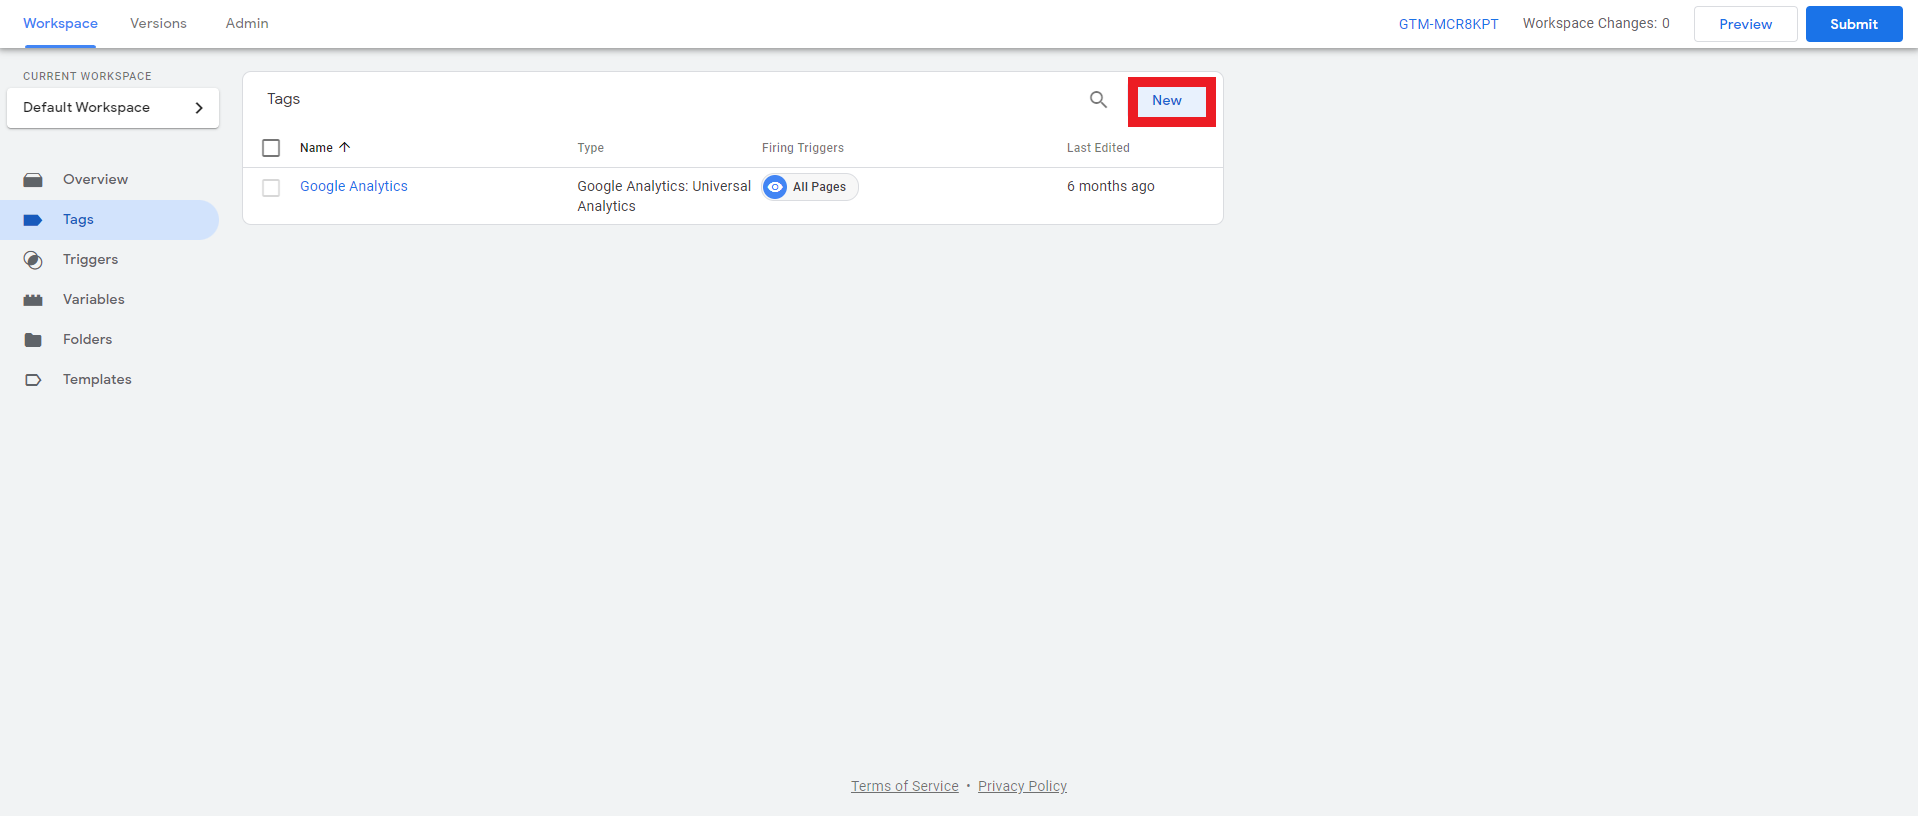
- In the Google Tag Manager account dashboard, click on the Tags tab.

- On the Tags screen, click the New button.

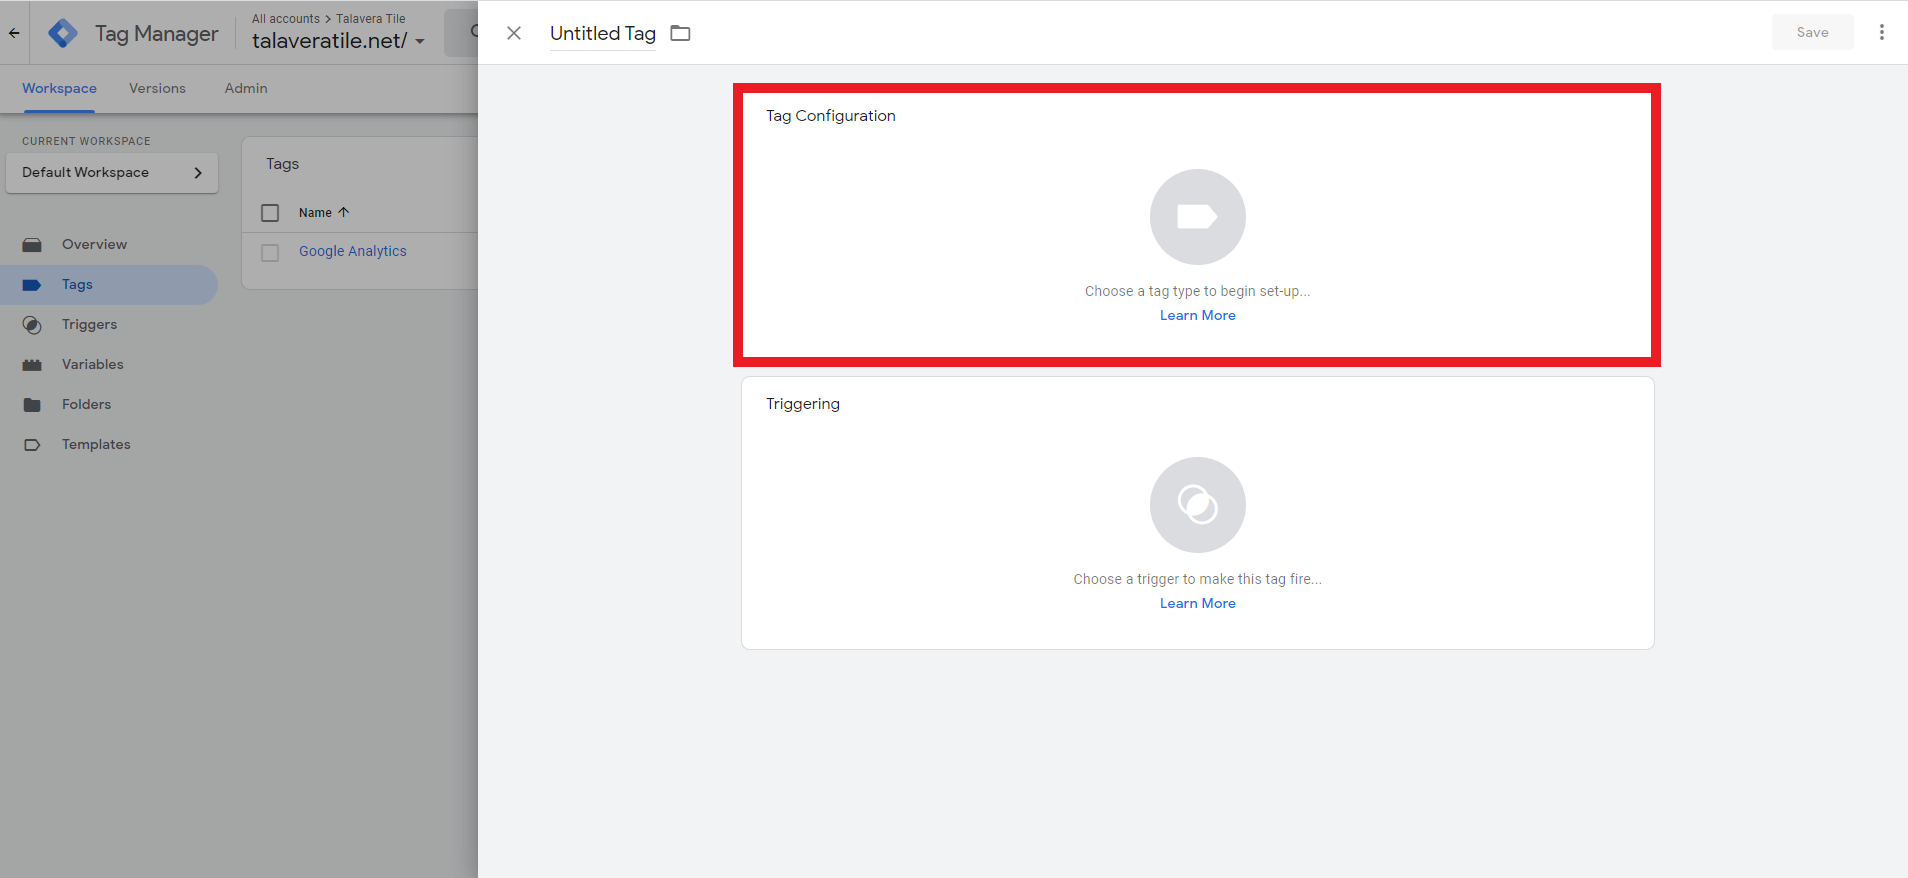
- On the tag creation screen, click on the Tag Configuration box.
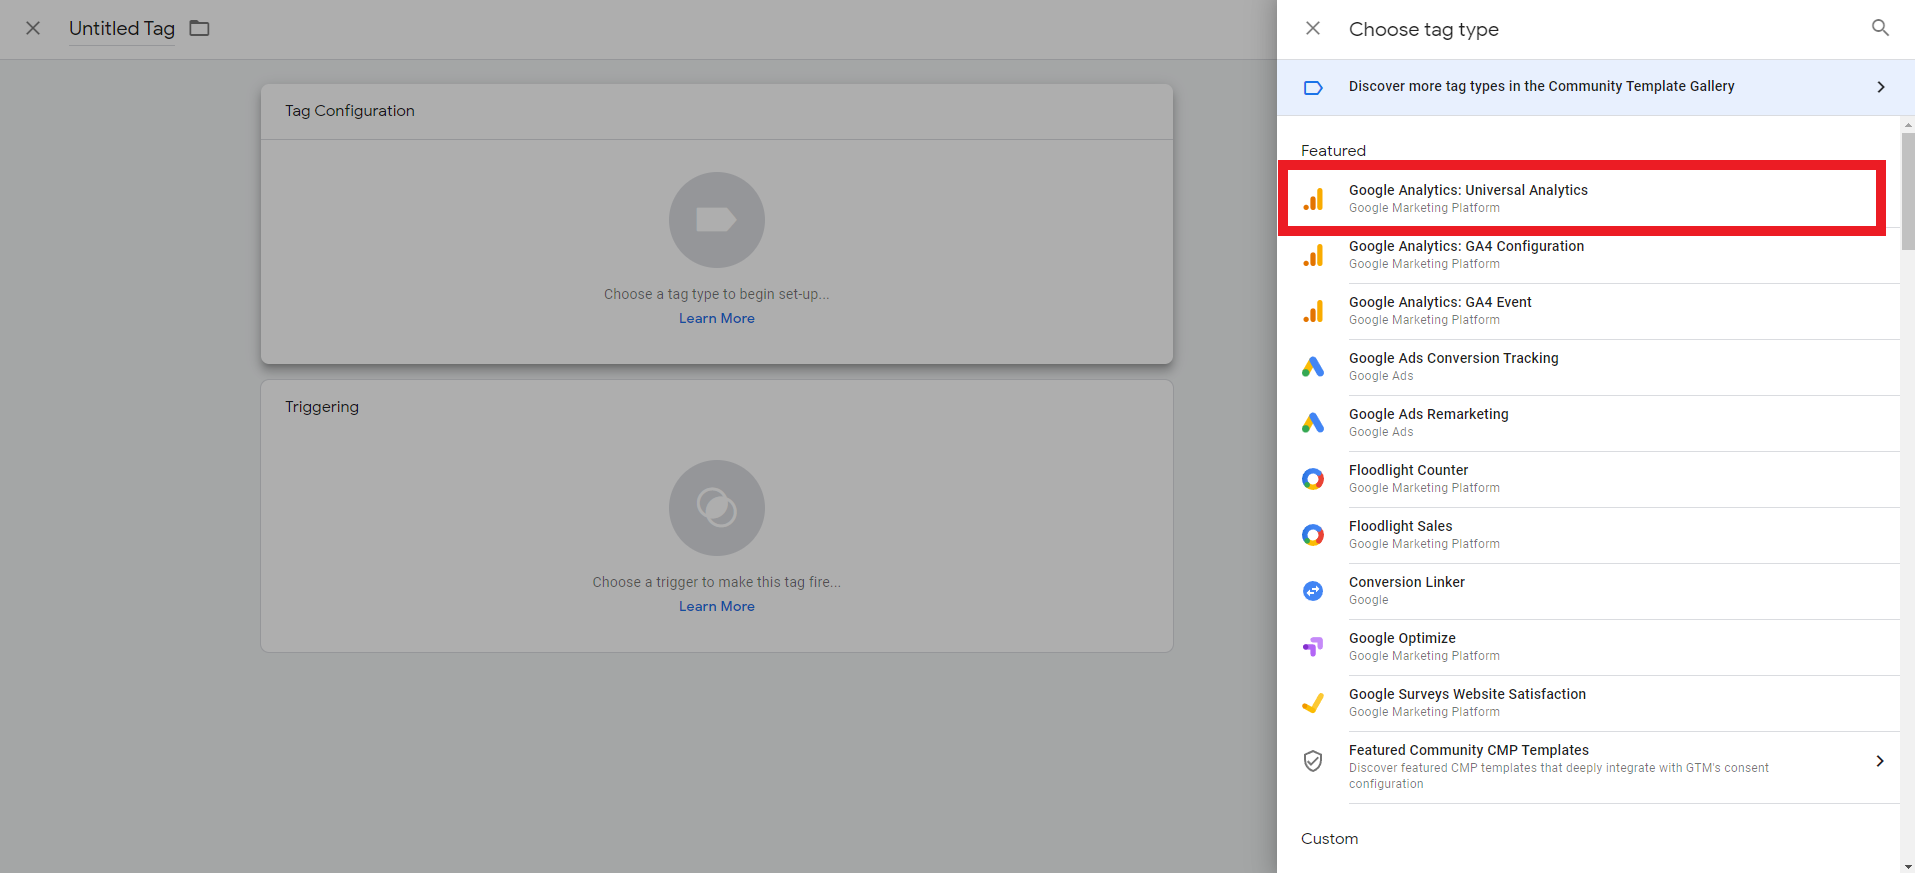
- On the Choose Tag Type menu, click on Google Analytics: Universal Analytics.
- In the Tag Configuration box, set the Track Type to Pageview, then click on New Variable in the dropdown menu under Google Analytics Settings.

- In the Universal Analytics Account, navigate to Admin->Property->Tracking Info->Tracking Code.

- Copy the Tracking ID that appears on the screen.
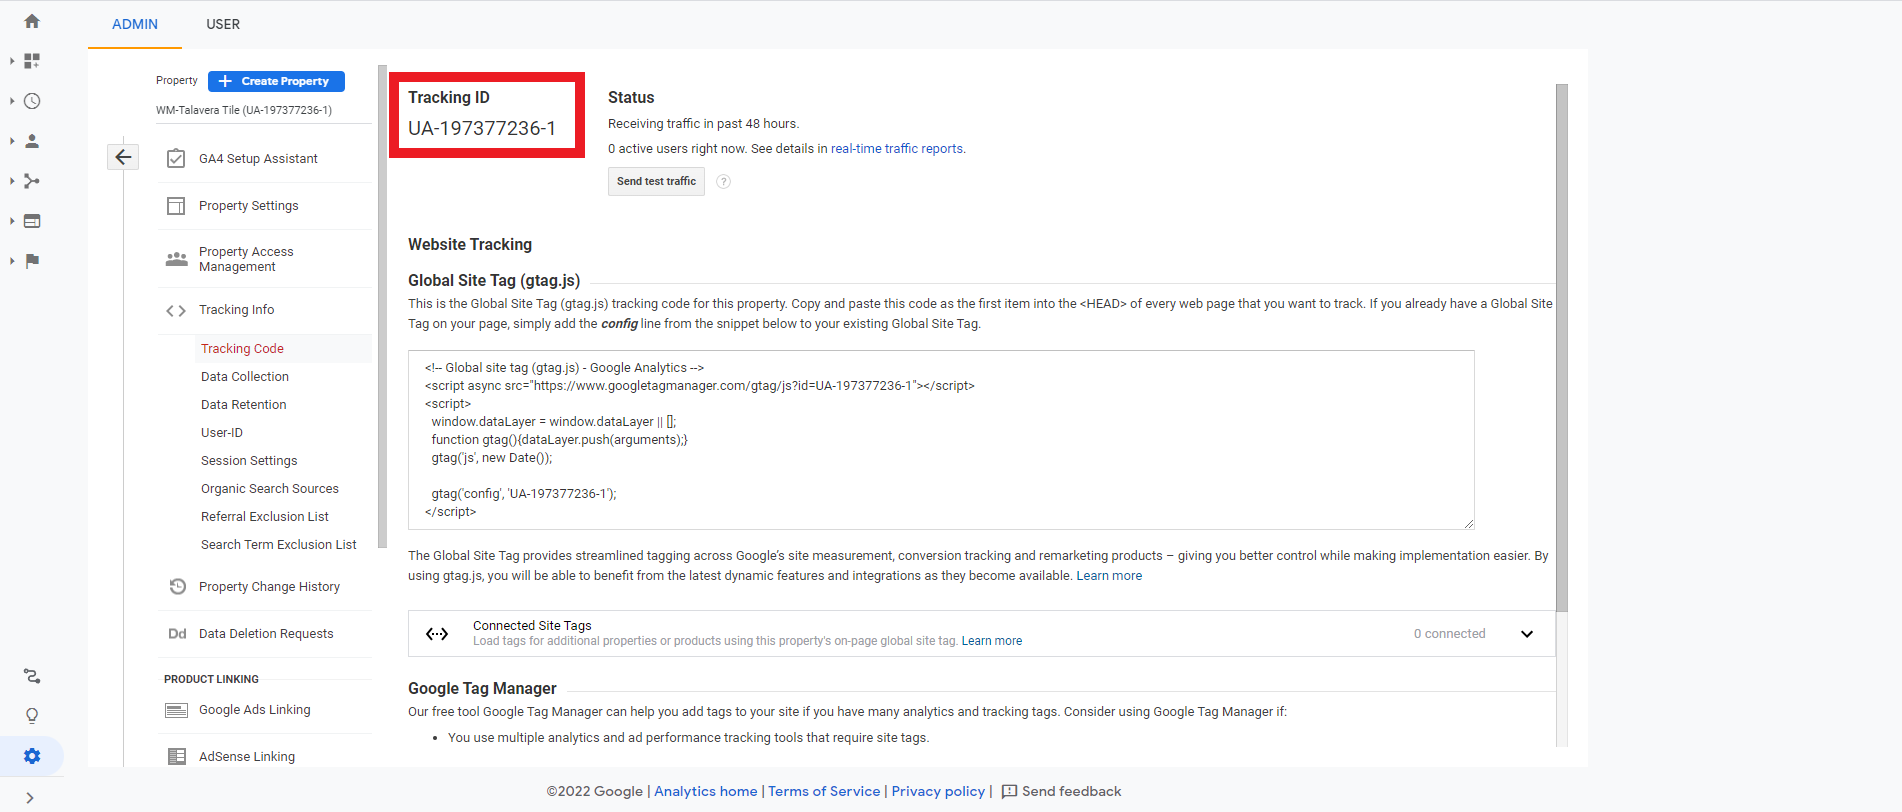
- Switch back to the Google Tag Manager tab in your browser and paste the Tracking ID into the Tracking ID field. Then, click the Save button and Save again in the popup window that follows.

- Click on the Triggering Box in the Tag Creator Screen.

- In the Choose a Trigger screen, select the All Pages – Page View trigger.
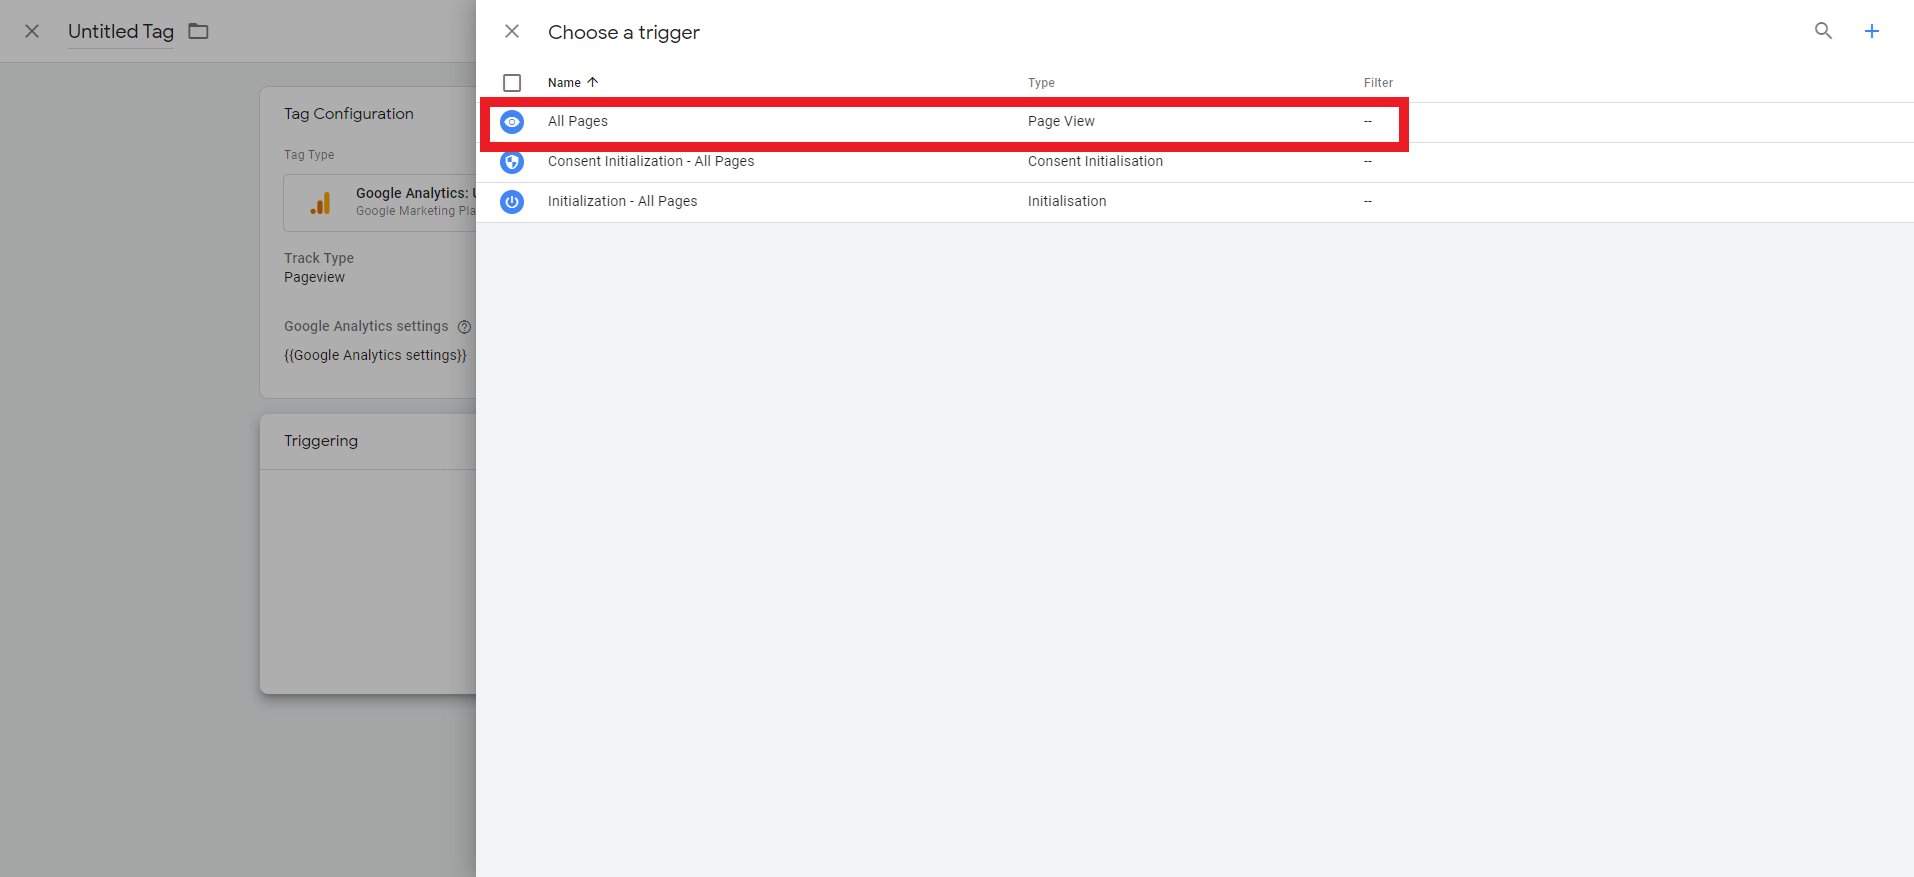
- Click the Save button, and then click Save again in the popup that follows.

Section 6.2: Google Analytics Phone & Email Conversion Tracking Tag
You will need to create a tag for each conversion action that you want to track in Google Analytics. These steps are repeatable until you have a tag for phone and email conversions.
- On the Tags screen in Google Tag Manager, click on the New button.

- On the tag creation screen, click on the Tag Configuration box.
- On the Choose Tag Type menu, click on Google Analytics: Universal Analytics.
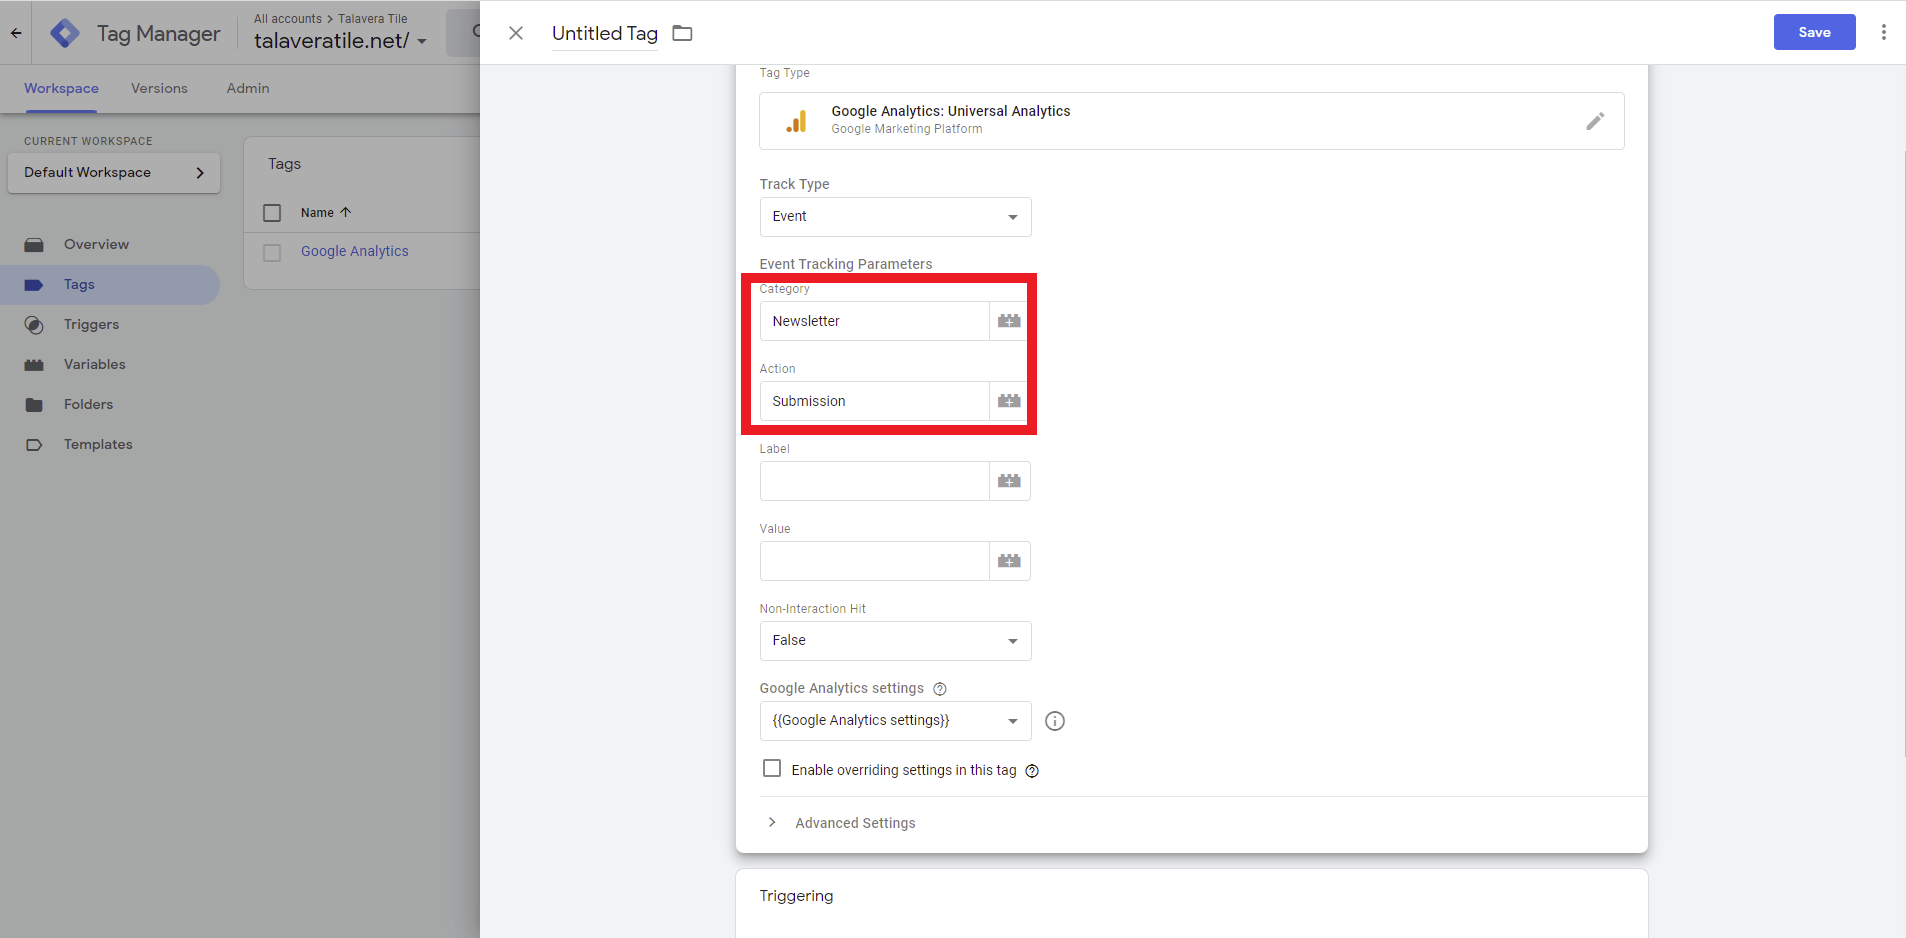
- On the tag creation screen, set the Track Type to Event. Then, enter in the Category and Action values you set for the Goal in Google Analytics. Then, set the Google Analytics Settings to {{Google Analytics settings}}.

- Scroll down and click on the Triggering box.

- On the Choose a Trigger screen, click on the blue “+” icon in the top right corner.

- On the Trigger Creation Screen, click on the Trigger Configuration box.
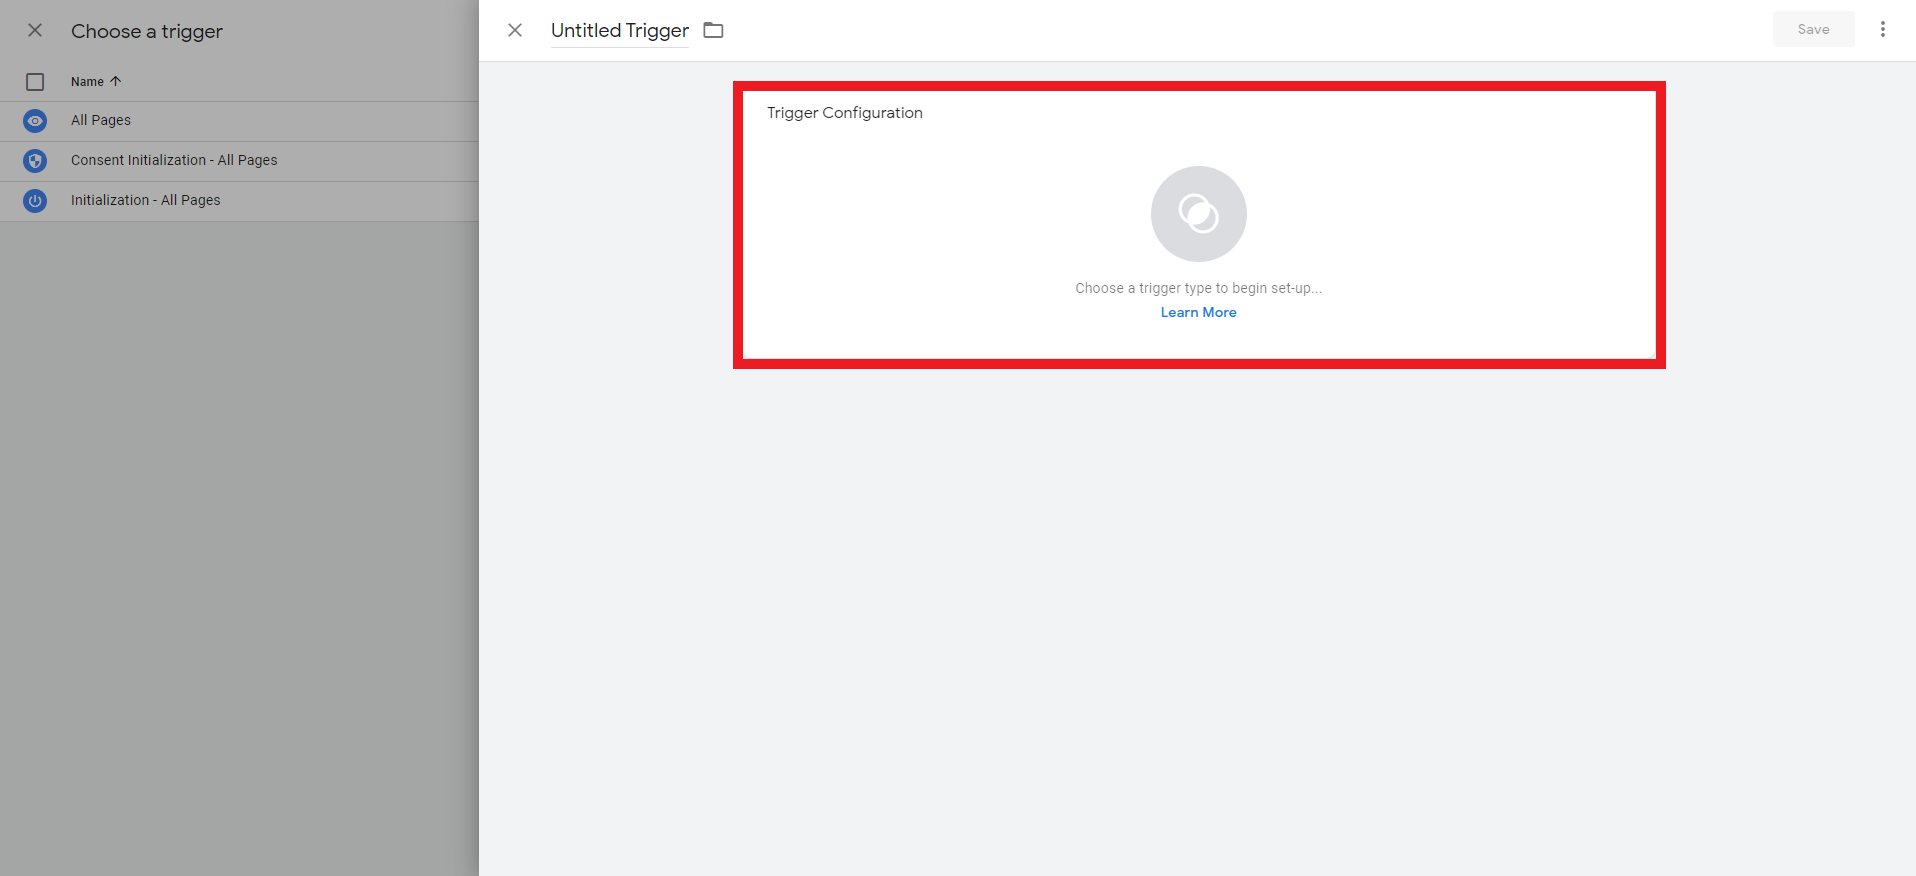
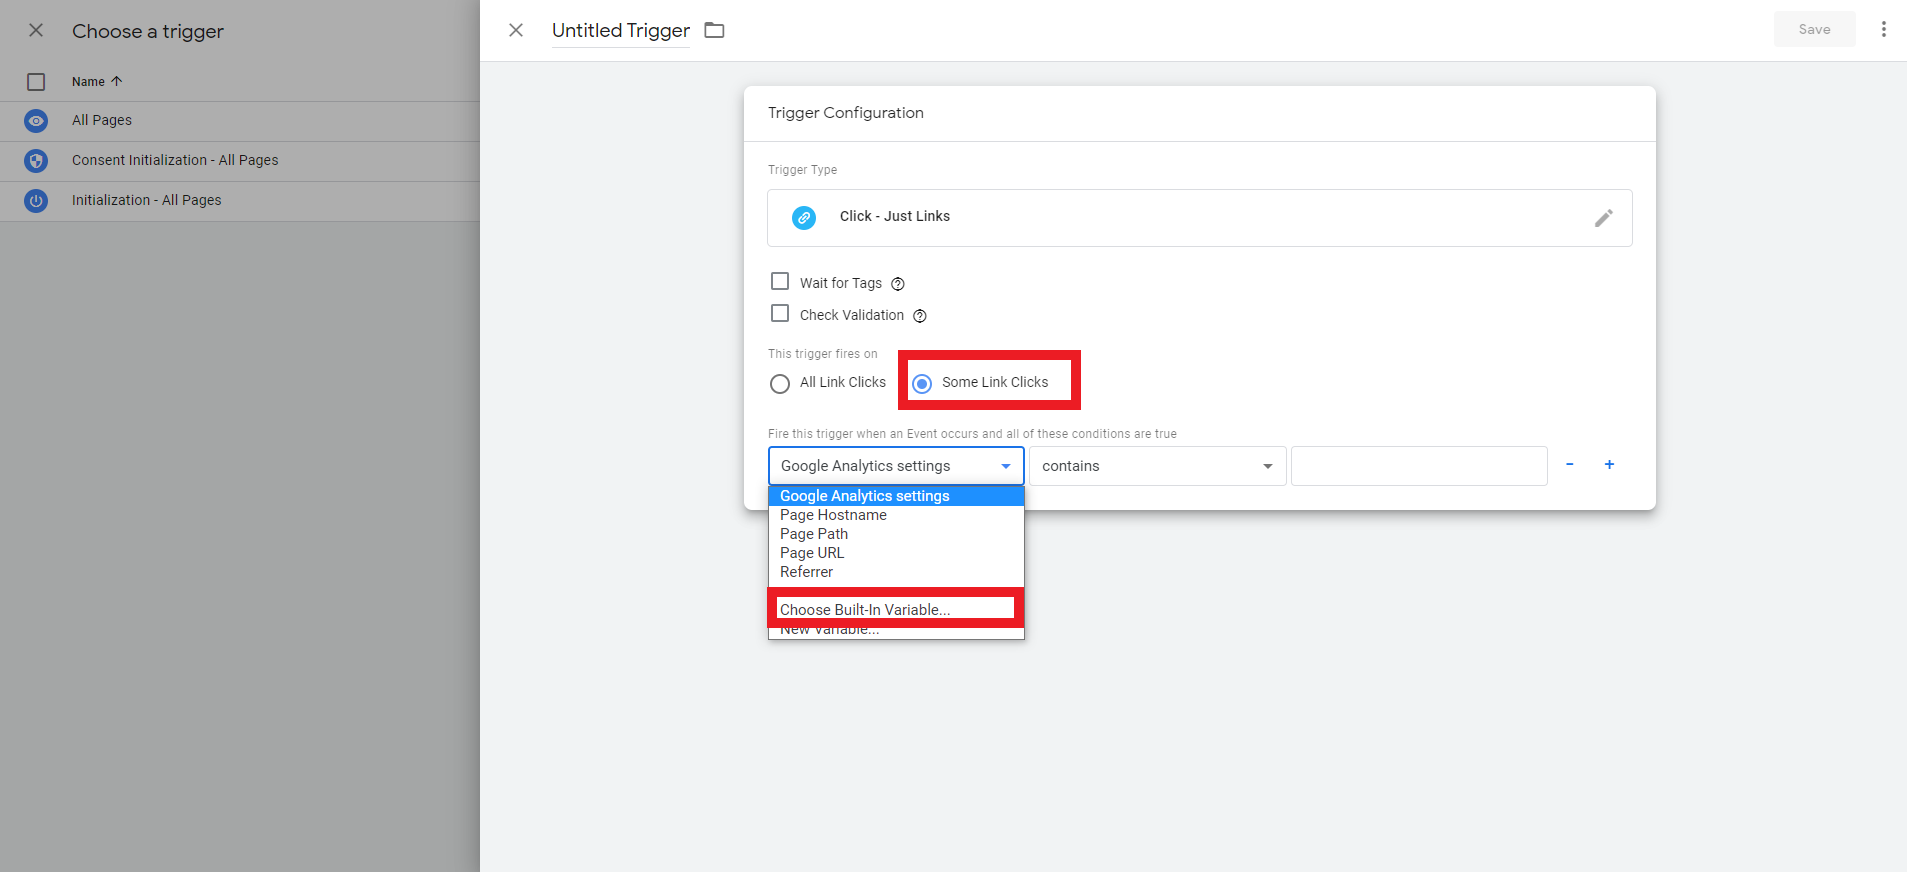
- In the Choose Trigger Type menu, select Just Links.

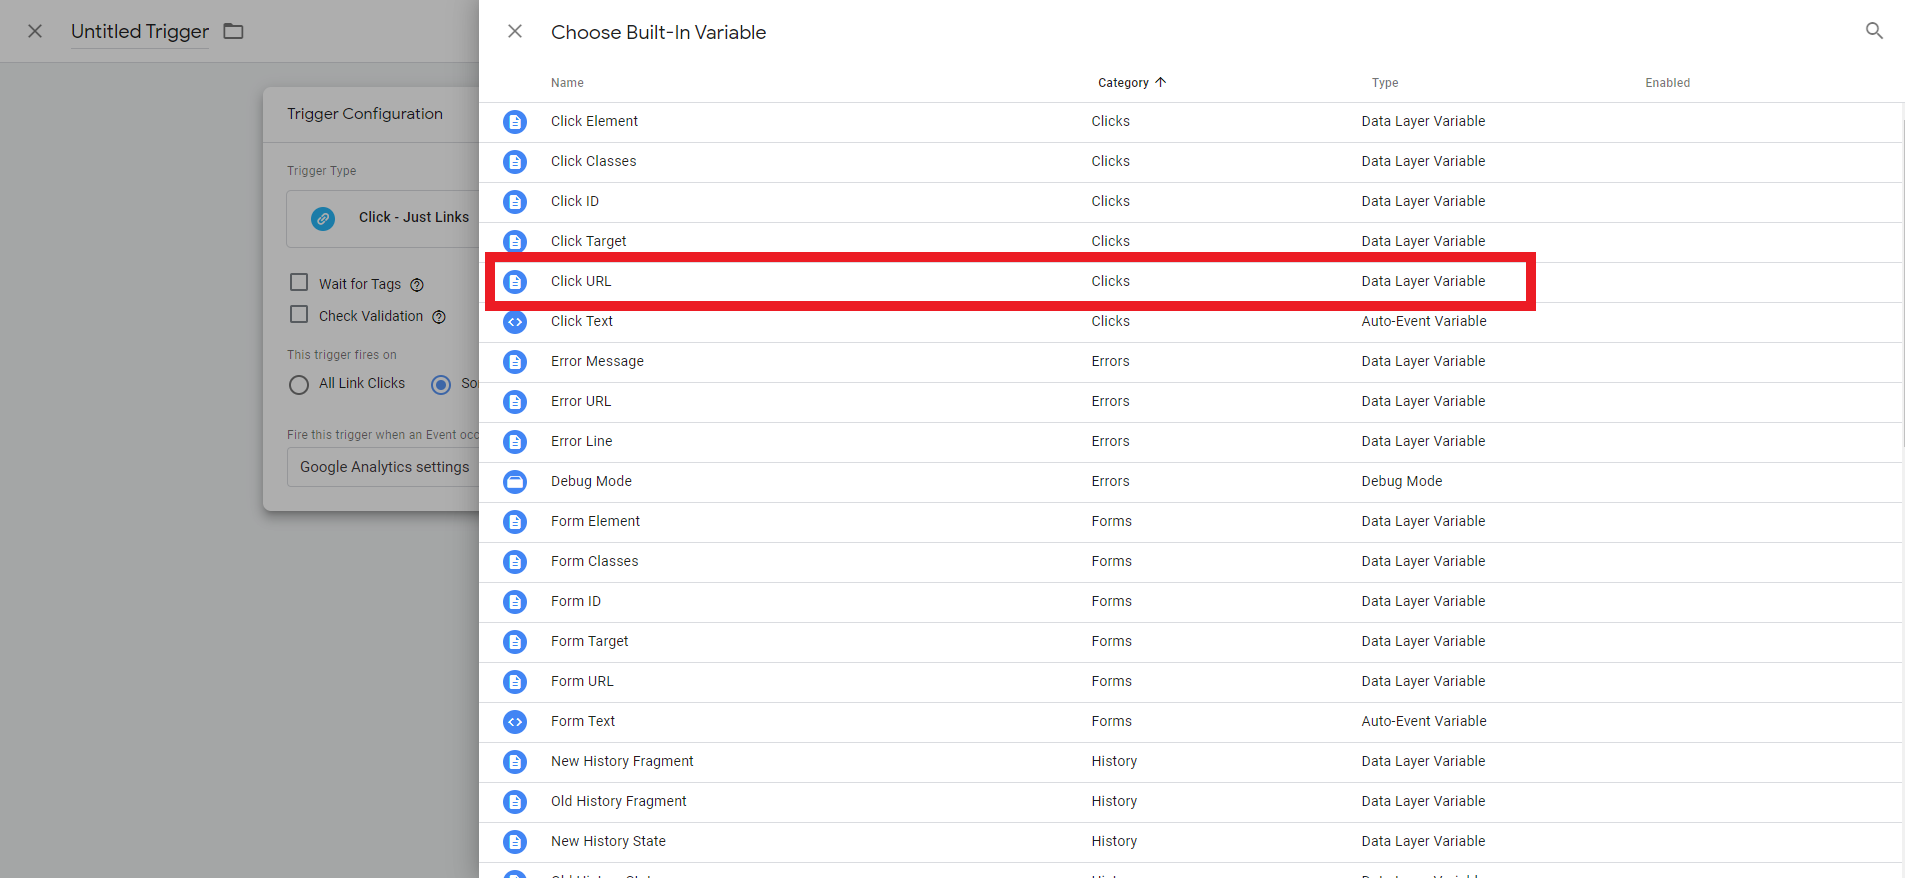
- On the Trigger Configuration screen, click the radio button labelled Some Link Clicks. Then click Choose Built-In Variable in the left-hand dropdown menu.
- On the Choose Built-In Variable screen, select Click URL.
- Back on the Trigger Configuration screen, select “matches RegEx” in the middle dropdown menu. Then enter the following in the text field:
- Phone Conversions – Tel:
- Email Conversions – Mailto

- Replace the “Untitled Trigger” text with the name of the trigger, then click the Save button:
- Phone Conversions – Phone Trigger
- Email Conversions – Email Trigger

- Back on the Tag Creation screen, replace “Untitled Tag” with the name of the tag, then click the Save button:
- Phone Conversions – Phone Conversion
- Email Conversions – Email Conversion

- Repeat Steps 1 through 13 to create the other conversion tracking tag. There needs to be one tag for phone conversions, and one tag for email conversions.
Section 6.3 Google Analytics Contact Form & Newsletter Signup Conversion Tracking Tags
You won’t always need to set up a newsletter signup tag. This will outline both scenarios: Contact Form only, and Contact Form & Newsletter Signup.
- On the Tags screen in Google Tag Manager, click on the New button.
- On the tag creation screen, click on the Tag Configuration box.
- On the Choose Tag Type menu, click on Google Analytics: Universal Analytics.
- On the tag creation screen, set the Track Type to Event. Then, enter in the Category and Action values you set for the Goal in Google Analytics. Then, set the Google Analytics Settings to {{Google Analytics settings}}.

- Scroll down and click on the Triggering box.
- On the Choose a Trigger screen, click on the blue “+” icon in the top right corner.
- On the Trigger Creation Screen, click on the Trigger Configuration box.
- In the Choose Trigger Type menu, select Form Submission.

- Back on the Trigger Configuration screen, select the trigger firing setting:
- If you are only tracking contact form submissions: All forms
- If you’re tracking newsletter signups and contact form submissions: Some forms

NOTE: If you are planning to track newsletter signups, you will need to complete some additional steps. Skip section 6.3A and follow section 6.3B.
Section 6.3A: If You Are Only Tracking Contact Form Conversions
- Click the Save button and then click Save again in the popup that follows.

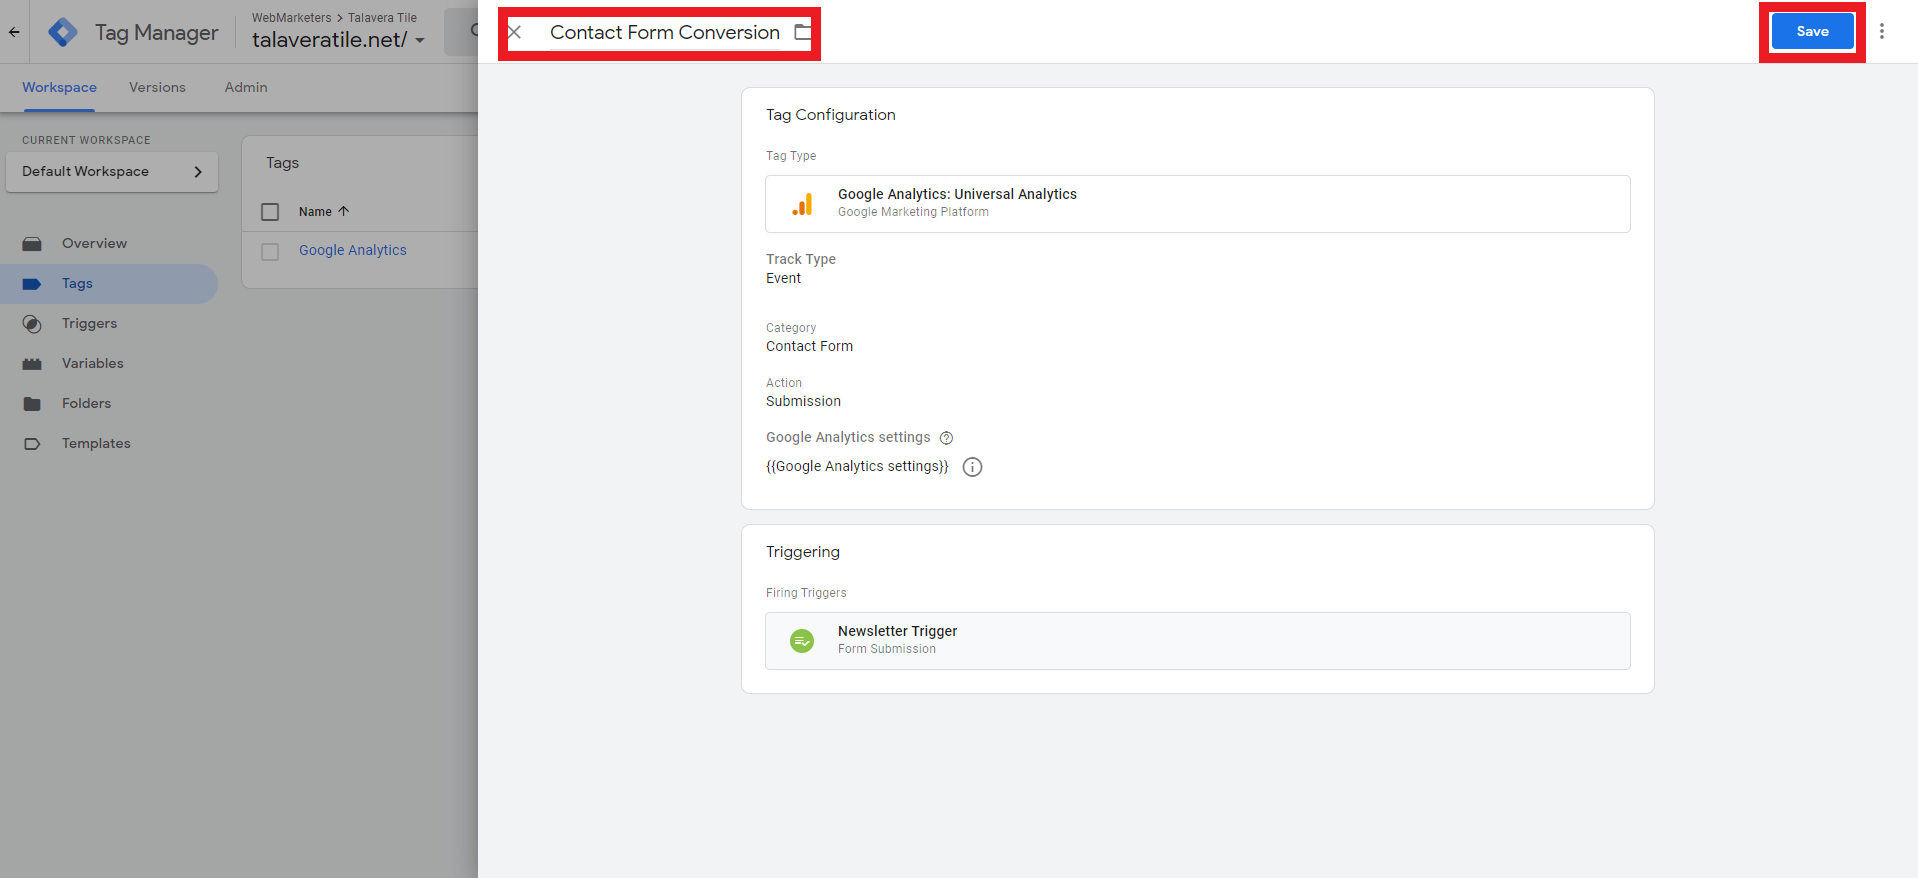
- Back on the Tag Creation screen, replace “Untitled Tag” with “Contact Form Conversion” then click the Save button.

Section 6.3B: If You Are Tracking Contact Form Conversions & Newsletter Signups
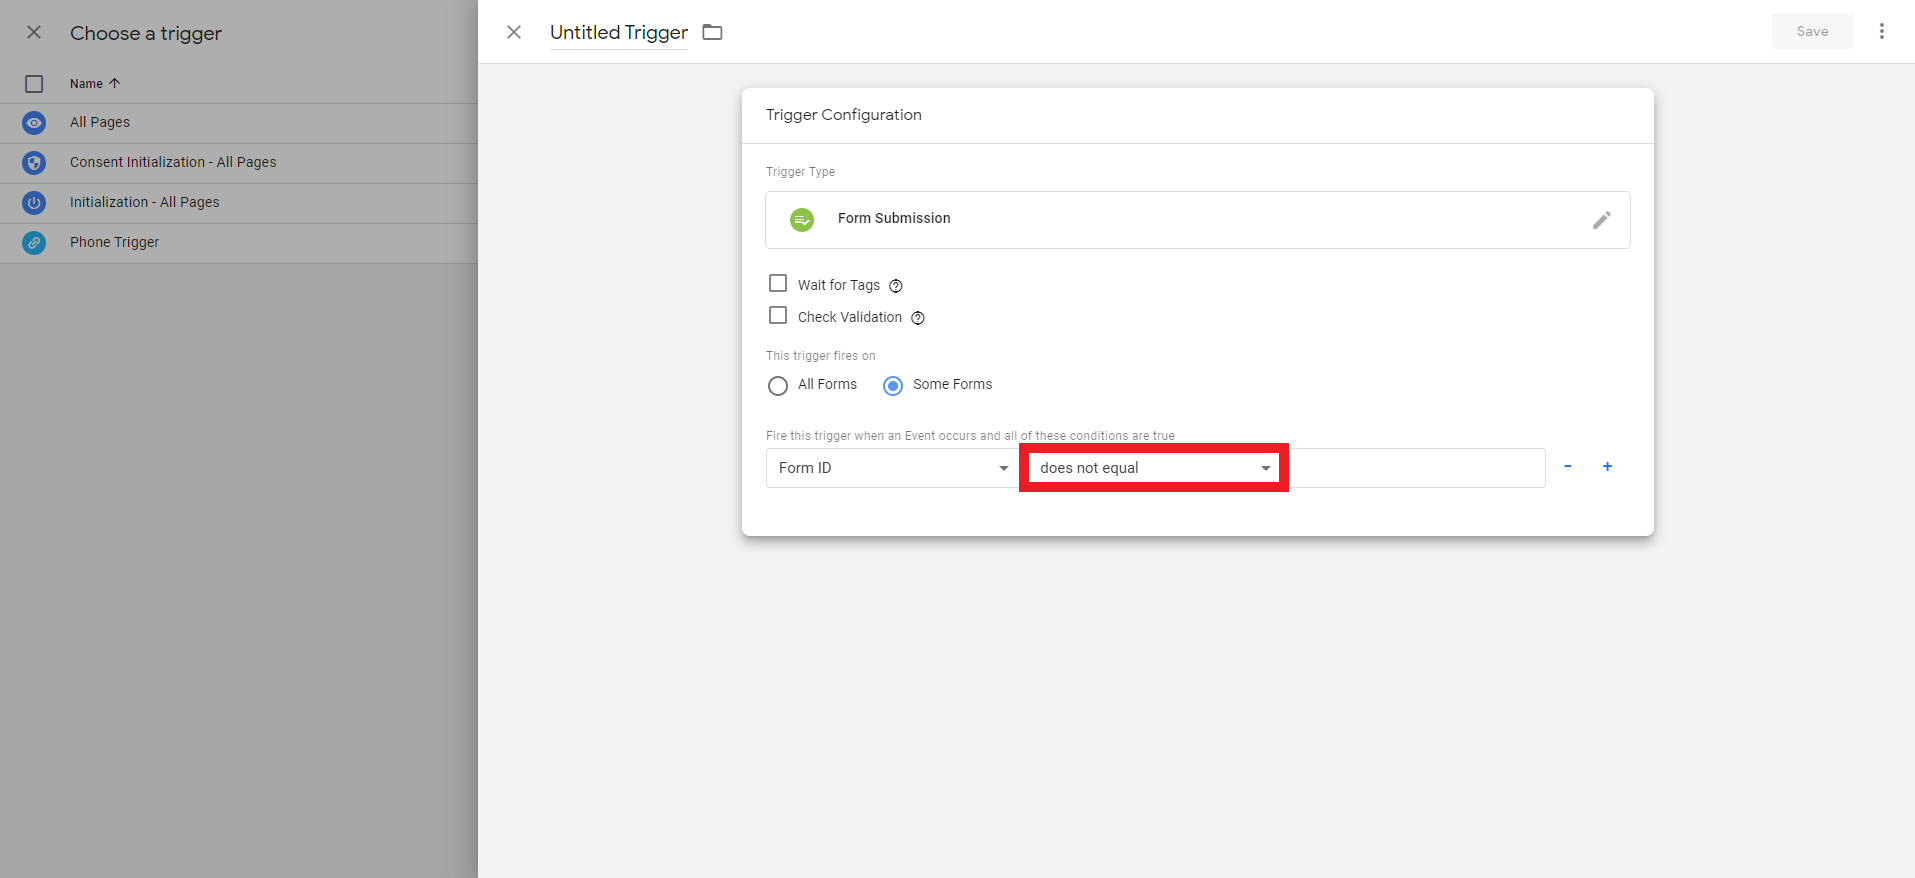
- On the Trigger Configuration Screen, select Choose Built-In Variable in the left-hand dropdown menu.

- On the Choose Built-In Variable screen, select Form ID.

- Back on the Trigger Configuration Screen, set the middle dropdown menu to Does Not Equal.
- Switch over to a browser tab with the client’s website open. Find the newsletter signup form, right click on the first text field on the form, then click Inspect.

- In the Console that opens up, look for a tag that starts with “<form” and look for the ID=“[formID]” element within that tag.
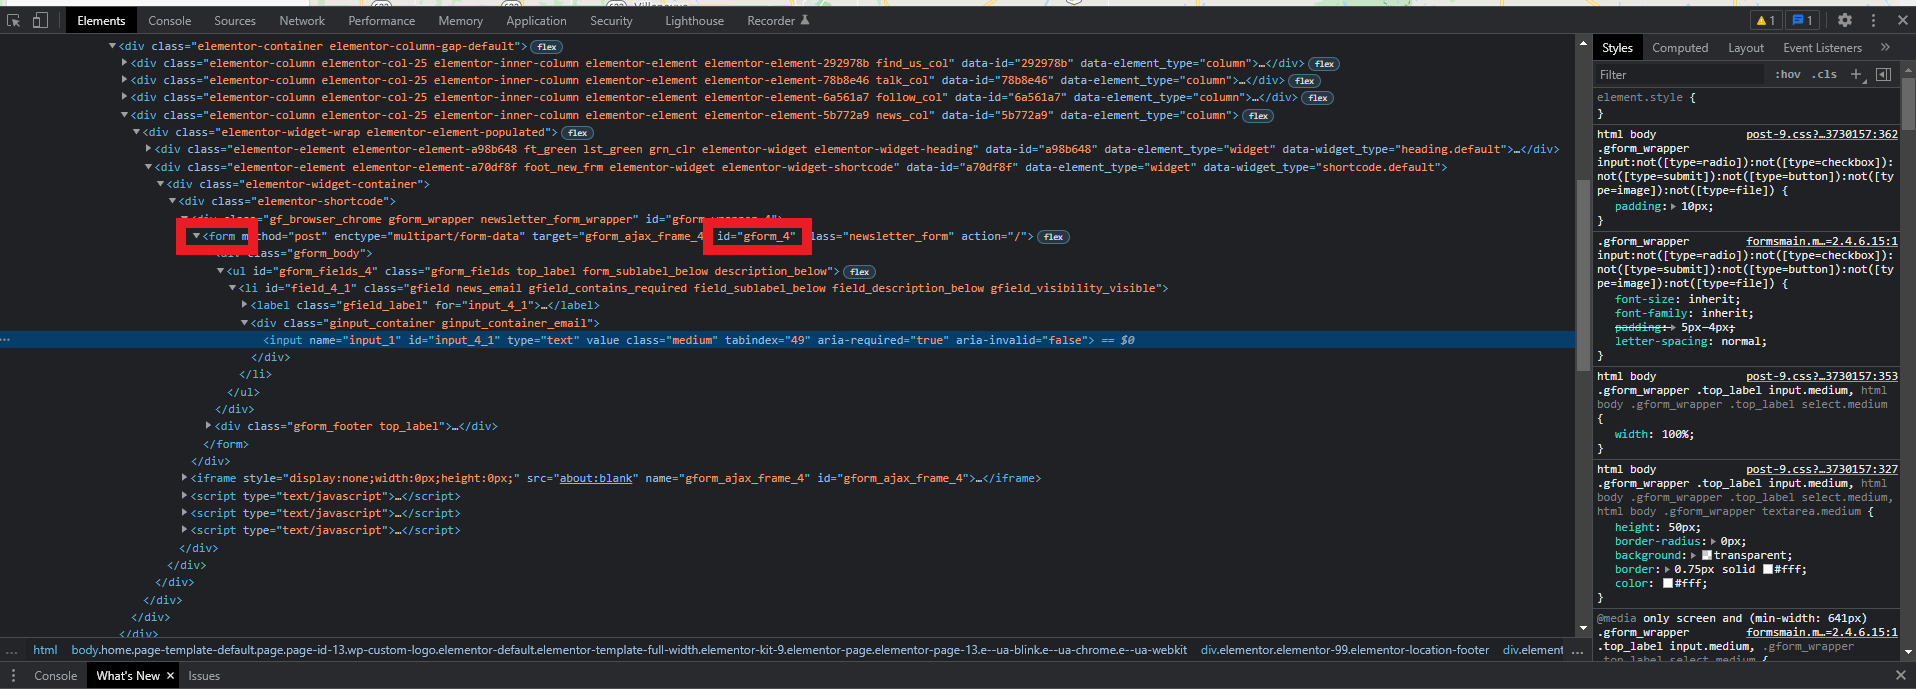
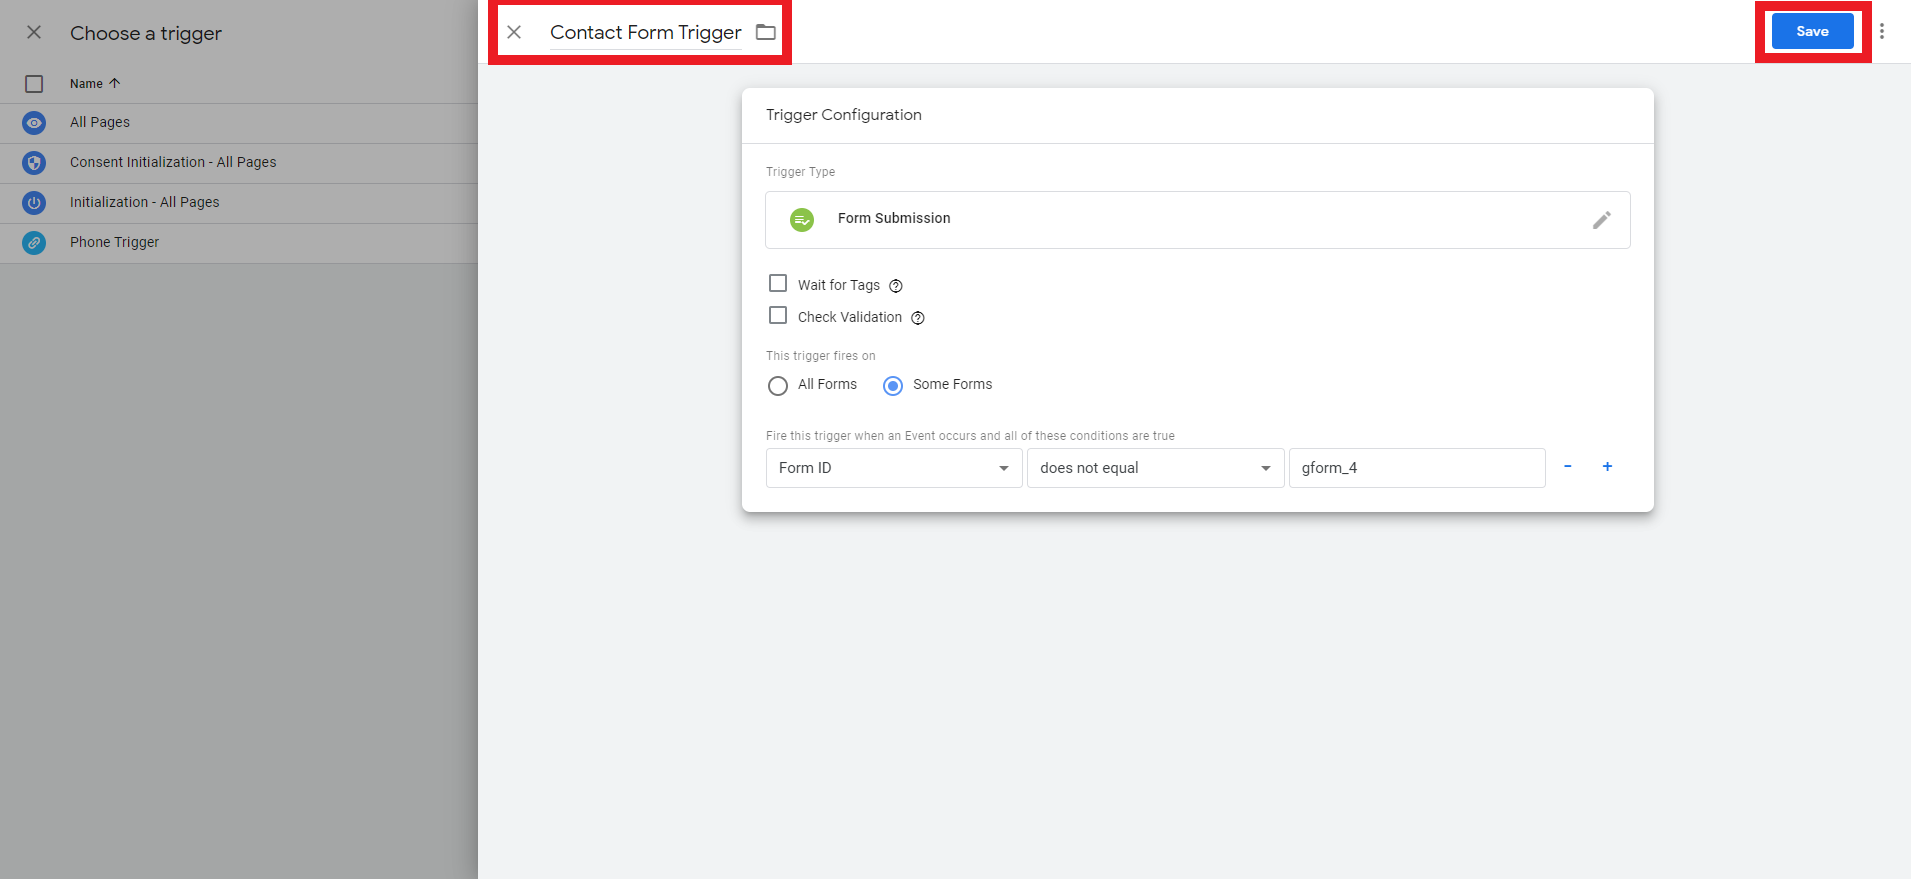
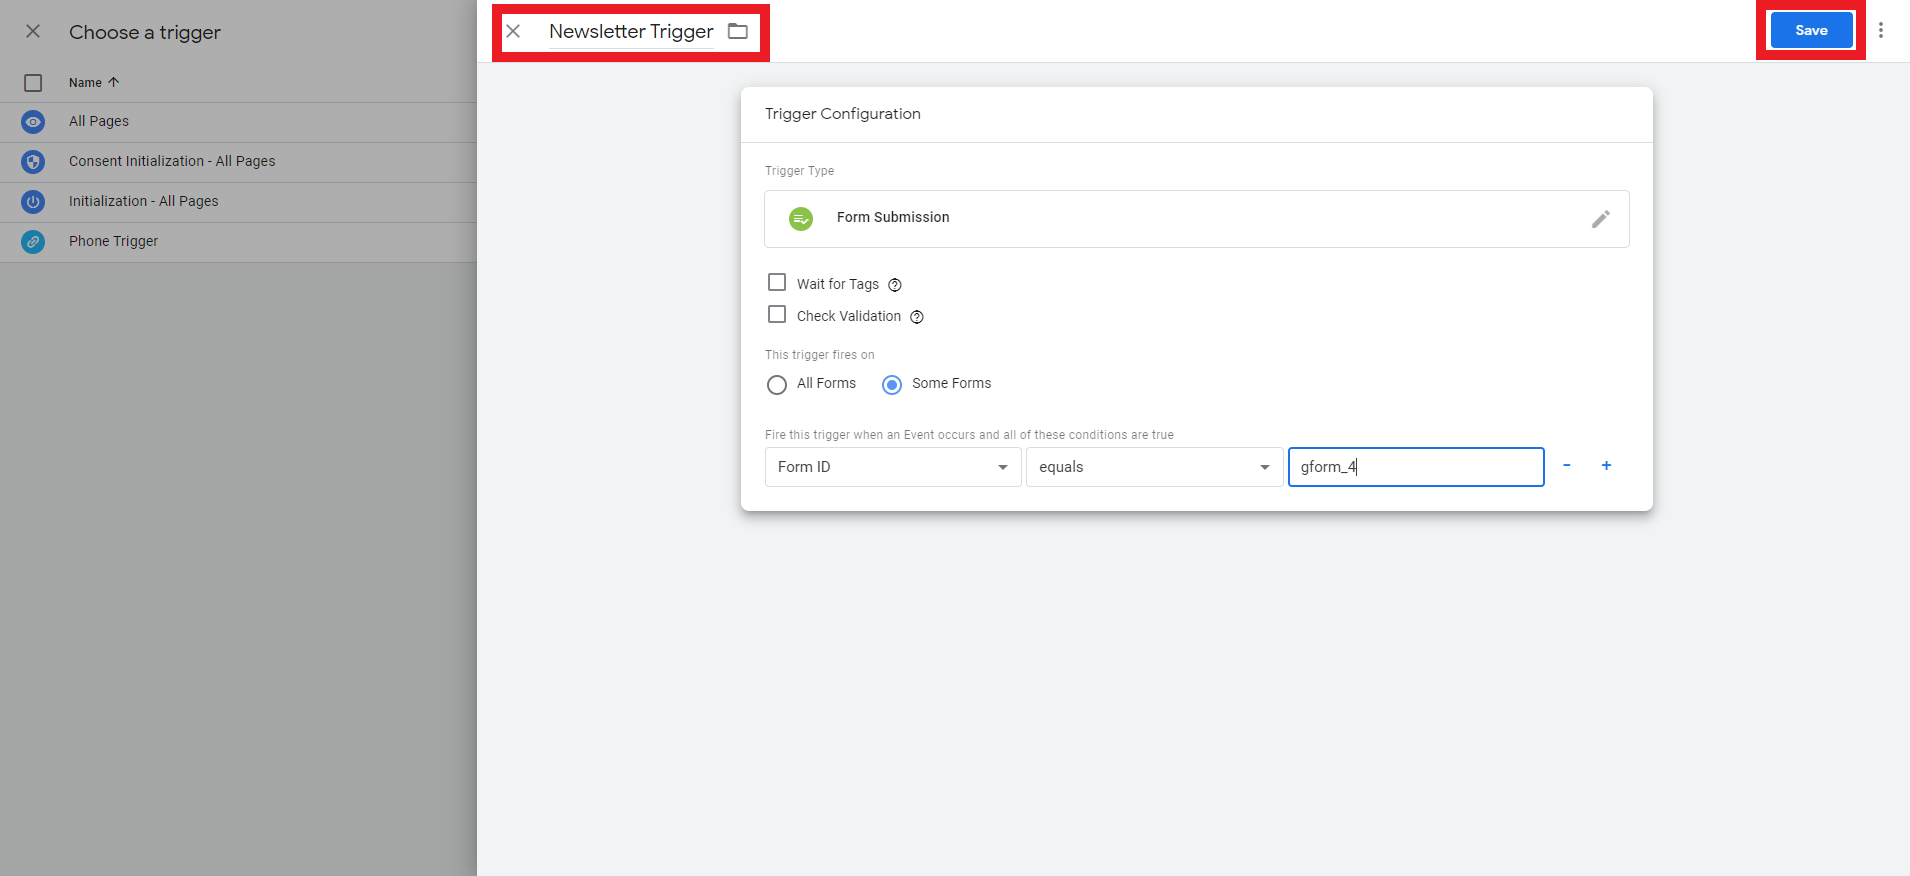
- Back on the Trigger Configuration screen, enter the form ID that you found on the Newsletter Signup form in Step 13 into the text field.

- Replace “Untitled Trigger” with “Contact Form Trigger” then click the Save button.
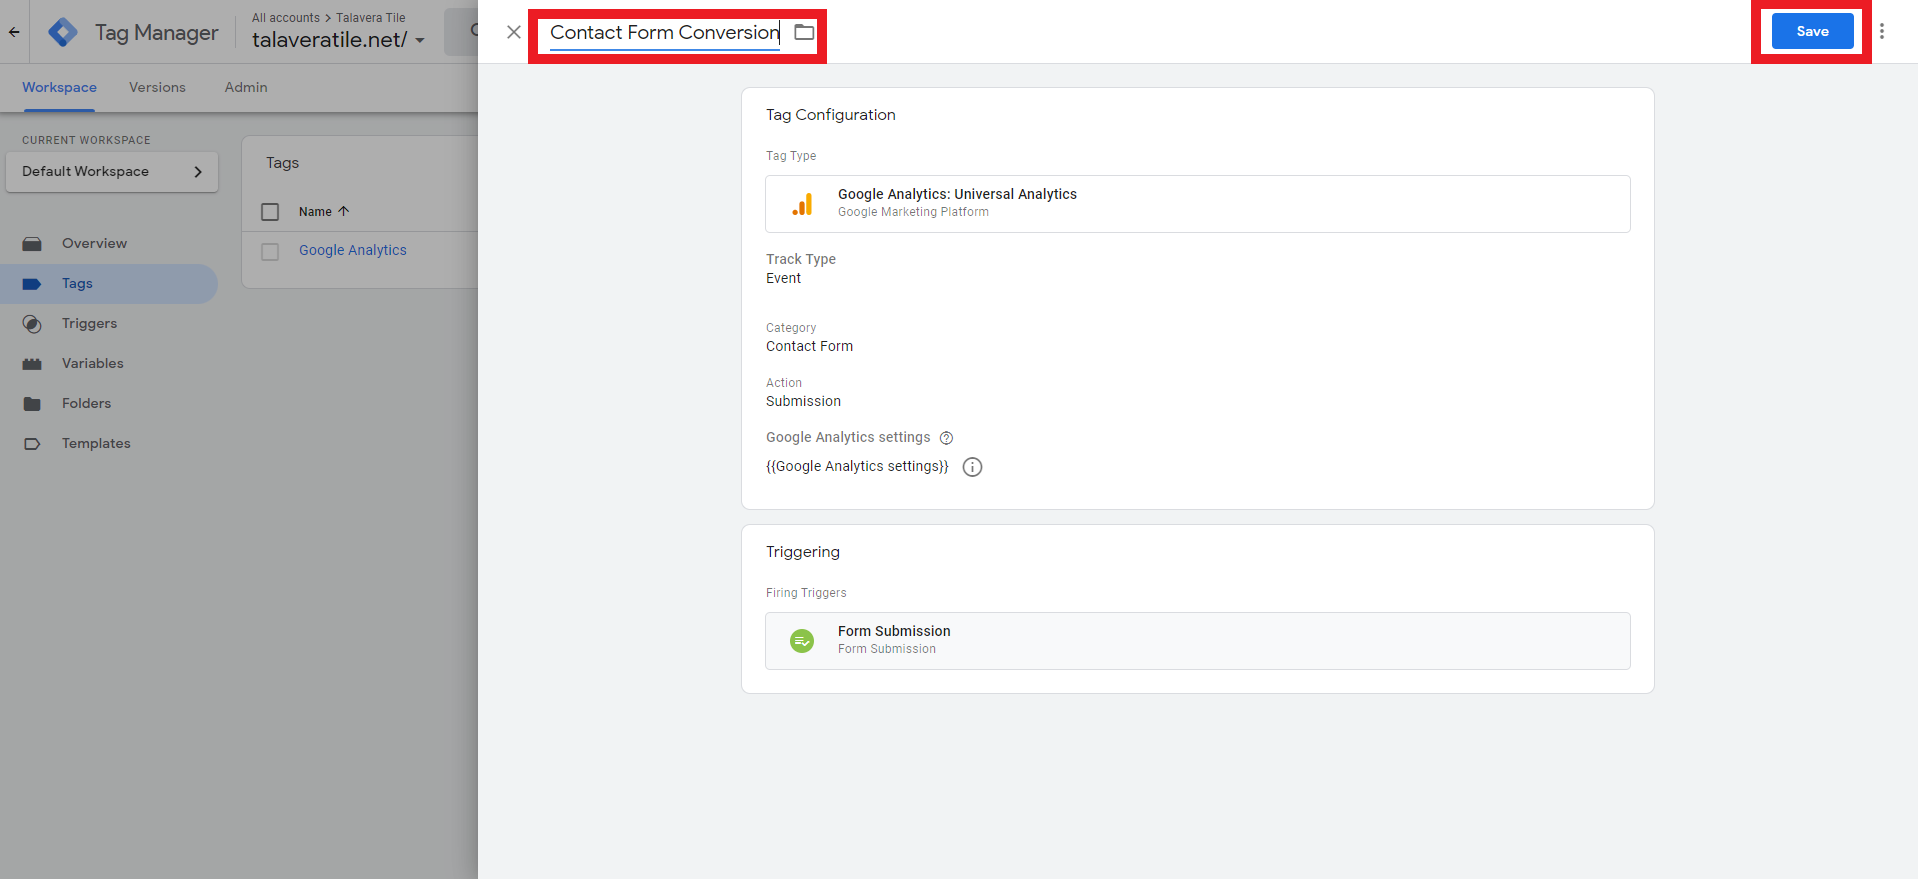
- Back on the Tag Creation screen, replace “Untitled Tag” with “Contact Form Conversion” then click the Save button.
- Repeat steps 1-17 from this section with the following differences to create the Newsletter Signup Tracking Tag:
-
- In Step 4, enter the Category and Action you set in the Google Analytics Goal for Newsletter Signups instead of Contact Form Conversions.

- In Step 10, select Form ID from the dropdown menu.

- In Step 12, set the field to Equals.

- In Step 16, replace “Untitled Trigger” with “Newsletter Trigger” then click the Save button.

- Back on the Tag Creation screen, replace Untitled Tag with “Newsletter Signup” then click the Save button.

- In Step 4, enter the Category and Action you set in the Google Analytics Goal for Newsletter Signups instead of Contact Form Conversions.
-
Section 7: Set Up Conversion Tags in Google Tag Manager with Google Analytics 4
Section 7.1: Google Analytics Traffic Tracking Tag
This tag will track website traffic which is important to monitor for SEO. It is also required to be able to track conversions through the other tags that will be created.
- In the Google Tag Manager account dashboard, click on the Tags tab.

- On the Tags screen, click the New button.
- On the tag creation screen, click on the Tag Configuration box.

- In the Choose Tag Type menu, select Google Analytics: GA4 Configuration.

- Switch your browser tab to the Google Analytics Account, then click Admin in the bottom-left corner of the screen.

- Under the Property Menu, click Data Streams.

- Select the Data Stream you have created.
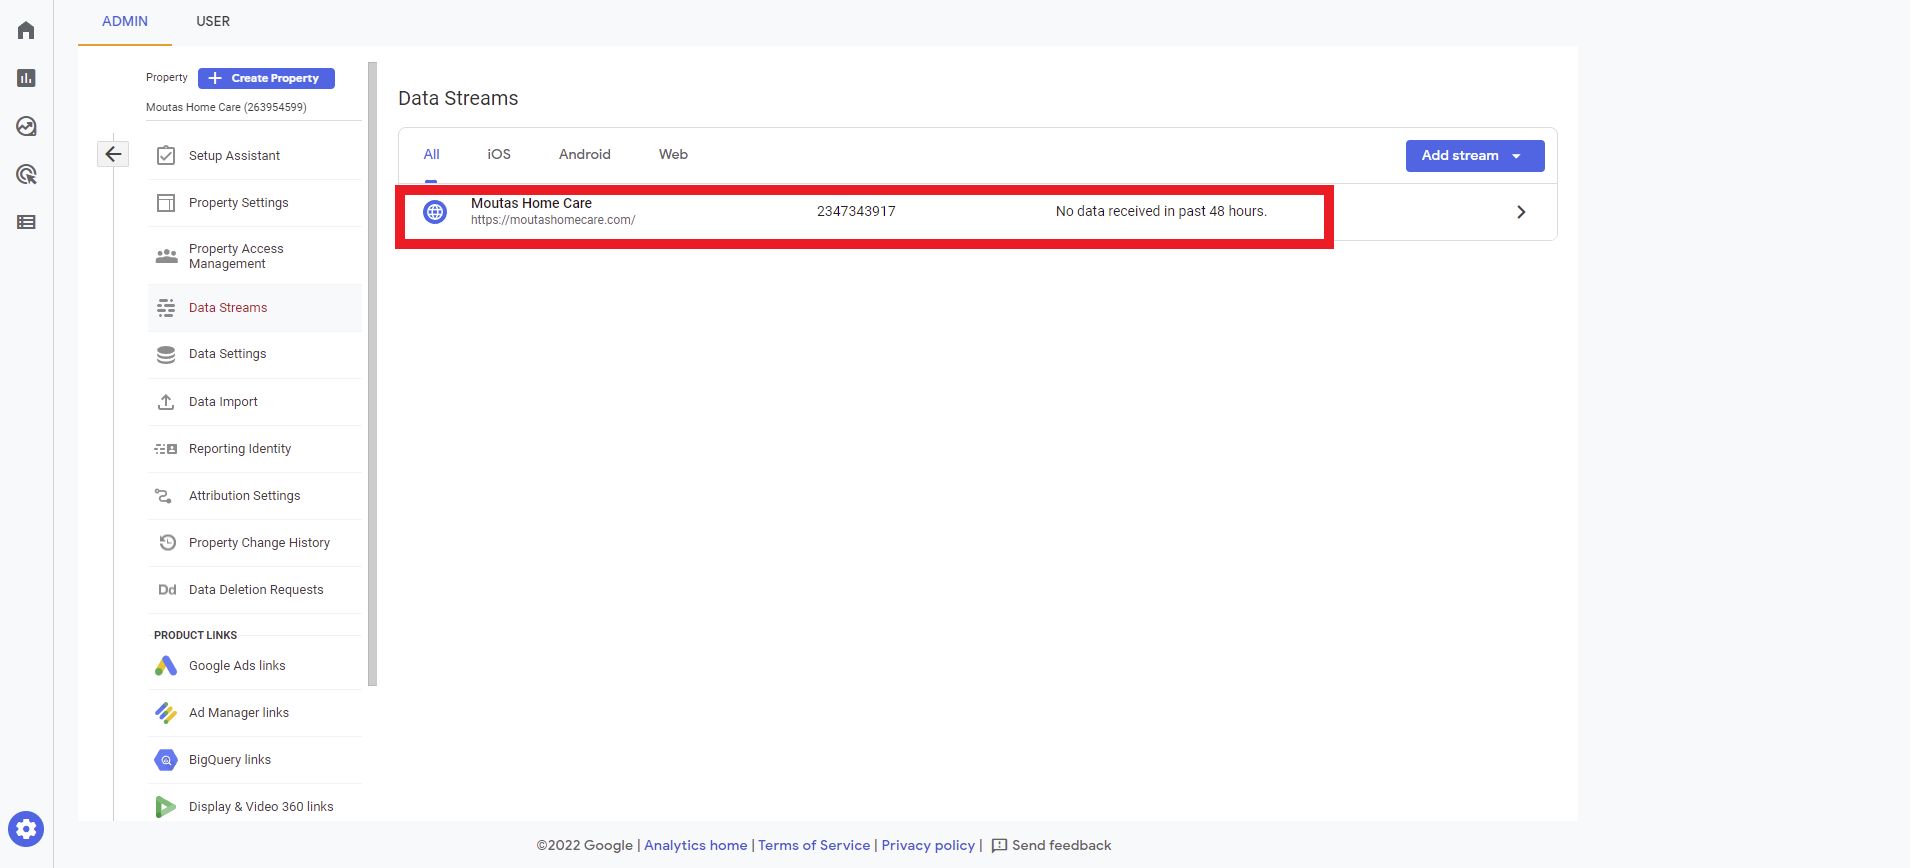
- On the Web Steam Details page, click the copy icon beside the Measurement ID.
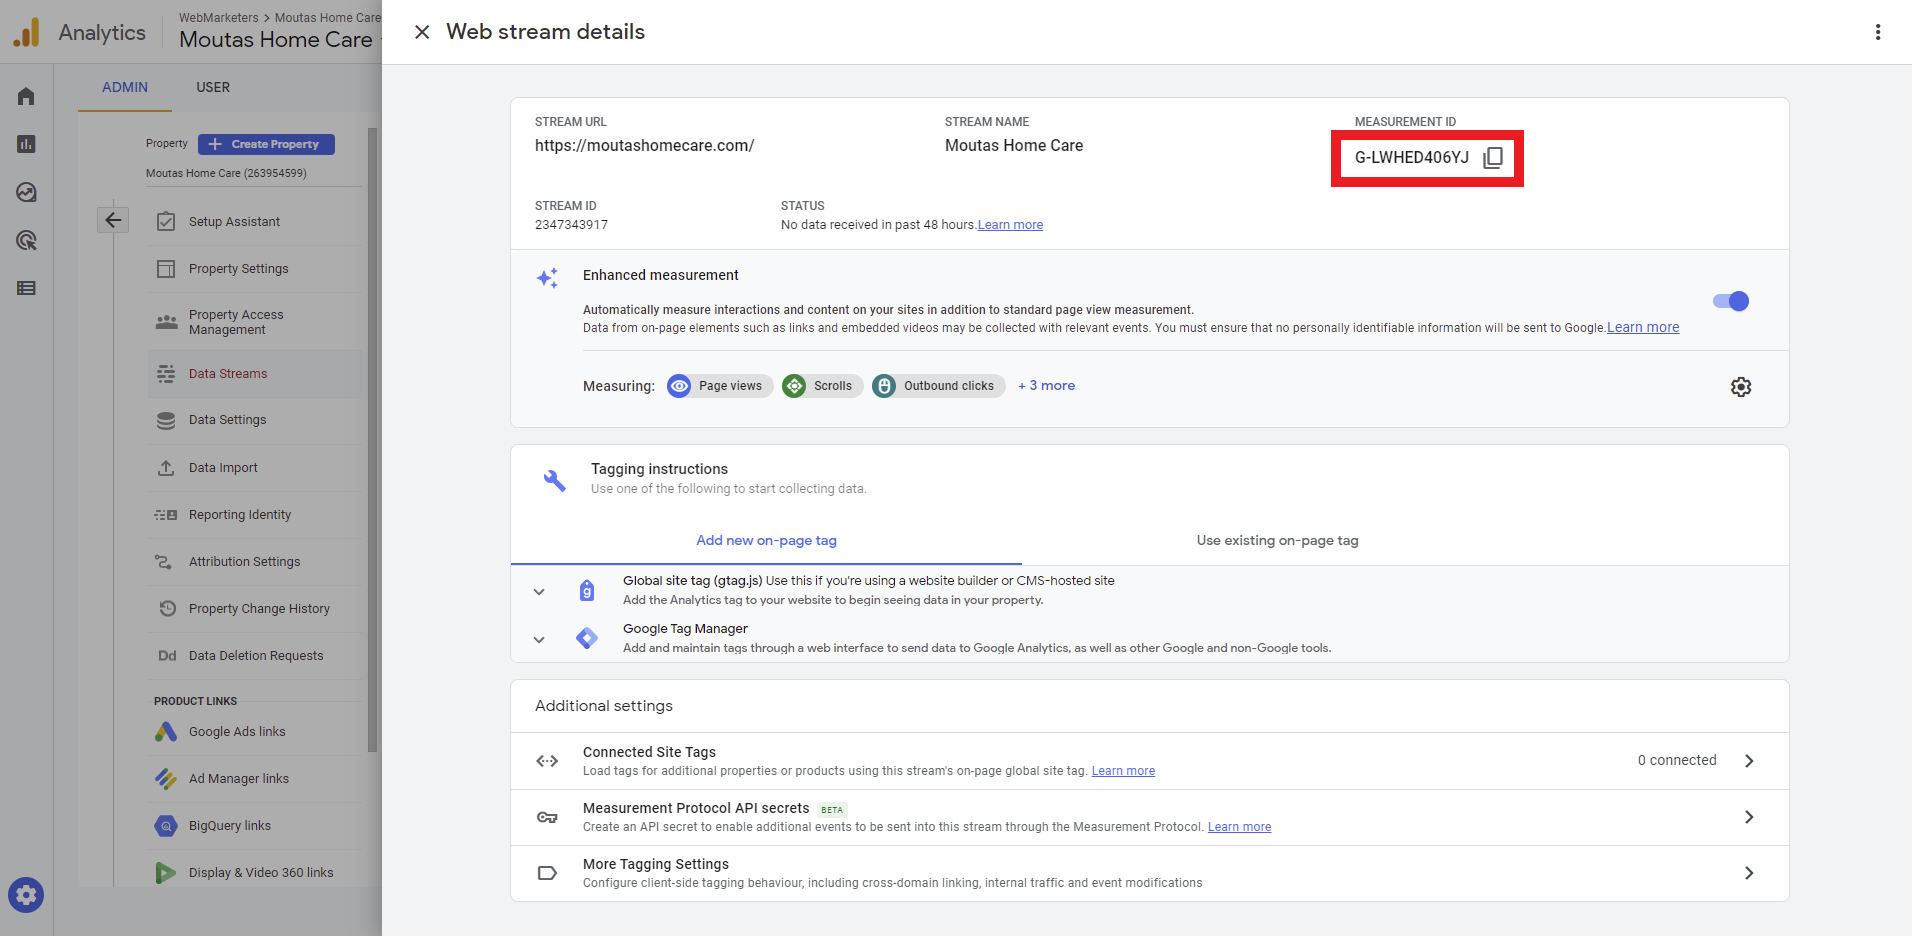
- Switch back to the browser tab with Google Tag Manager open, then paste the Measurement ID into the Measurement ID field on the tag creation screen. Then, click on the Triggering box.
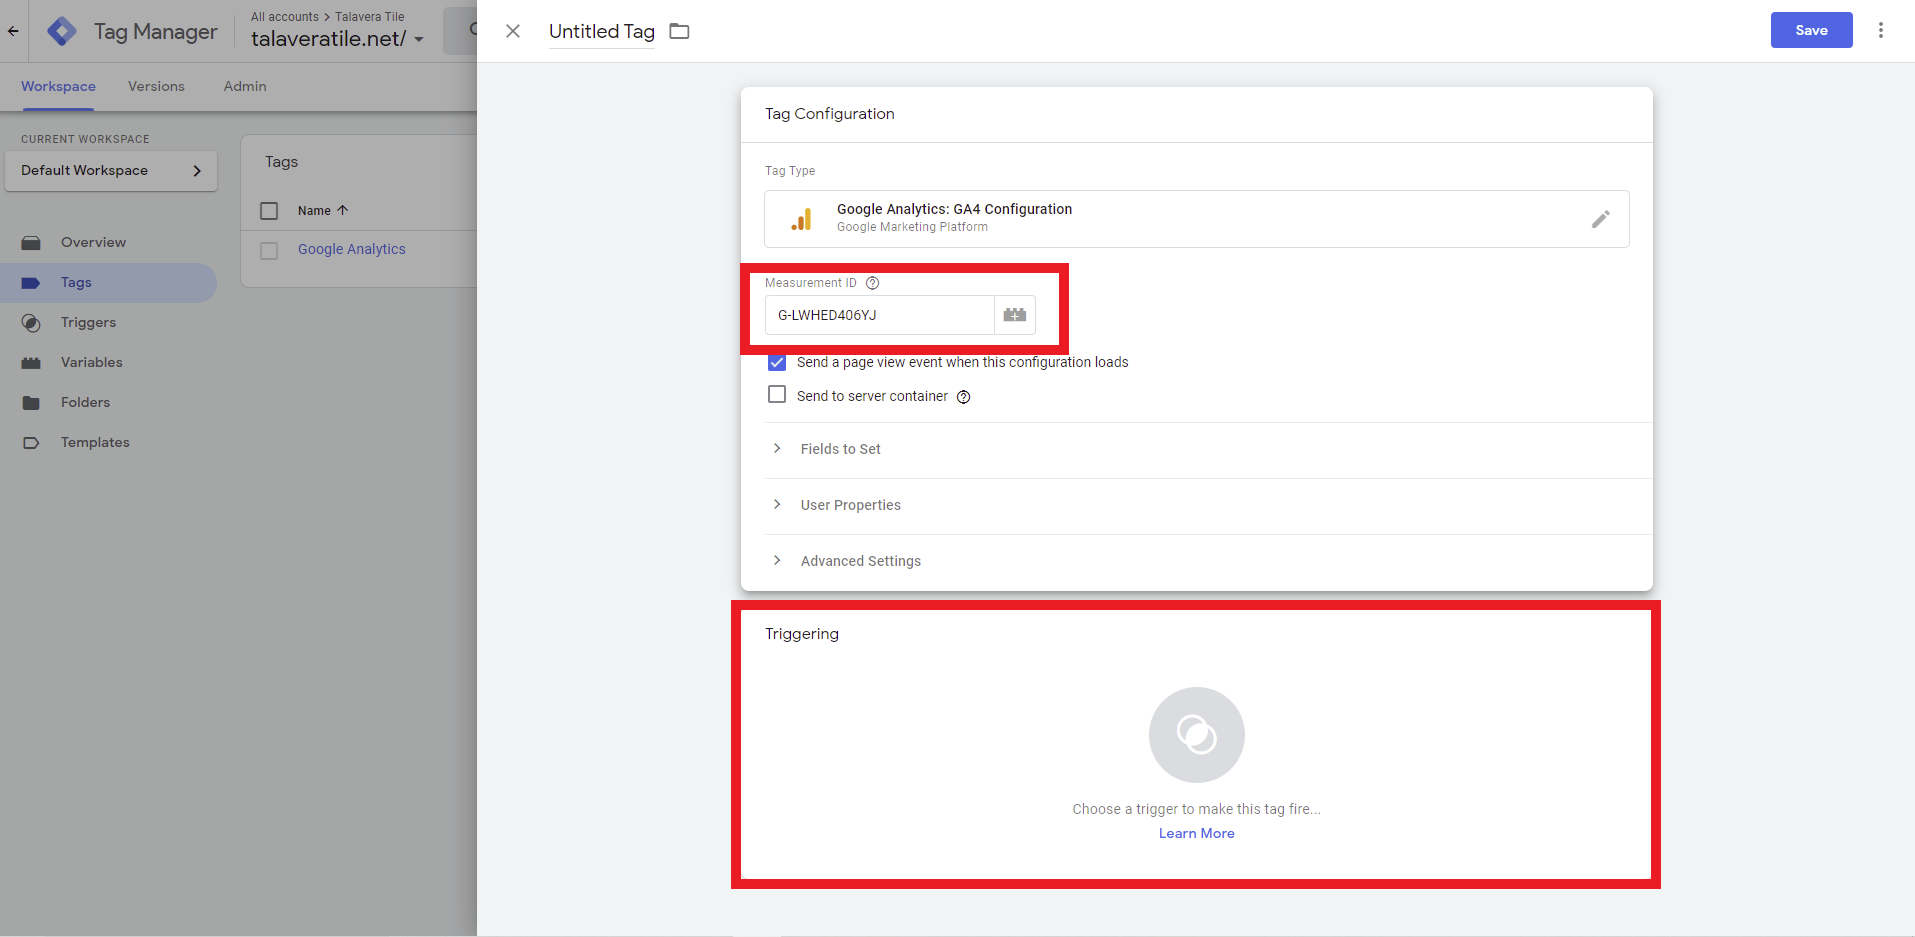
- On the Choose a Trigger screen, select the All Pages – Page View Trigger.

- Back on the tag creation screen, click the Save button, then click Save on the following popup.

Section 7.2: Google Analytics Phone & Email Conversion Tracking Tags
You will need to create a tag for each conversion action that you want to track in Google Analytics. These steps are repeatable until you have a tag for phone and email conversions.
- On the Tags screen in Google Tag Manager, click on the New button.
- On the tag creation screen, click on the Tag Configuration box.
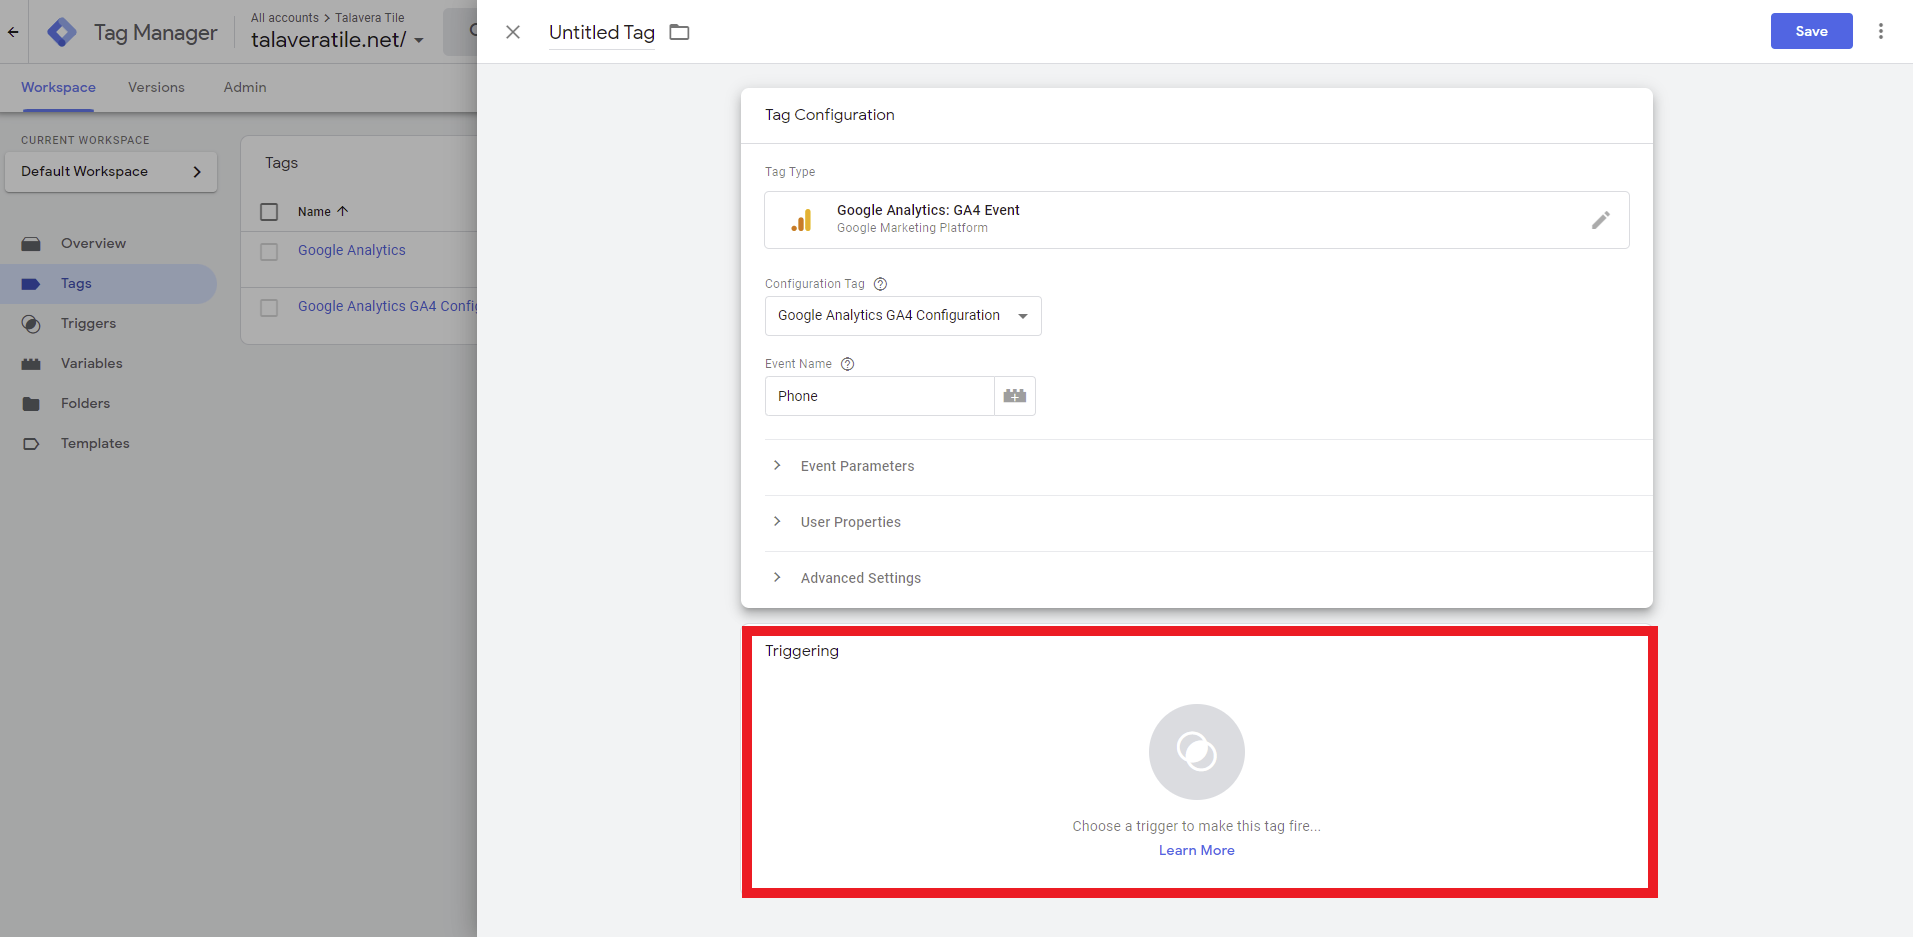
- On the Choose Tag Type menu, click on Google Analytics: GA4 Event.

- On the tag creation screen, set the configuration tag to Google Analytics GA4 Configuration. Then, enter in the Conversion name you entered in the GA4 account.
- Phone for Phone Call Conversions
- Email for Email Conversions

- Scroll down and click on the Triggering box.
- On the Choose a Trigger screen, click on the blue “+” icon in the top right corner.

- On the Trigger Creation Screen, click on the Trigger Configuration box.

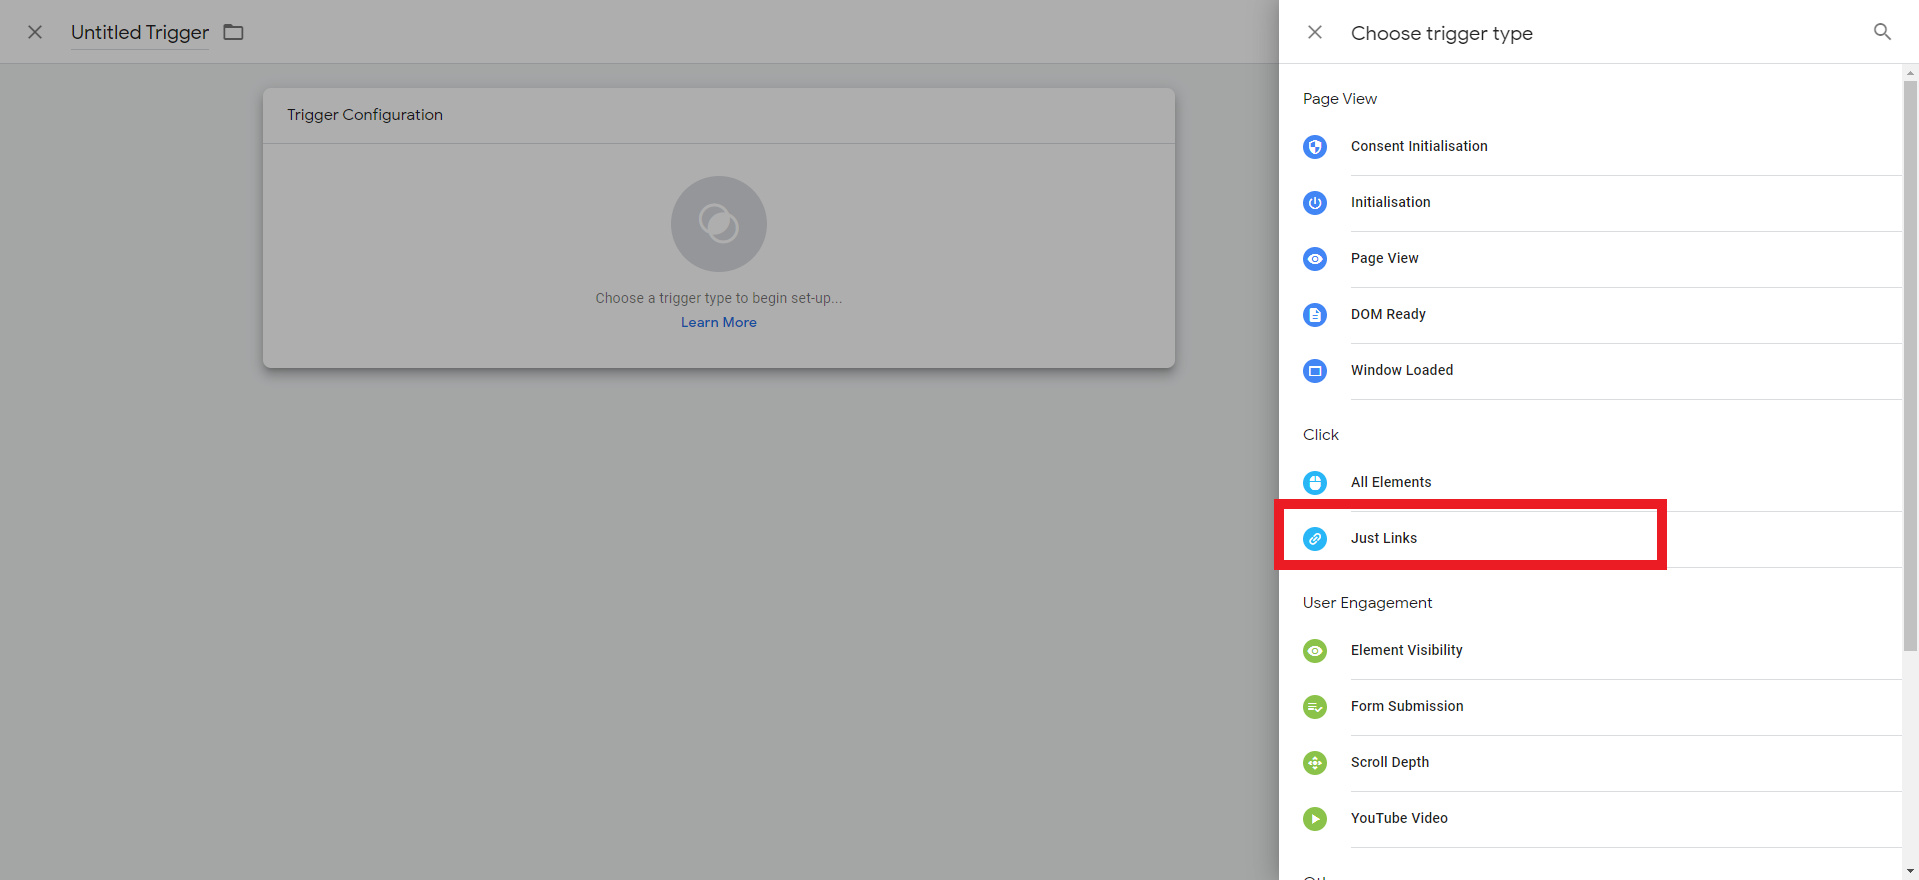
- In the Choose Trigger Type menu, select Just Links.
- On the Trigger Configuration screen, click the radio button labelled Some Link Clicks. Then click Choose Built-In Variable in the left-hand dropdown menu.

- On the Choose Built-In Variable screen, select Click URL.

- Back on the Trigger Configuration screen, select “matches RegEx” in the middle dropdown menu. Then enter the following in the text field:
- Phone Conversions – Tel:
- Email Conversions – Mailto:

- Replace the “Untitled Trigger” text with the name of the trigger, then click the Save button:
- Phone Conversions – Phone Trigger
- Email Conversions – Email Trigger

- Back on the Tag Creation screen, replace “Untitled Tag” with the name of the tag, then click the Save button:
- Phone Conversions – Phone Conversion
- Email Conversions – Email Conversion

- Repeat Steps 1 through 13 to create the other conversion tracking tag. There needs to be one tag for phone conversions, and one tag for email conversions.
Section 7.3: Google Analytics Contact Form & Newsletter Signup Conversion Tracking Tags
You won’t always need to set up a newsletter signup tag. This will outline both scenarios: Contact Form only, and Contact Form & Newsletter Signup.
- On the Tags screen in Google Tag Manager, click on the New button.
- On the tag creation screen, click on the Tag Configuration box
- On the Choose Tag Type menu, click on Google Analytics: GA4 Event.
- On the tag creation screen, set the configuration tag to Google Analytics GA4 Configuration. Then, enter in the Conversion name you entered in the GA4 account.
- ContactForm for Contact Form Submissions
- Newsletter for Newsletter Signups

- Scroll down and click on the Triggering box.
- On the Choose a Trigger screen, click on the blue “+” icon in the top right corner.
- On the Trigger Creation Screen, click on the Trigger Configuration box.
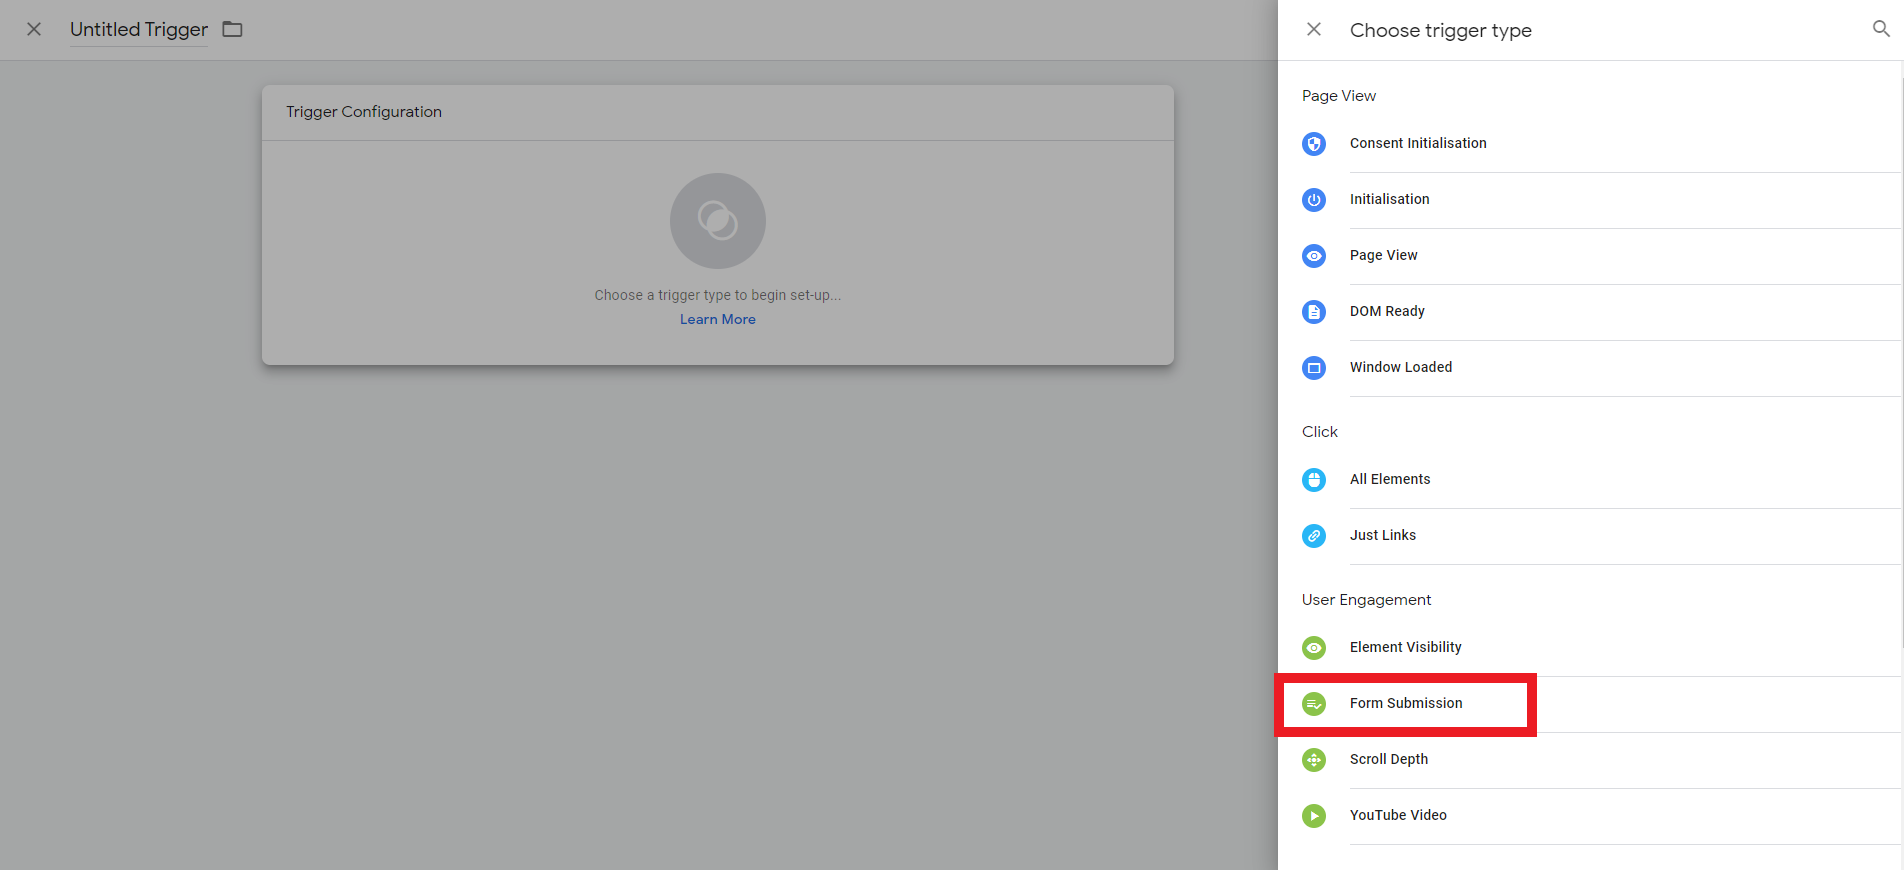
- In the Choose Trigger Type menu, select Form Submission.
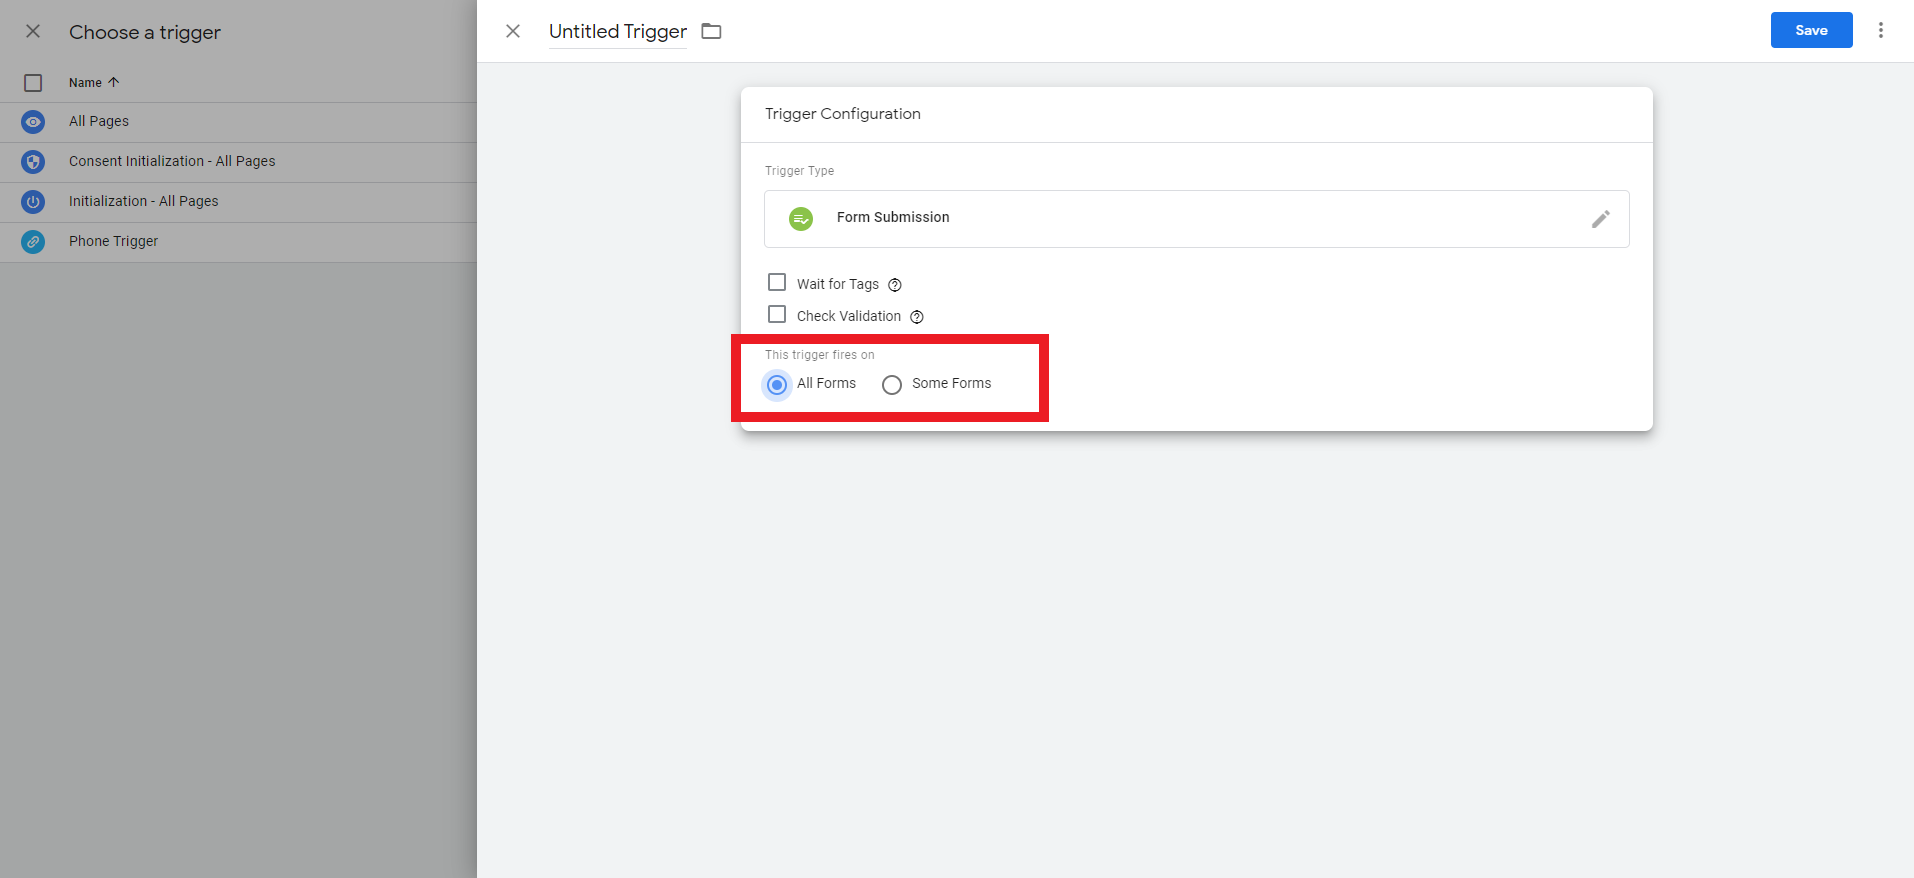
- Back on the Trigger Configuration screen, select the trigger firing setting:
- If you are only tracking contact form submissions: All forms
- If you’re tracking newsletter signups and contact form submissions: Some forms
NOTE: If you are planning to track newsletter signups, you will need to complete some additional steps. If this is the case, skip section 7.3A and follow section 7.3B.
Section 7.3A: If You Are Only Tracking Contact Form Conversions
- Click the Save button and then click Save again in the popup that follows.

- Back on the Tag Creation screen, replace “Untitled Tag” with “Contact Form Conversion” then click the Save button.
Section 7.3B: If You Are Tracking Contact Form Conversions & Newsletter Signups
- On the Trigger Configuration Screen, select Choose Built-In Variable in the left-hand dropdown menu.

- On the Choose Built-In Variable screen, select Form ID.

- Back on the Trigger Configuration Screen, set the middle dropdown menu to Does Not Equal.

- Switch over to a browser tab with the client’s website open. Find the newsletter signup form, right click on the first text field on the form, then click Inspect.

- In the Console that opens up, look for a tag that starts with “<form” and look for the ID=“[formID]” element within that tag.

- Back on the Trigger Configuration screen, enter the form ID that you found on the Newsletter Signup form in Step 13 into the text field.

- Replace “Untitled Trigger” with “Contact Form Trigger” then click the Save button.

- Back on the Tag Creation screen, replace “Untitled Tag” with “Contact Form Conversion” then click the Save button.

- Repeat steps 1-17 from this section with the following differences to create the Newsletter Signup Tracking Tag:
-
- In Step 4, enter the Category and Action you set in the Google Analytics Goal for Newsletter Signups instead of Contact Form Conversions.
- In Step 10, select Form ID from the dropdown menu.

- In Step 12, set the field to Equals.

- In Step 16, replace “Untitled Trigger” with “Newsletter Trigger” then click the Save button.
- Back on the Tag Creation screen, replace Untitled Tag with “Newsletter Signup” then click the Save button.

- In Step 4, enter the Category and Action you set in the Google Analytics Goal for Newsletter Signups instead of Contact Form Conversions.
-
Section 8: Testing Conversions in Universal Analytics
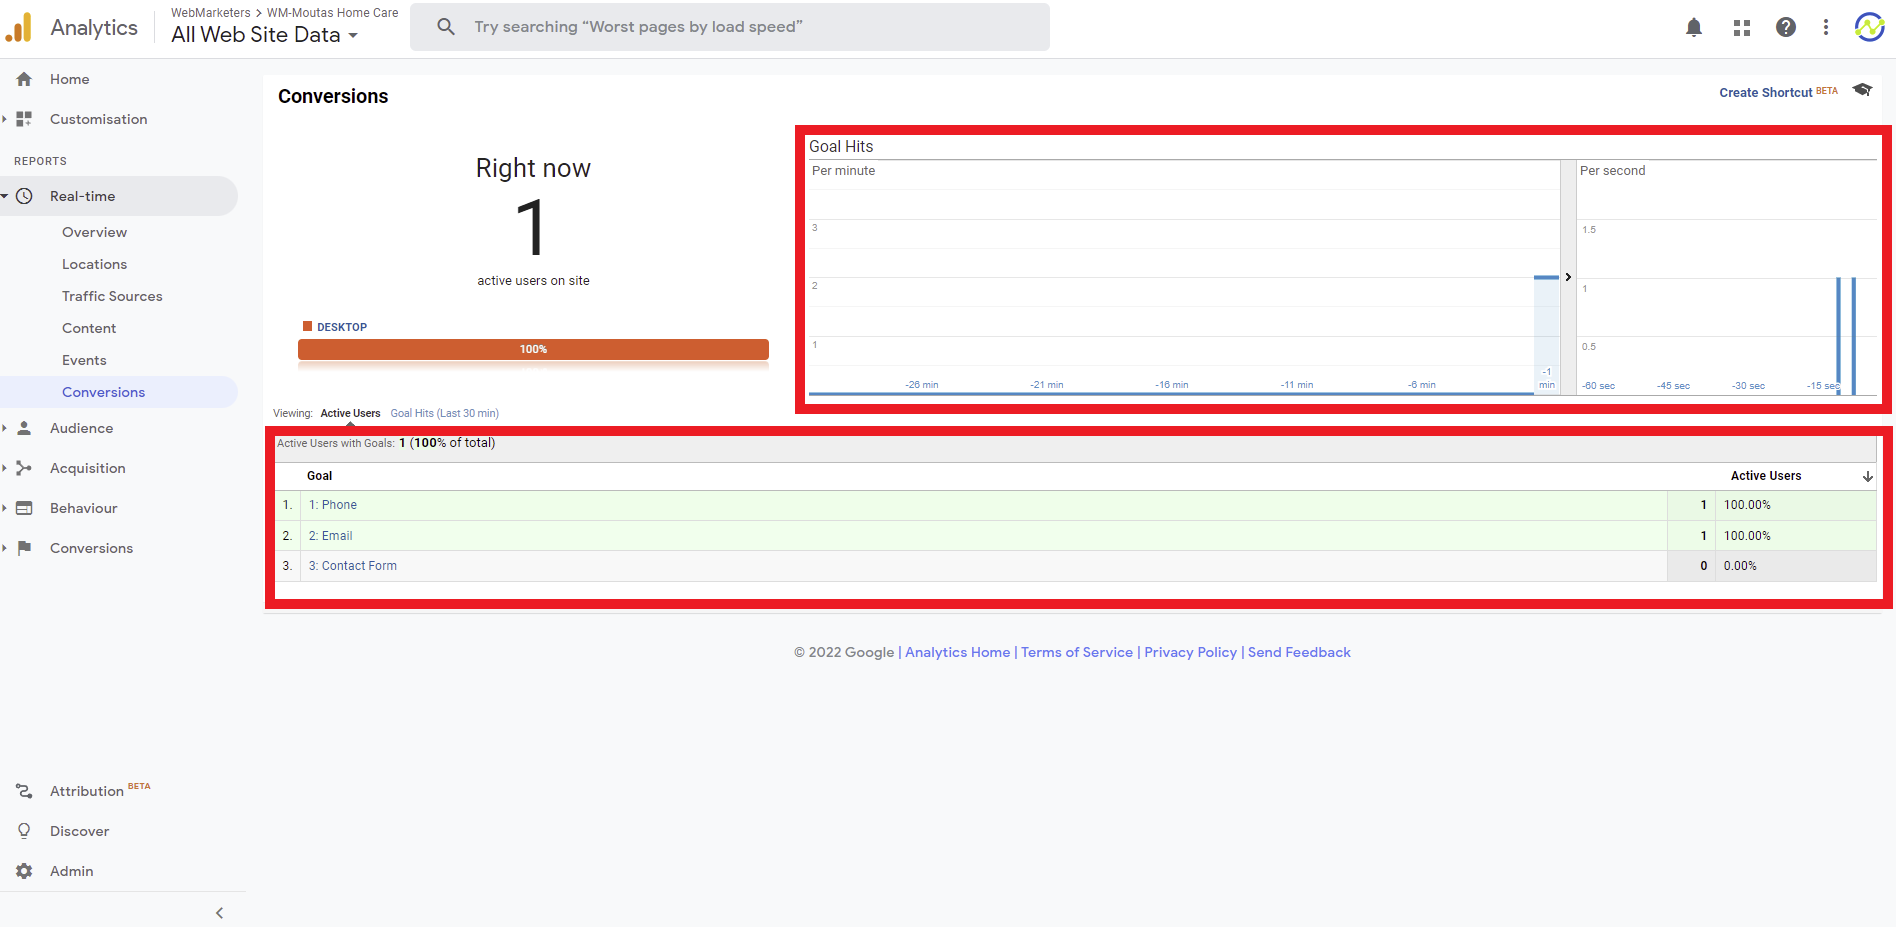
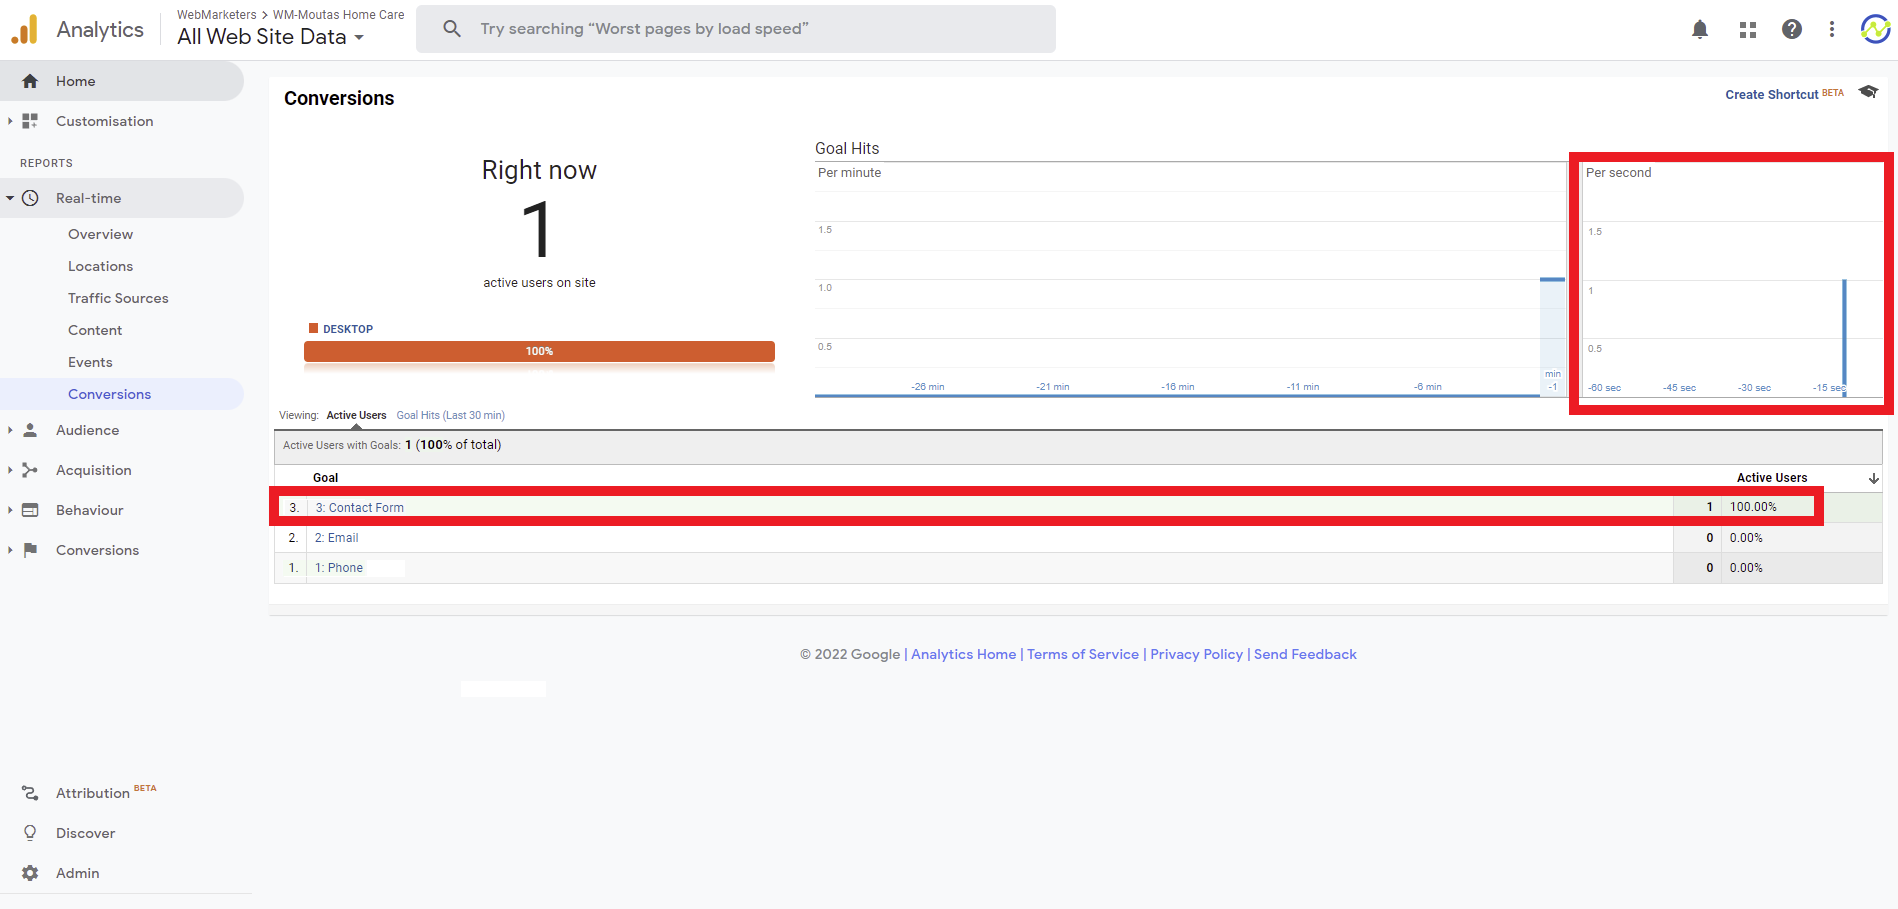
- In the Google Analytics account, select Real-Time in the left-hand menu, then select Conversions.

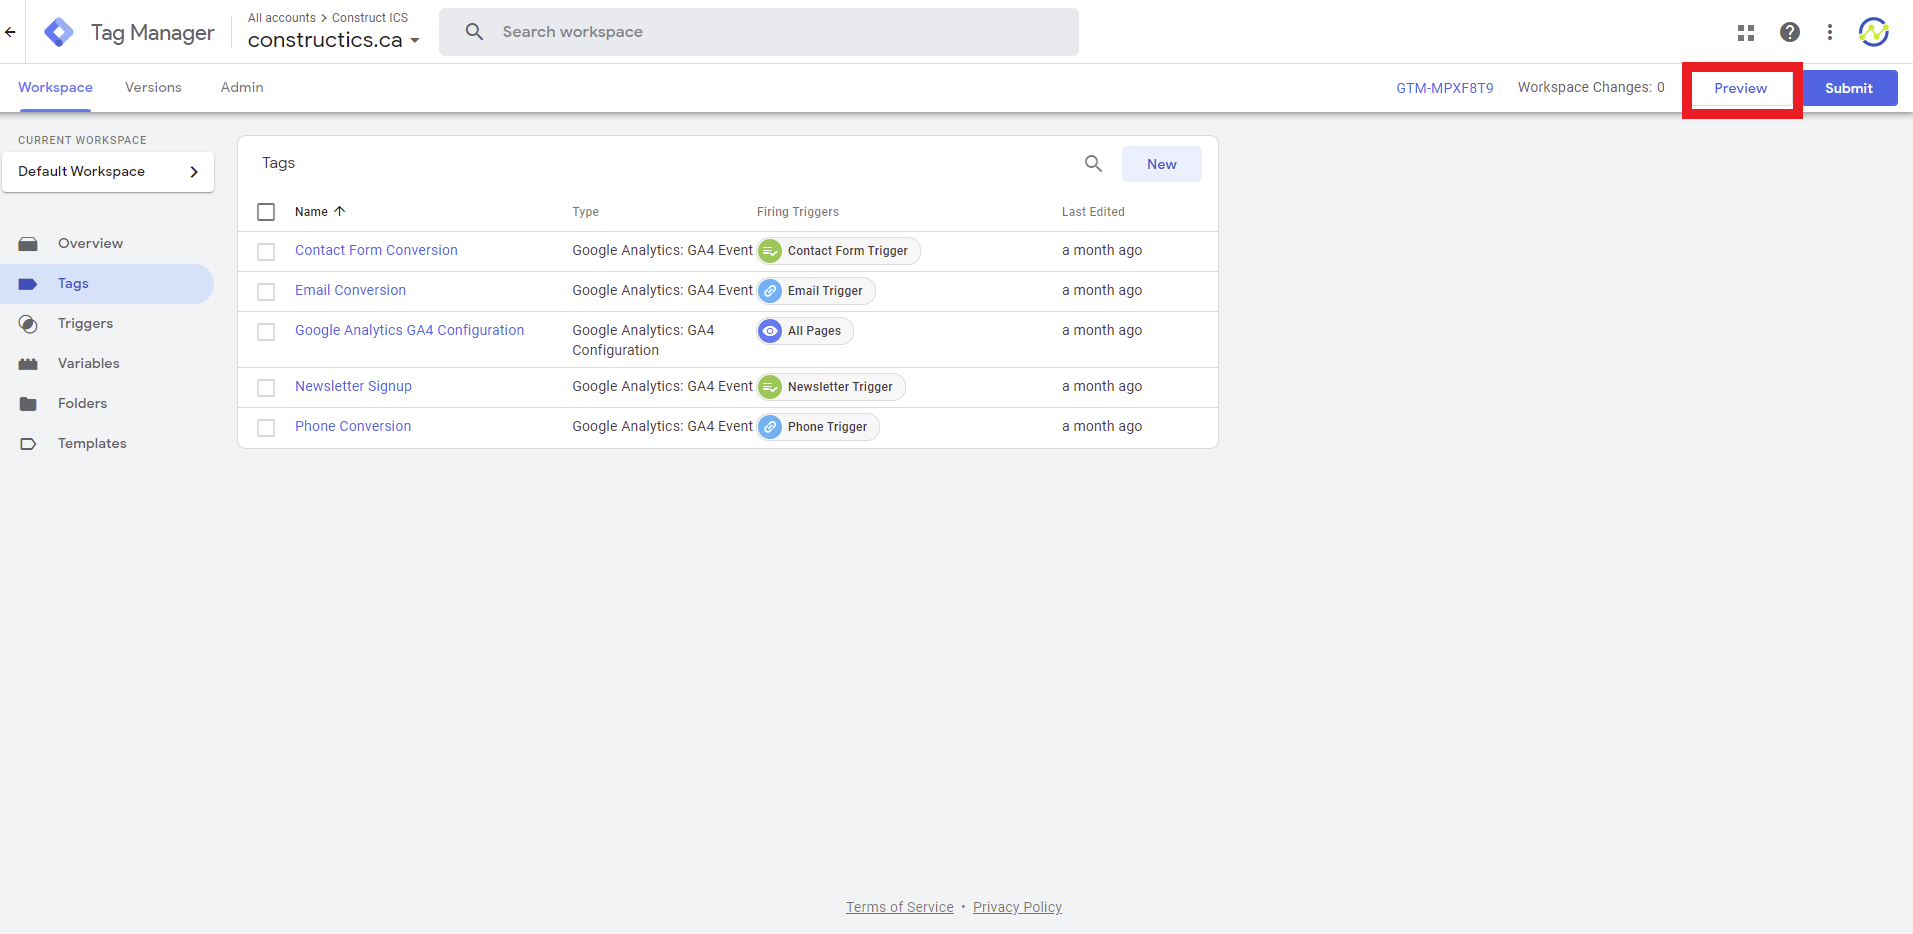
- Switch to the browser tab with Google Tag Manager open, then click the Preview button in the top right corner of the screen.

- In the Tag Assistant browser tab that opens up, enter the client website URL into the Your Website’s URL field, then click the Connect button.

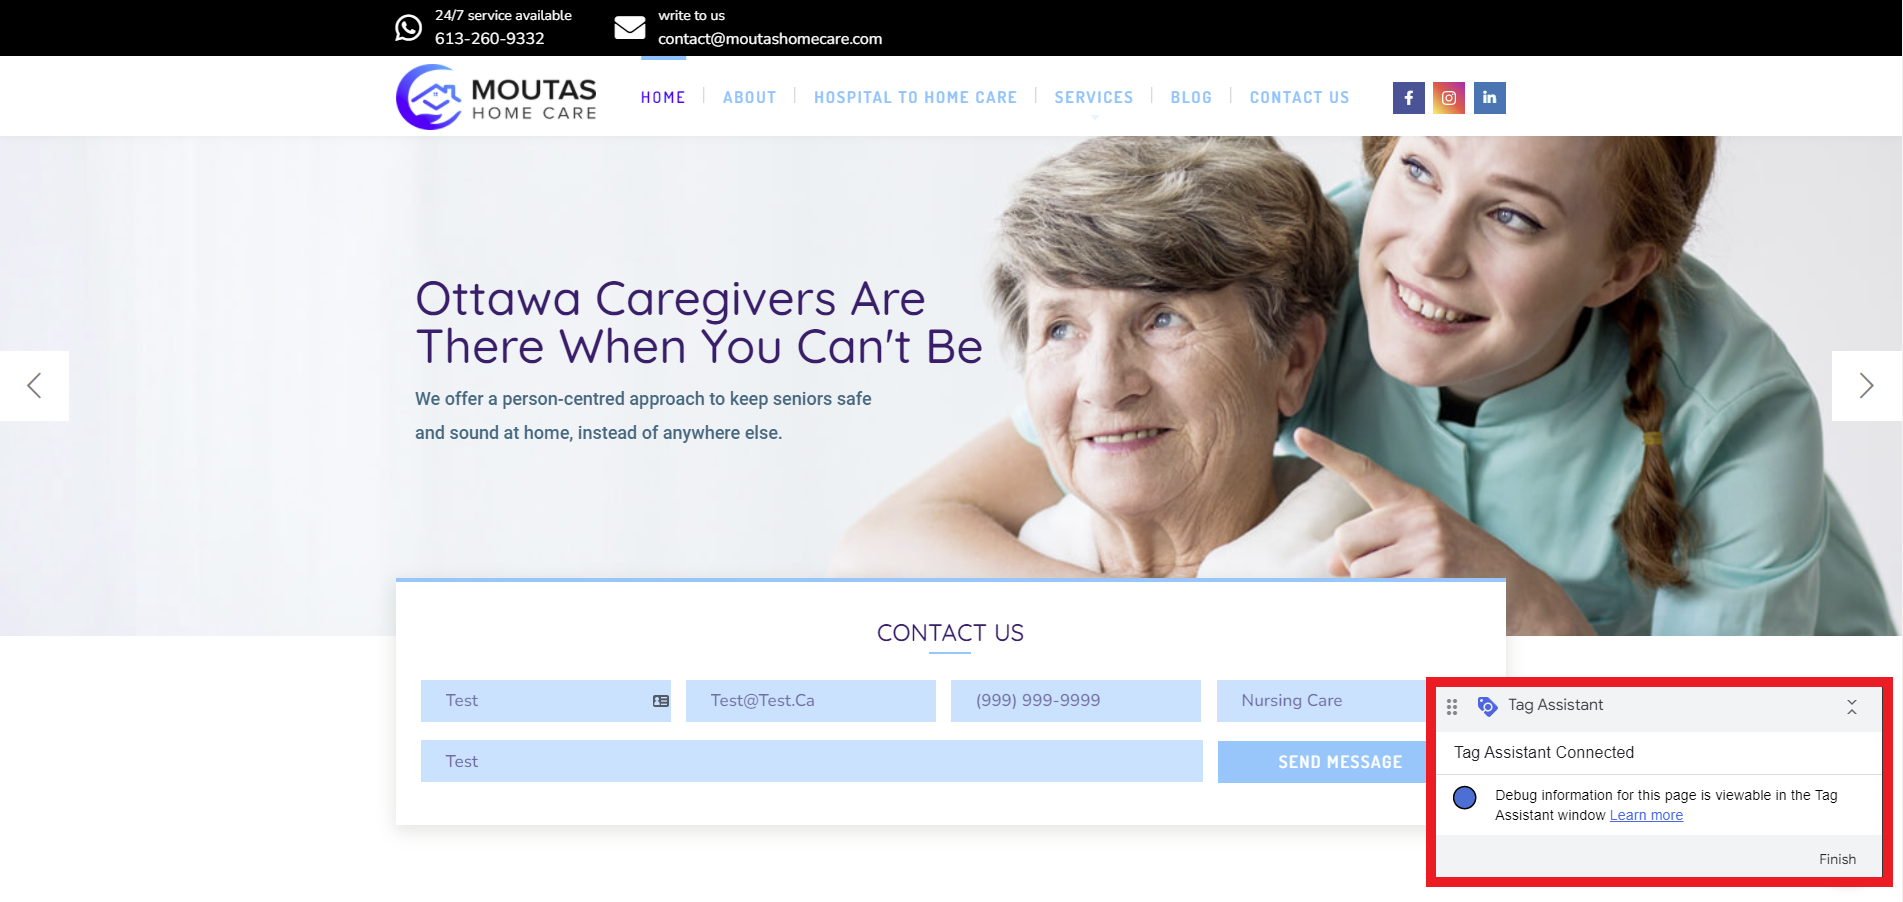
- Once the client’s website opens in a new browser tab, check the Tag Assistant popup in the bottom right corner of the screen to see if tag assistant is connected.
NOTE: If tag assistant fails to connect, check and make sure you have the Google Tag Assistant (Legacy) Chrome Extension installed, and that it is active.
Section 8.1: Testing Phone & Email Conversions
- On the client’s website tab that is connected to Tag Assistant, click on any email address and phone number link.

- Switch your browser tab to the Tag Assistant tab and check to see if the conversion tracking tags have fired correctly. You should see 3 tags have fired:
- Google Analytics Universal Analytics (Traffic Tracking Tag)
- Phone Conversion Tag
- Email Conversion Tag

NOTE: If a tag did not fire, it means that there was an error in setting up the tag. Review your configuration of the tag that didn’t fire, then restart this process from Step 2 in Section 8.
- Switch your browser tab to the Google Analytics account and check to see if the Phone & Email conversions registered there. If the conversions appear, then move on to the next section.
Section 8.2: Testing Contact Form & Newsletter Signup Conversions
Before you test Contact Form & Newsletter Signup Conversions, you will need to change the form settings to send the notification email to your work email. This is so you can confirm that the form works properly, and the client doesn’t receive spam email while you are testing.
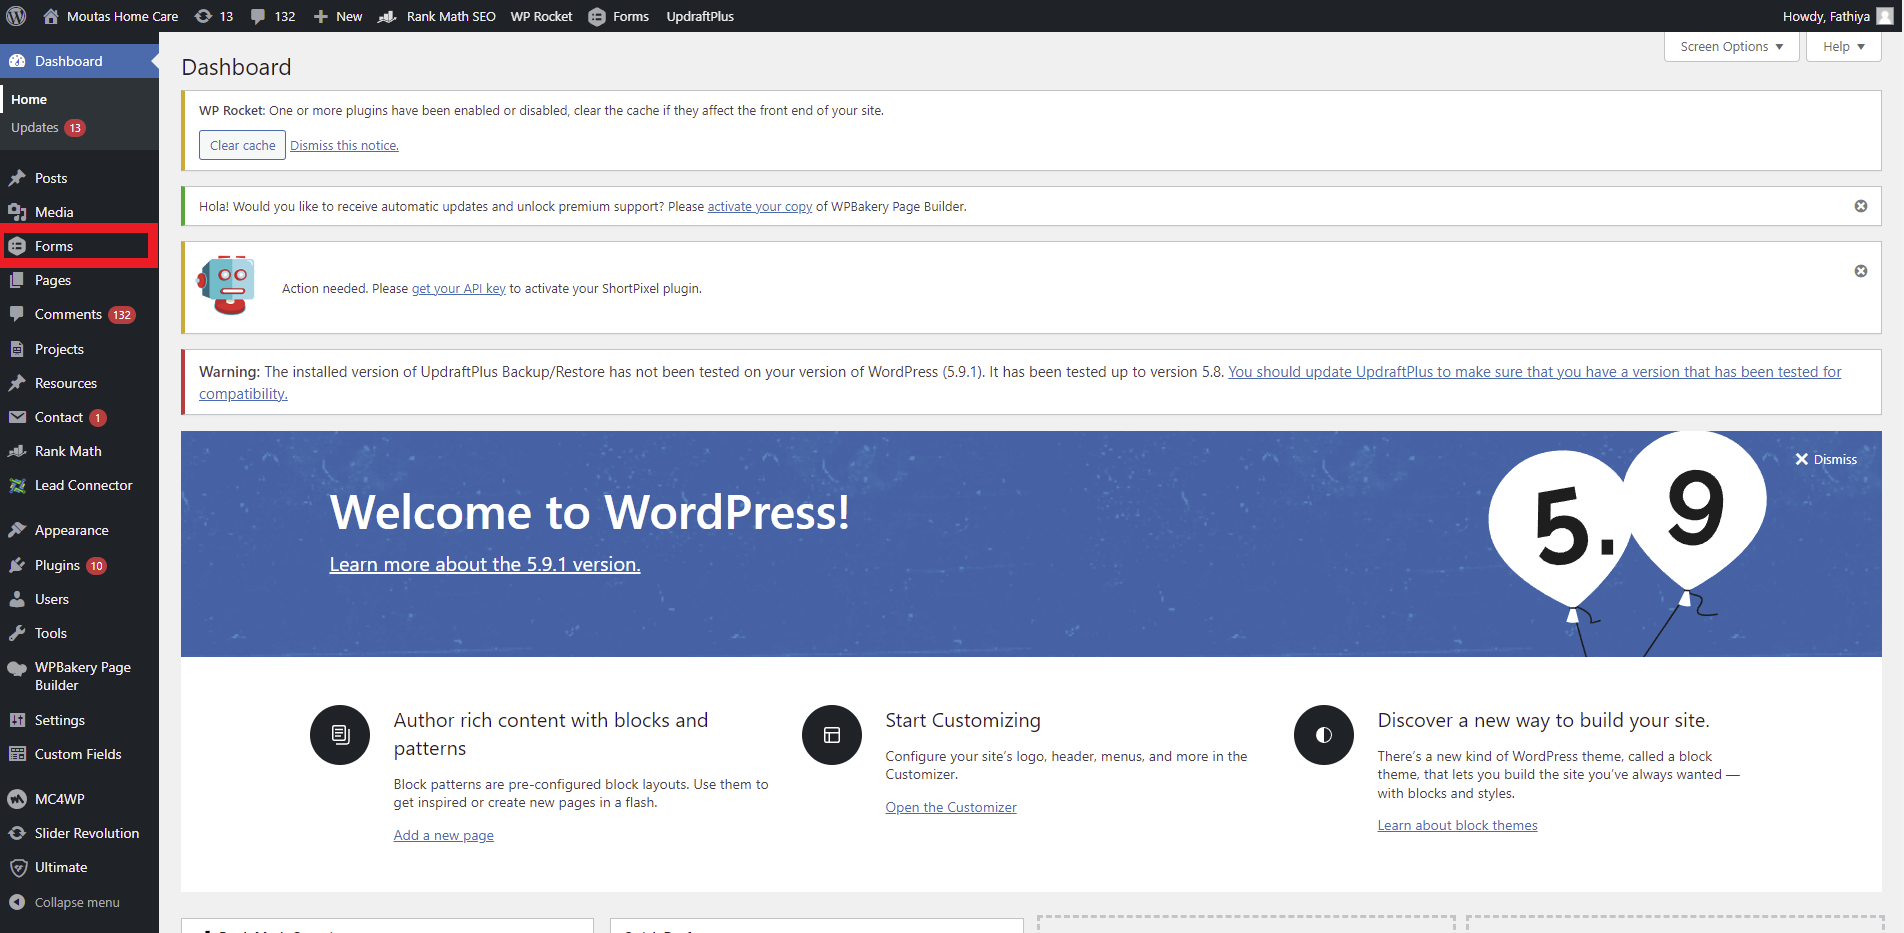
- In a new browser tab, sign into the client’s WordPress. In the dashboard, click on Forms in the left-hand menu.
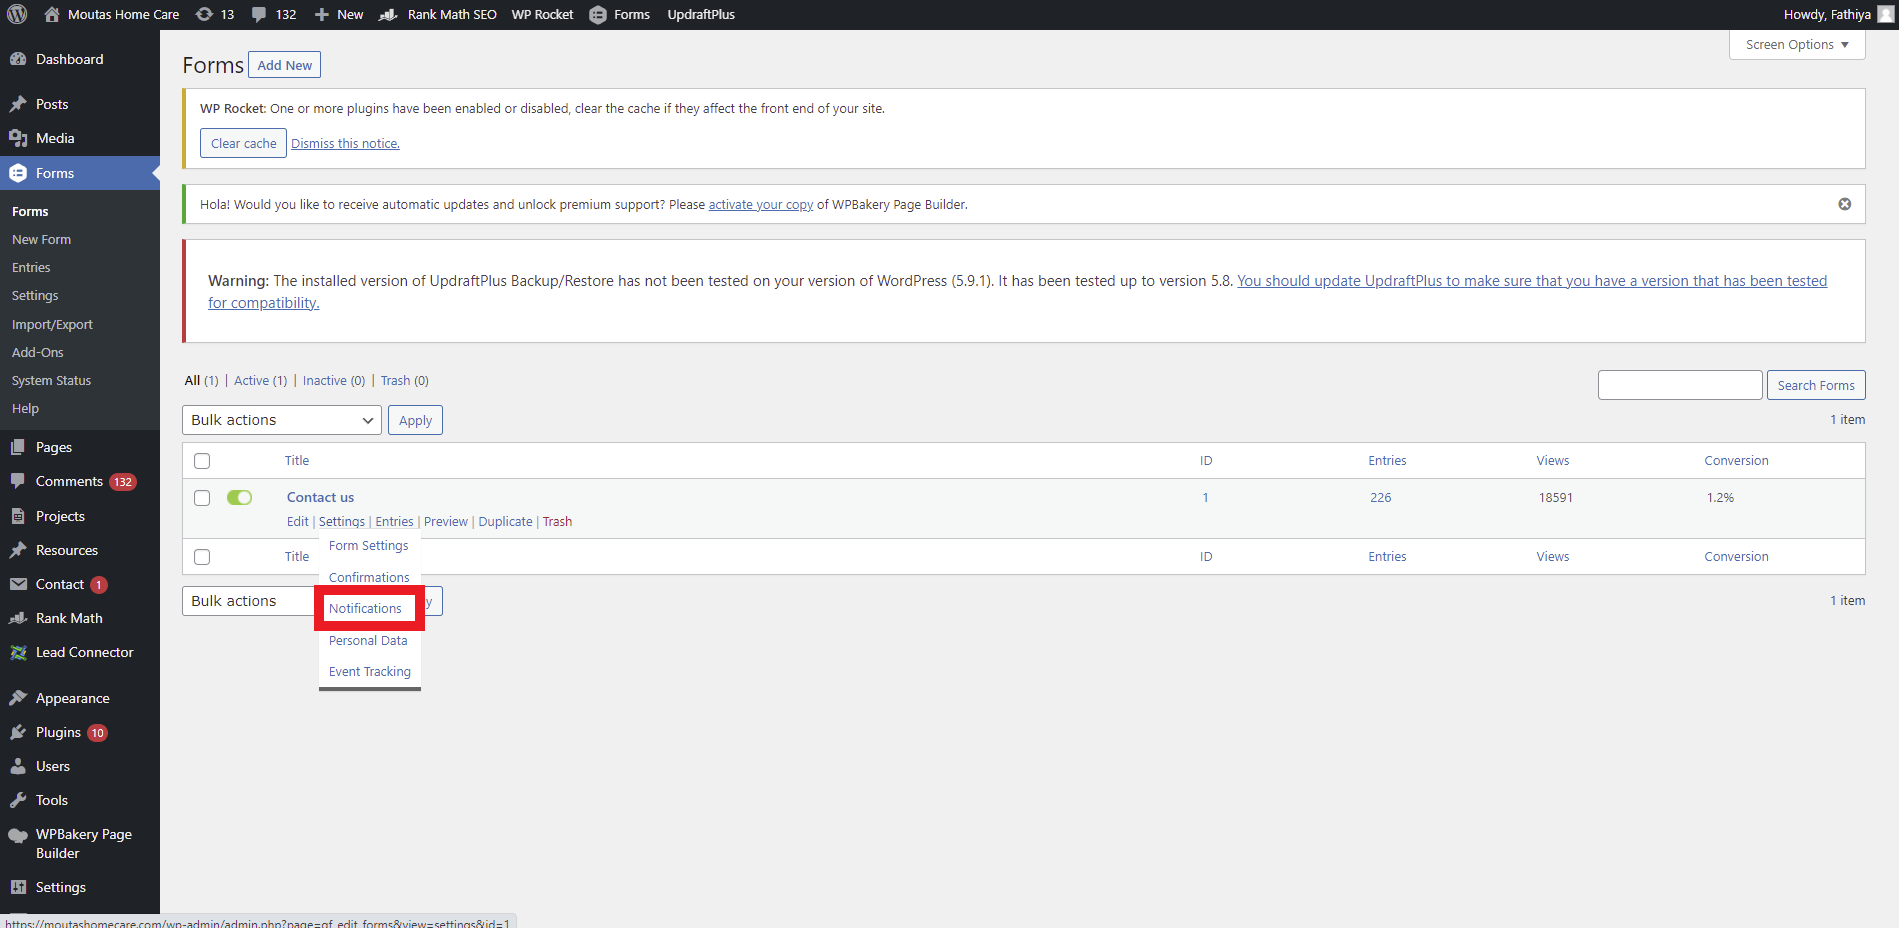
- Select the form you wish to use for testing. Then hove over Settings, then click Notifications.
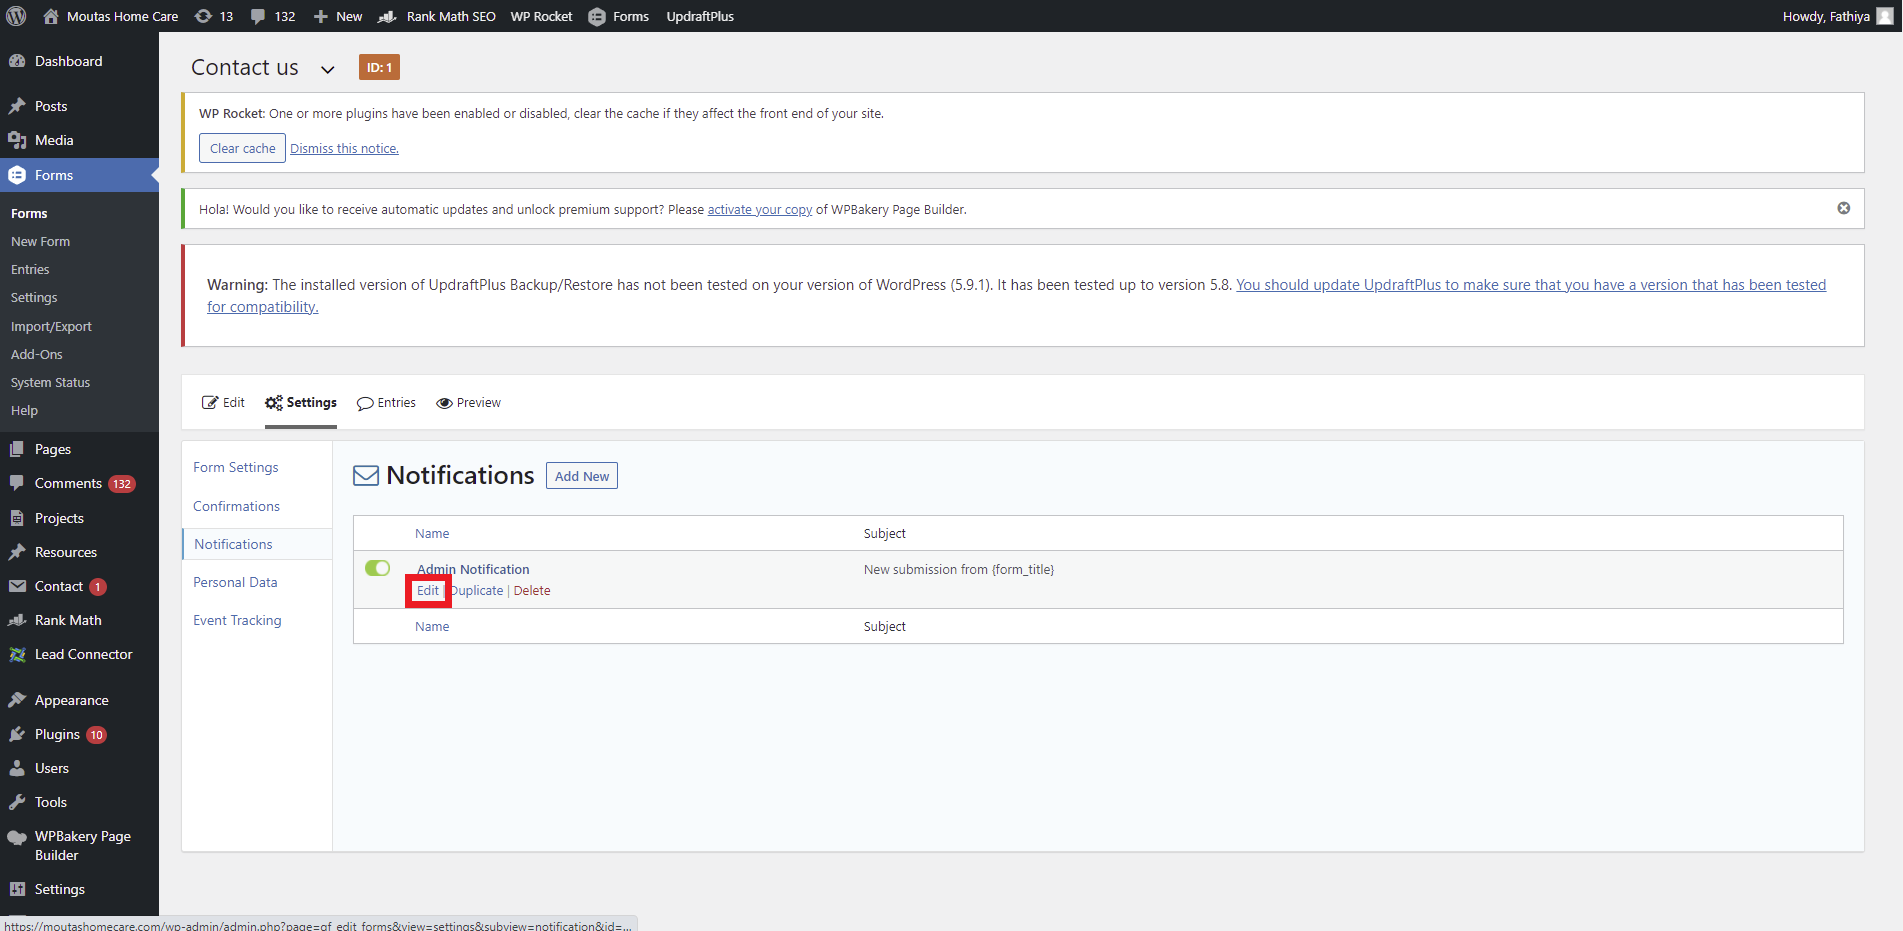
- On the Notifications screen, hover over the Admin Notification and click Edit.
- On the Admin Notification Edit screen, cut the Send to Email, paste it in a blank document, then enter your work email address in the Send to Email field.

- Scroll down and click the Update Notification button.

- Switch to the browser tab with the client’s website open that is connected to Tag Assistant and refresh the page. Then find the form you changed the notification for, fill it out and submit it.

- Switch over to the Tag Assistant and check to see if the Contact Form Conversion tag fired properly.

NOTE: If the conversion tracking tag did not fire, then there was an error made when setting up the tag. Review the tag settings, make necessary changes, restart the Tag Assistant (Step 2 in Section 8), then submit the form again. - Switch over to the Google Analytics Browser tab and check that the Contact Form goal is registered.
- Return to the browser tab with the Form Notification edit screen open, replace the email address in the Send to Email field with the orginal email that was there, then click the Update Notification Button.
- Repeat steps 2-9 using the newsletter signup form to test that conversion.
Section 9: Testing Conversions in Google Analytics 4
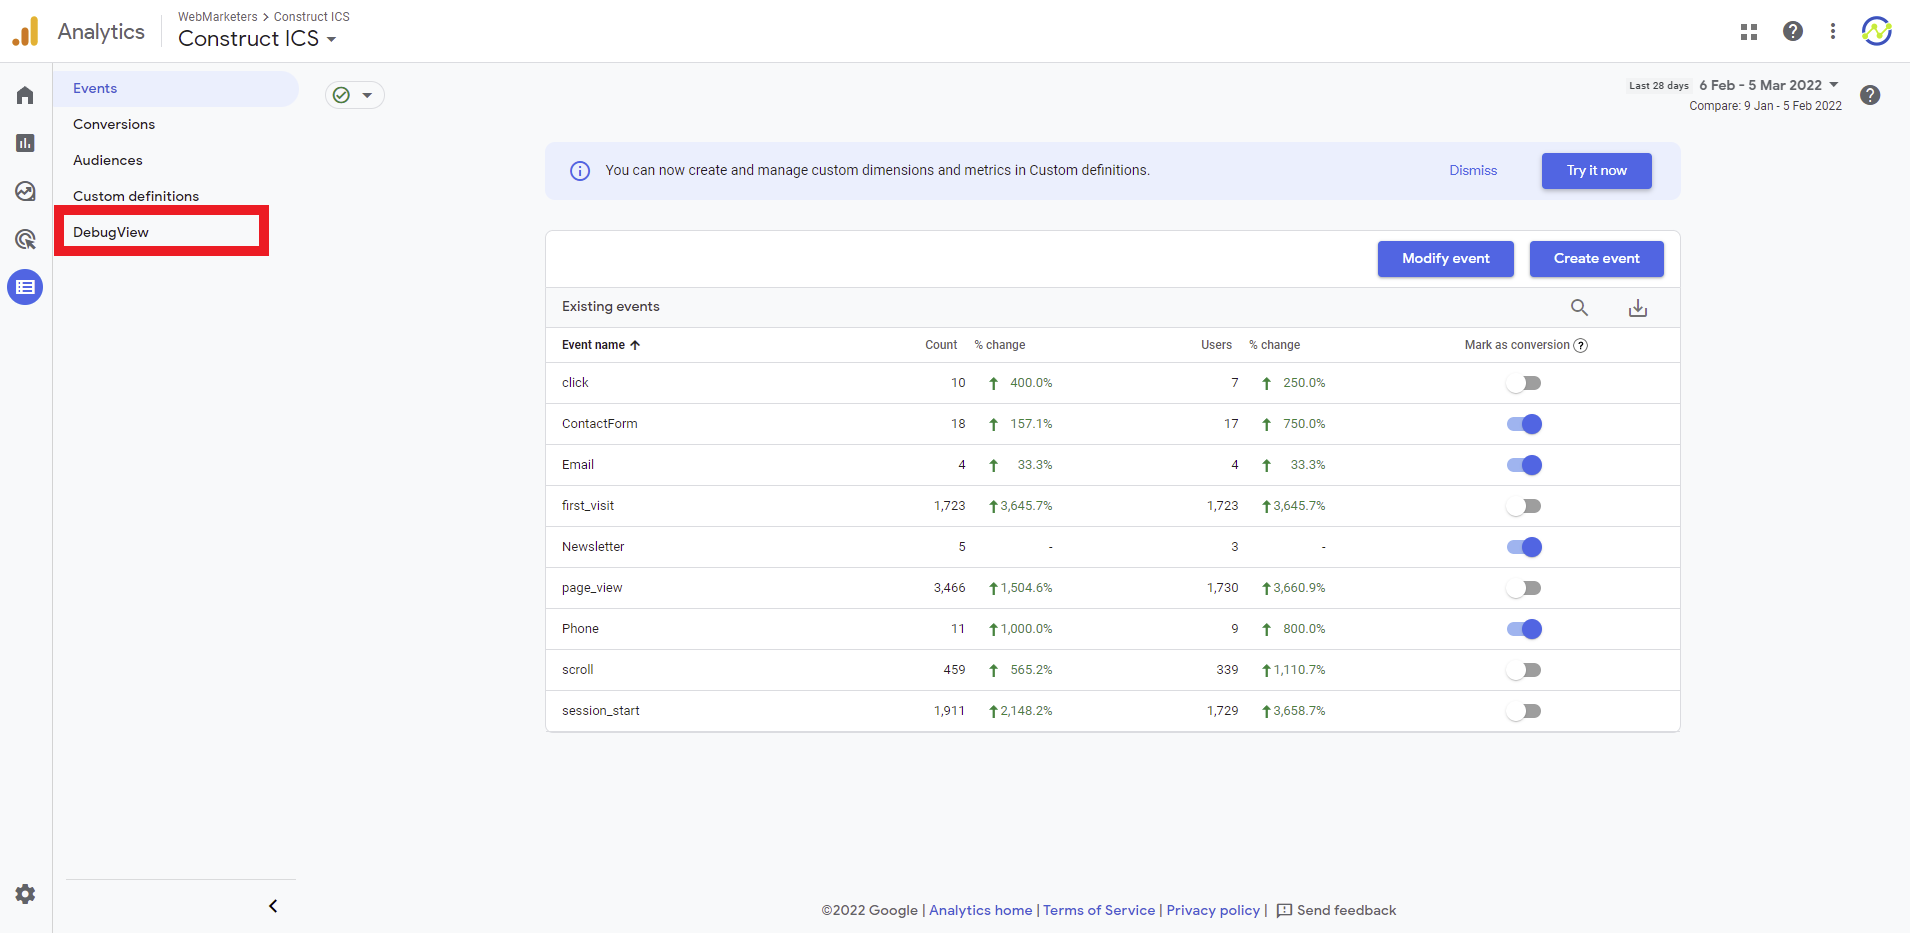
- In the Google Analytics account, select Configure in the left-hand menu, then select Conversions.
- On the Configure screen, select DebugView in the left-hand menu.
- Switch to the browser tab with Google Tag Manager open, then click the Preview button in the top right corner of the screen.
- In the Tag Assistant browser tab that opens up, enter the client website URL into the Your Website’s URL field, then click the Connect button.

- Once the client’s website opens in a new browser tab, check the Tag Assistant popup in the bottom right corner of the screen to see if tag assistant is connected.

NOTE: If tag assistant fails to connect, check and make sure you have the Google Tag Assistant (Legacy) Chrome Extension installed, and that it is active.
Section 9.1: Testing Phone & Email Conversions
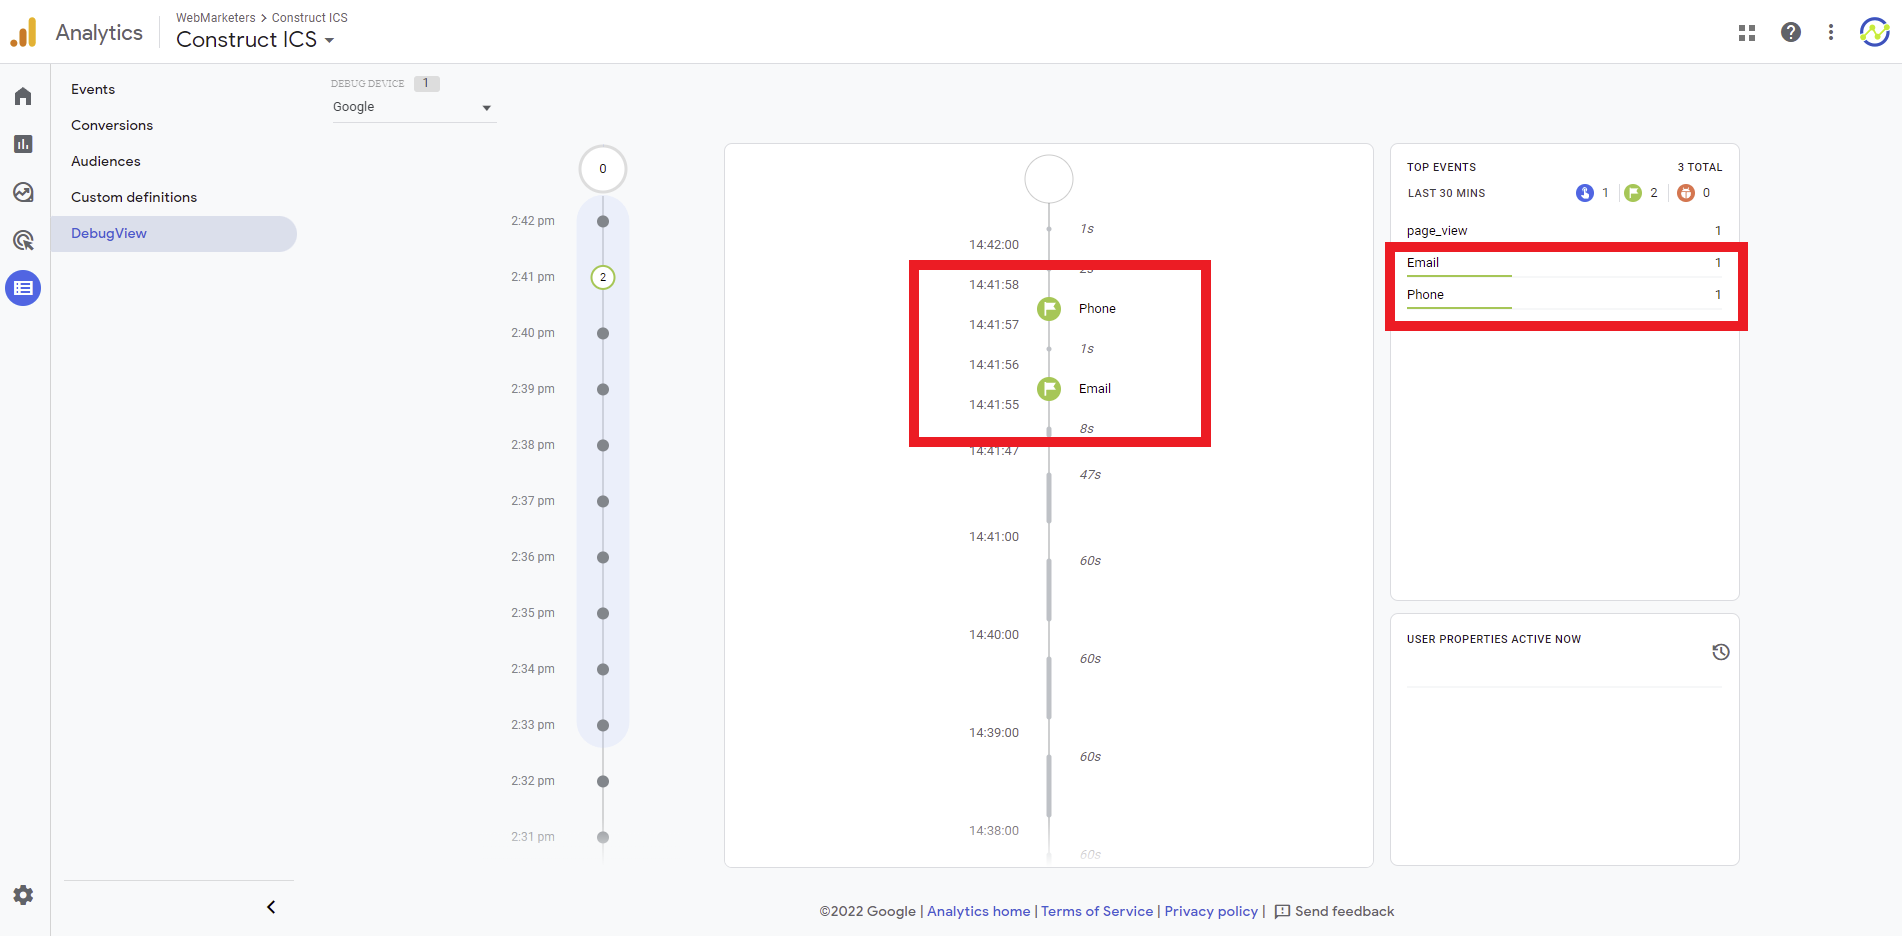
- On the client’s website tab that is connected to Tag Assistant, click on any email address and phone number link.

- Switch your browser tab to the Tag Assistant tab and check to see if the the conversion tracking tags have fired correctly. You should see 3 tags have fired:
- Google Analytics Universal Analytics (Traffic Tracking Tag)
- Phone Conversion Tag
- Email Conversion Tag
NOTE: If a tag did not fire, it means that there was an error in setting up the tag. Review your configuration of the tag that didn’t fire, then restart this process from Step 2 in Section 8.
- Switch your browser tab to the Google Analytics account and check to see if the Phone & Email conversions registered in DebugView. If the conversions appear, then move on to the next section.
Section 9.2: Testing Contact Form & Newsletter Signup Conversions
Before you test Contact Form & Newsletter Signup Conversions, you will need to change the form settings to send the notification email to your work email. This is so you can confirm that the form works properly, and the client doesn’t receive spam email while you are testing.
- In a new browser tab, sign into the client’s WordPress. In the dashboard, click on Forms in the left-hand menu.
- Select the form you wish to use for testing. Then hove over Settings, then click Notifications.
- On the Notifications screen, hover over the Admin Notification and click Edit.
- On the Admin Notification Edit screen, cut the Send to Email, paste it in a blank document, then enter your work email address in the Send to Email field.
- Scroll down and click the Update Notification button.
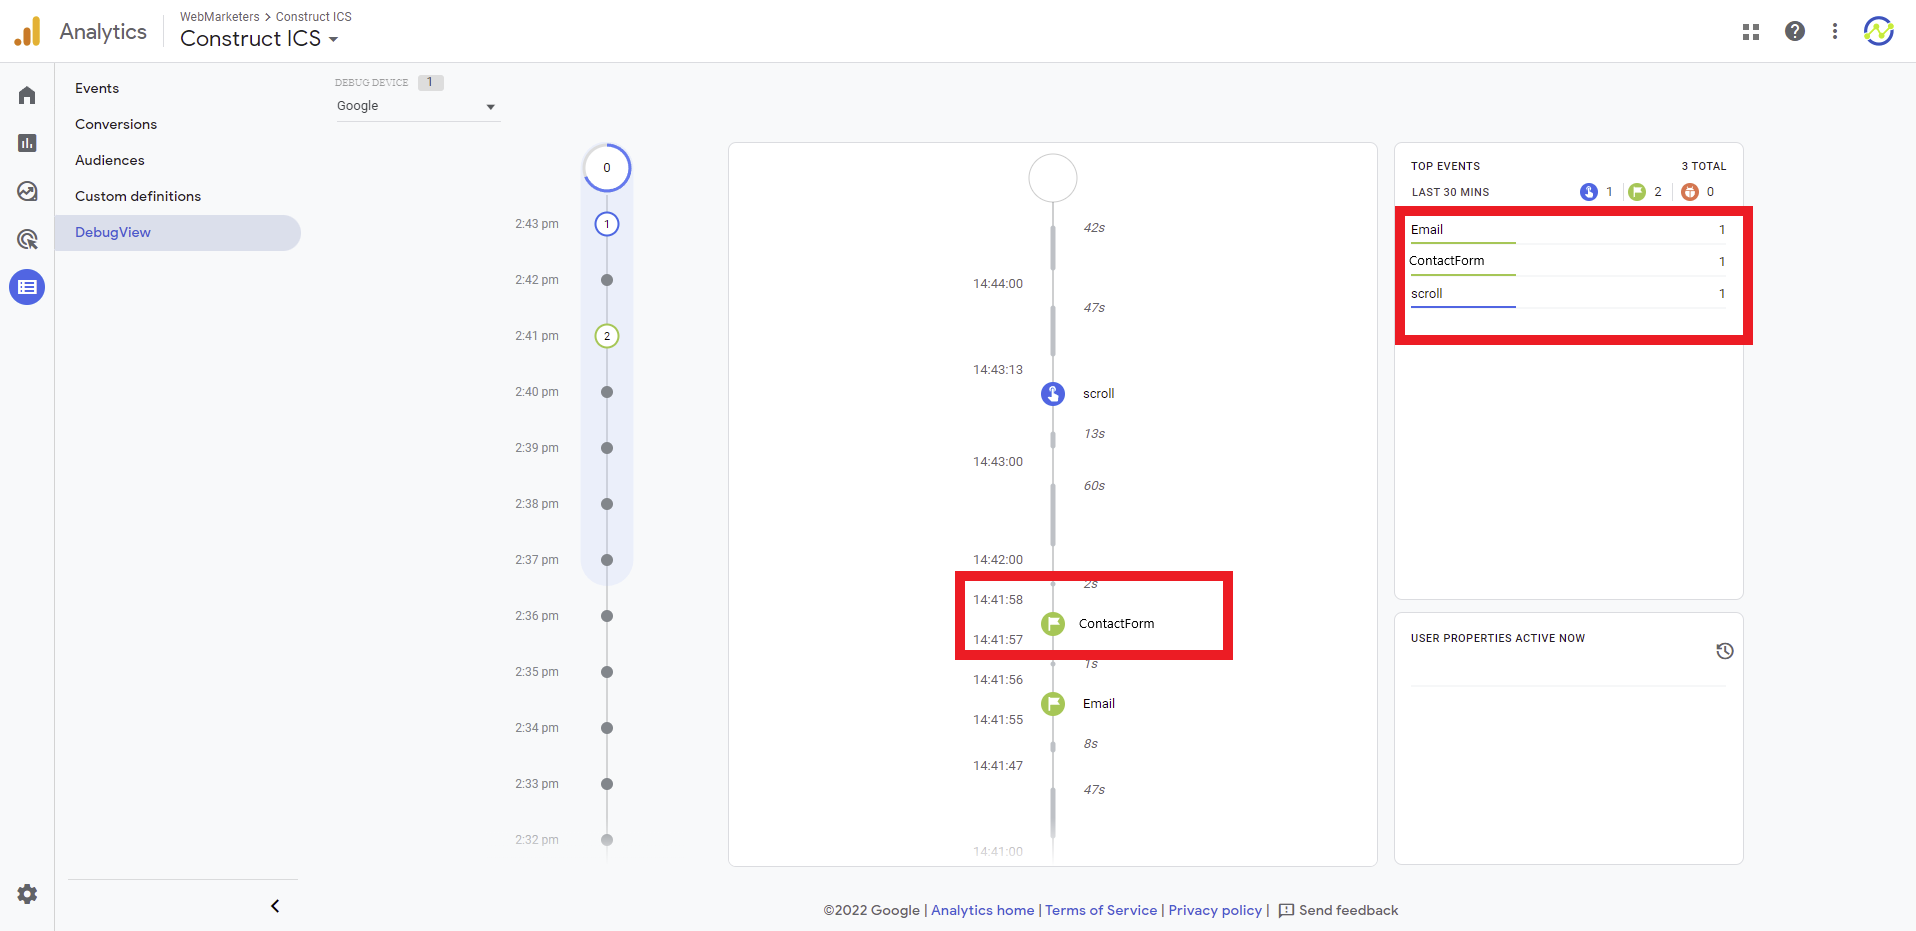
- Switch to the browser tab with the client’s website open that is connected to Tag Assistant and refresh the page. Then find the form you changed the notification for, fill it out and submit it.
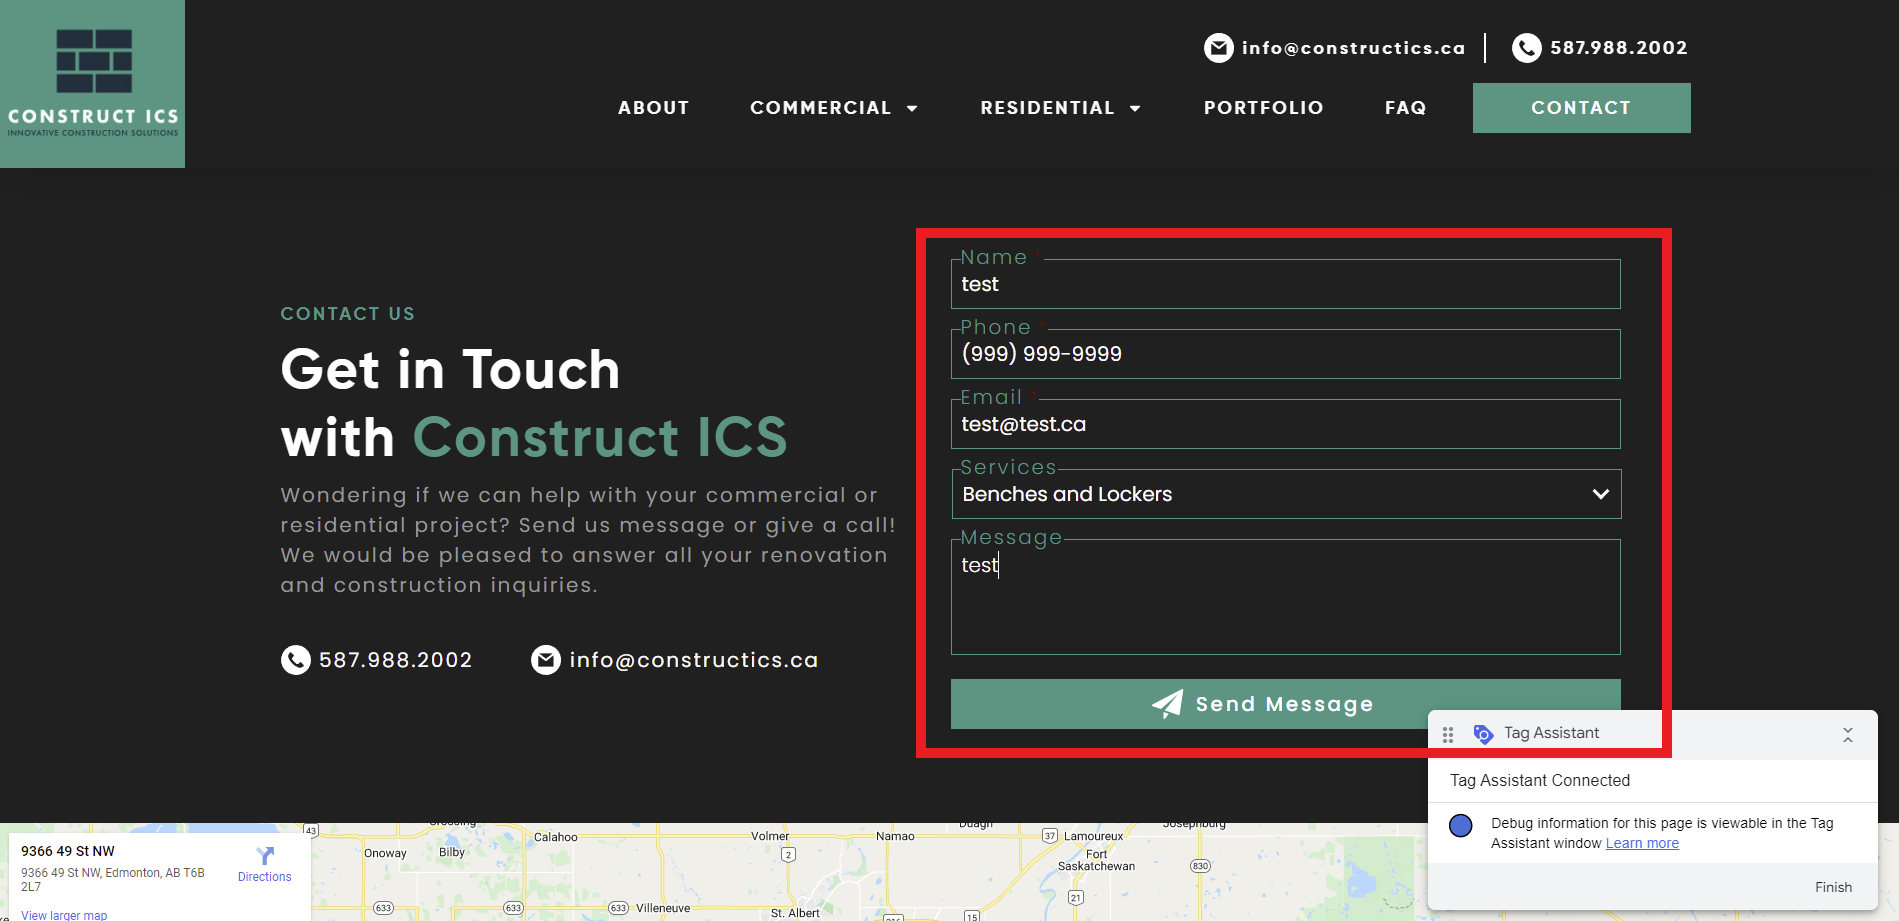
- Switch over to the Tag Assistant and check to see if the Contact Form Conversion tag fired properly.
NOTE: If the conversion tracking tag did not fire, then there was an error made when setting up the tag. Review the tag settings, make necessary changes, restart the Tag Assistant (Step 2 in Section 8), then submit the form again. - Switch over to the Google Analytics Browser tab and check that the Contact Form goal registered in DebugView.
- Return to the browser tab with the Form Notification edit screen open, replace the email address in the Send to Email field with the orginal email that was there, then click the Update Notification Button.
- Repeat steps 2-9 using the newsletter signup form to test that conversion.
Section 10: Publishing the Google Tag Manager Container
Once you have tested your conversion tracking and confirmed that all conversions are being tracked properly, all that is left to do is publish the Google Tag Manager Container.
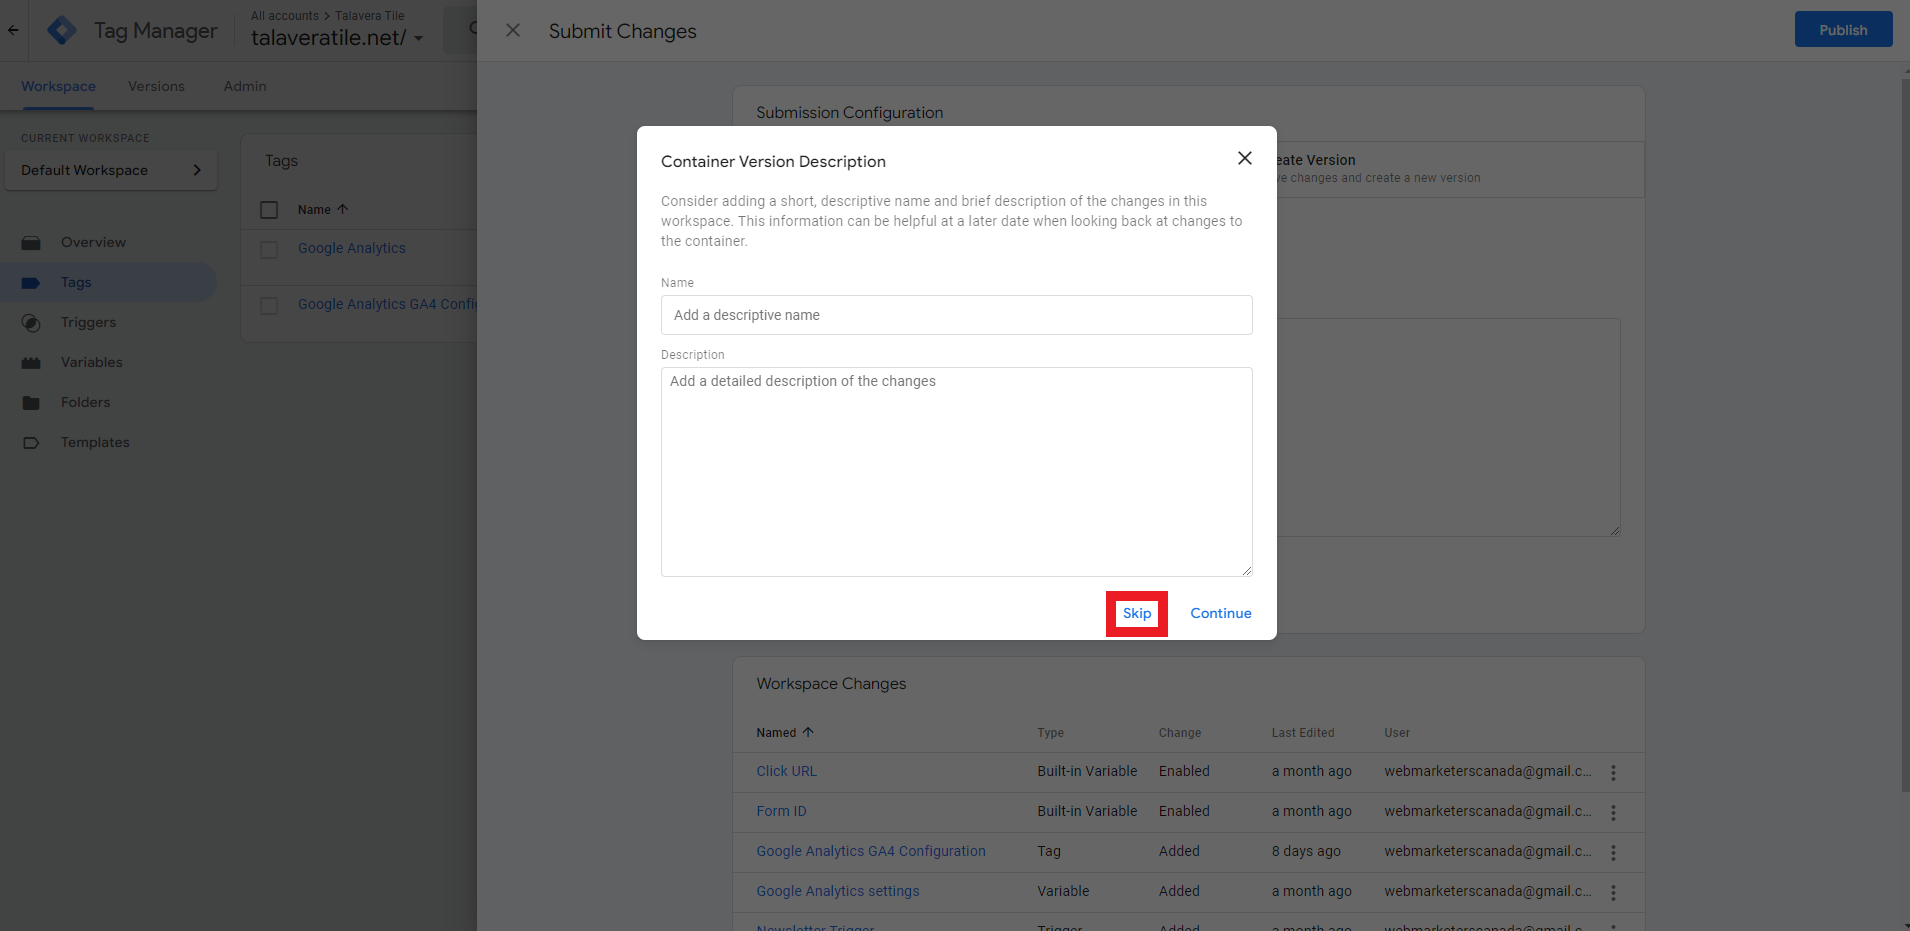
- On any screen in Google Tag Manager, click the Submit button in the top right corner of the screen.

- On the Submit Changes screen, click the Publish button in the top right corner of the screen.

- In the Container Version Description popup, click Skip.